How to process e-Payments in Sage 50
How to process e-Payments in Sage 50
When you have correctly configured your bank and suppliers for e-Payments you are ready to generate your first bank file. Your e-payment is generate in sage
through the ‘Supplier Payment’ option in either the Bank Account and Supplier module.
This document will explain how to generate your e-Payment file and what to do if you get any errors along with the e-Payment file formats. Please note you can’t
generate and e-Payment file with foreign currency suppliers, nor can you generate an e-Payment file from payments entered in the ‘Batch Supplier Payment’
and ‘Batch Invoice’ windows screens.
Create your supplier payment
Generate your supplier payment from the ‘Supplier Payment’ screen, this can be access from either your Supplier module or Bank Account Module. When
you have selected a supplier that has been configured for e-payment, the word ‘(BAS)’ will appear in the ‘Cheque No.’ box. This is a quick way to identify e-payment suppliers.
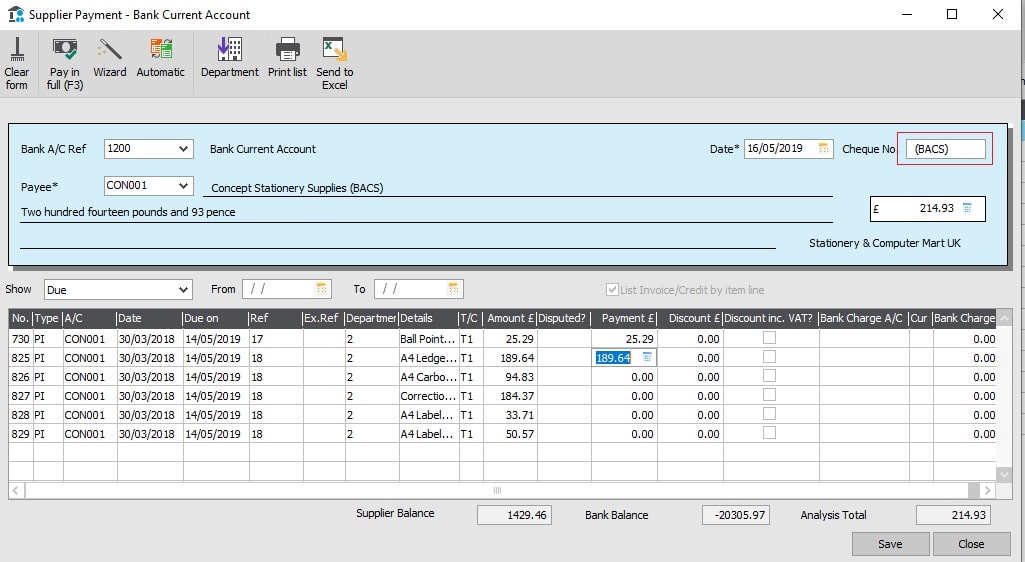
When you have made your payments click ‘Save’.
Note: Before making generating your e-payments file, it is advised to take a Sage backup. This is because once the payment file has been created Sage flags these e-Payments
as been processed. If a mistake has been you can either restore the data back or delete all the payments in Sage that were on the e-payment file and re enter them.
Create your e-Payment bank file
The e-Payment bank file is generated in the Bank Account module in Sage 50. Select the bank that has been configured for e-Banking and click on ‘Payments’ and
E-payments’.
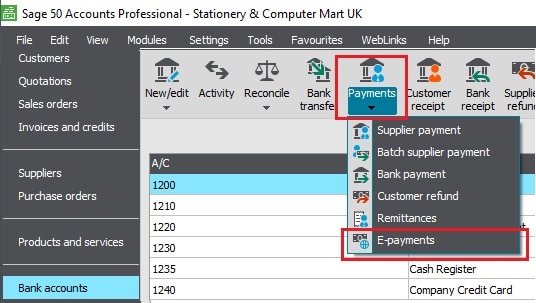
This will open up the Send Payment screen listing all your e-payments made in Sage.

To generate and e-payment file, select the payments from the list that you want to include on your payment file to the bank. You can print or send this list to excel if
you need to get authorisation on what payments to included. When you know what payments you are including select them from the list and click ‘Send’.
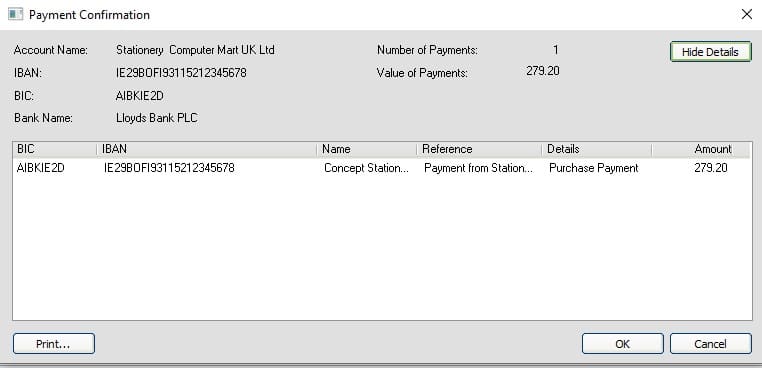
A ‘Payment Confirmation’ screen will open summarising your bank details and the number of payments on file along with the total payment value. If you click the
‘Show Details’ button, you can view all your payments that will be included to which you can print by selecting the ‘Print’ button.
Click ‘OK’ and the Process details screen will open. This holds your OIN number and the location to where you are saving the e-payment file to along with the
Requested Date. Once you click ‘OK’ the e-payment file has been created and is stored in the locations that you setup in the e-payment configuration.
Payment Error
If you receive and error when creating the payment file, click ‘Yes’ to view the payment error log. This log will provide you with more information in order
to determine what’s wrong with the file. The error log is saved within your ACCDATA folder and the file name consists of the sort ode and account number for the
bank that you were sending the e-payment file from.
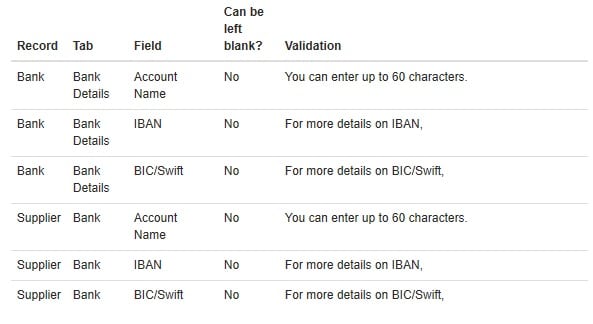
Errors occur if there is incorrect information in Sage 50. The following information is included in the e-payment file so you will need to check that
your suppliers and bank account are setup correctly.