How to setup e-Banking and e-Payments in Sage 50
How to setup e-Banking and e-Payments in Sage 50
If you use a compatible banking software or a compatible banking website, you can use Sage e-Banking to connect to your banking software for the purpose of
e-Payments and e-Reconciliations.
This document will explain the steps in order for you to setup e-banking in Sage50 v21(2015) and above. If you are unsure if your banking software is compatible with Sage, please click here to view a list of compatible banks and their e-banking components. You may need to check with your Bank what component to use. You will also need to request an
OIN number from your bank.
Step 1 Enable e-banking
Before you can start using Sage e-banking you must first enable this feature in ‘Settings’ > ‘Bank Defaults’ and click on the ‘Enable e-banking’ tick box then select
‘OK’ to save your settings.
Step 2 Enter you bank details
In your Bank Account module click ‘New/Edit’ on the bank account that you want to setup for e-banking, this will open up the Bank Record. Click onto ‘Bank Details’ tab and complete the following:
Bank Name: This is the name of your bank and can be up to 60 characters long. This must be entered for e-banking.
Address: You can enter your address on each line up to 60 characters per line.
Account Name: The name of your bank account. This must be entered for e-banking.
Account Number: This is your bank account number. This is usually 8 digits long but you can enter up to 60 characters. This must be entered for e-banking
Sort Code: This is your 6 digit sort code number and must be entered for e-banking.
Expiry date: If you account is a credit card you must enter your credit card expiry date.
BACS/SEPA ref: Enter in your reference number. This reference identifies the payer and must be entered for e-banking.
IBAN: Enter in your bank account IBAN number. This must be entered for e-banking.
BIC/Swift: Enter in your bank accounts BIC/Swift number. This must be entered for e-banking
Roll number: If your building society notifies you of a ‘Roll Number’ for this account enter it here. This is an additional reference that some building societies use.
Additional Ref: You can use this box to enter any additional information you receive relating to your bank account. You can enter any text up to 3 lines and 60
characters.

Step 3 Download and run the correct banking plugin for Sage 50
Before you can start using e-banking you will need let Sage know what Bank Type you are using. This Bank Type is a plugin that is used to connect your Sage 50 to
your banking software. Depending on your banking software you can download the relevant banking plugin here. If you are unsure of what plugin to use please
contact your bank. To download and run the latest Sage e-Banking plugin, please follow the instructions below.
1 Select the correct banking plugin for your e-Banking software.
2 You may have a pop up screen asking you to Save or Run this file. Click ‘Run’. If you only have a ‘Save’ option, click ‘Save’ and locate the plugin in your ‘Downloads’ folder.
3 When the installation is completed click ‘Finish’, the Sage plugin for your Bank Type as been completed.
Step 4 To configure your Sage 50 Bank Account
Once you have run the Sage e-banking plugin, you are now ready to configure your Sage bank account for e-banking. Log back into Sage and go to your Bank
Account module select the bank that you are going to use for e-banking and click ‘New/Edit’ to open your Bank Record. Click on the Bank Details tab and
under the section called ‘Electronic Banking’, select the drop down for the ‘Bank Type’ and locate your Bank Type, this is the Banking plugin that you just installed.
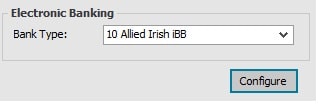
Once you have selected the Bank Type click on the ‘Configure’ button, The information required to configure the e-Banking option depends on the bank type you
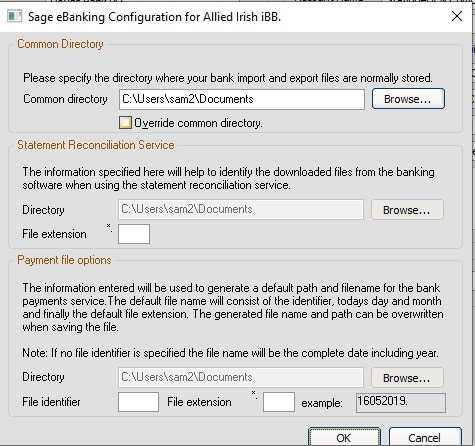
choose from the drop down list. Some of the following options may not be available depending on which banking component you selected.
Common Directory
Common Directory: This is the directory where the e-payment files and e-Reconcile statements will save to. You can amend this location by clicking on the ‘Browse’ button.
Override Common: If you want to use the same directory for e-Payment files and e-Reconcile statements, click on this box. If you click this box you must
complete the ‘Statement Reconciliation Service’ section and enter in the Directory.
Statement Reconciliation (used for e-Reconciliation only)
Directory: This is the directory where the statement files from you banking software are saved to before you import into your e-Reconciliation.
File Extension: You can enter the file extension your banking software saves the statement files in, for example .txt. This ensure only that extension appears in the import Window.
Payment File Options (used for e-Payments only)
Directory: This is the location that your e-payment file will be saved to. You can amend this location by clicking on Browse.
File Identifier: If you don’t enter a file identifier then the file name of your e-payment file will be DDMMYYYY, the date, month and year the file was saved.
File Extension: is the extension of the file.
Once you have configured you Sage e-banking. click ‘Save’ on the e-banking configuration screen and then on your Sage Bank Record. You have now successfully setup your Bank account for e-Banking. If you are using e-Banking to pay your suppliers, you will need to follow the addition step below to ensure that your suppliers are setup correctly.
Step 5 Setting up your Suppliers for e-Payments
If you are just setting up e-banking in order to run e-Reconciliations, you can just run step 1-4, step 5 is the final setup for e-payments setup.
In order to ensure that your supplier payments are captured on your e-Payment file, there are a few additional amendments that you will need to make to your
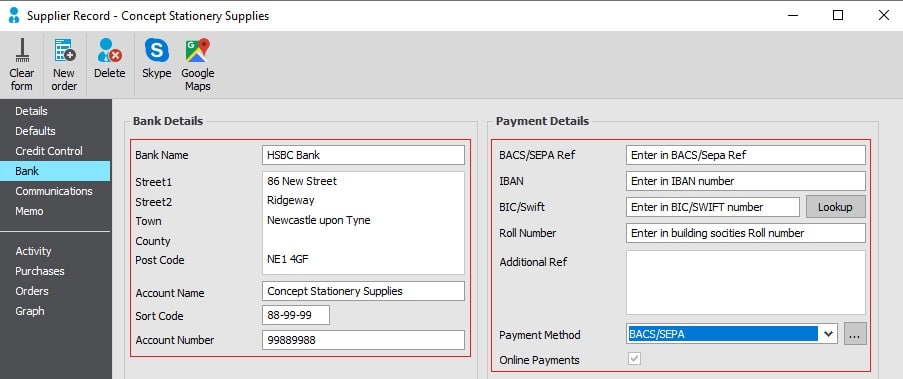
supplier records. Select a supplier that has opted for e-Payments and open their record. Click onto the ‘Banking’ tab and complete the Supplier Banking Details as follows:
Bank Details section
Bank Name: This is your suppliers Bank Name.
Address: This is your suppliers Bank Address.
Account Name: This is your suppliers bank account name.
Sort Code: Enter in your suppliers Banks sort code, this is an 6 digit number
Account Number: This is your suppliers Bank Account number. This is usually 8 digits long
Payment Details section
BACS/SEPA Ref: Enter in your suppliers BACS reference number
IBAN: Enter in your suppliers IBAN number
BICS/Swift: This is your suppliers BICS/Swift number and is used to identify bank.
Roll number: This is an additional number that your Building Society may provide.
Additional Ref: Use this box to enter in any additional information that your bank gives you. You can enter in 3 lines of text up to 60 characters.
Payment Method: Sage comes with several payment methods for e-Payment you must select ‘BACS’s from the drop down list.
Online Payments: Ensure that this section is ticked for e-Payments.
Please note that you will need to complete the bank details as mentioned above for each supplier that opted for e-Payment. Once done your e-Payment setup has been completed.
Your OIN number will be entered on the ‘SEPA Processing Details’ screen when you go to generate your first e-payment file.