Sage 50 Performance Issues – How to troubleshoot (Sage slow)
There are several reasons why Sage Accounts may run slowly, including:
- Volume of data
- Computer or network issues
- A known issue
Other environmental factors, for example antivirus software or external backup software
This guide helps you troubleshoot the common causes of performance issues in Sage Accounts. Some of the steps involve checking settings and specifications on your computer outside of your Sage software. Depending upon your level of experience it may be beneficial to refer to your local IT support.
These apply to scenarios where there is an active (visible) problem, crashing, visible speed problem and also repeated corruptions:
They could be reordered however, putting the quickest things to try early in the list and leaving the others to be tried over time…
Contents
1. Check existing known issues
2. Check the volume of data
3. Check each computer meets the recommended system requirements and has the latest build of the software installed
4. Where is the issue?
A – Software slow in one area
B – Software slow in all areas
5. If Sage accounts is installed on a network, ensure that Sage Accounts uses a UNC path to access the data
6. Check your data
7. Check for .s50 files in Accdata
8. File locking – Check for file locking
9. Antivirus software and scheduled tasks
10. Sage user-specific issues
11. Fixing Sage user-specific issues
12. Windows user-specific issues
13. Test the network transfer speed outside of Sage Accounts
14. Move the data to a new location
15. Further Troubleshooting
1. Check existing known issues
There are a number of known issues that may cause performance issues in the software. If you’re presented with a specific error message, or if the issue affects a certain area of the software we recommend searching Ask Sage. Search using the text of the error or the name of the software area where you’re experiencing performance issues.
2. Check the volume of data
There is no numerical limit to the number of transactions or records that may be recorded in Sage Accounts. Sage Accounts is only limited by the amount of disk space and memory available on your computer. The following numbers are for guidance only.
We cannot give a specific limit as this depends on several factors including data size, network speed, number of concurrent users etc. For example, these numbers may be perfectly reasonable for a 2 user version of Sage Accounts running on a high specification network.
As a rough guide, to optimise performance, we recommend:
As a rough guide we recommend that to optimise performance you have:
- Fewer than 250,000 transactions, or if using Sage Accounts 2014 or below, fewer than 100,000 transactions
For example, it wouldn’t be recommended to have 1,000,000 transactions posted to only one nominal code or customer record.
| Type |
Recommendations |
Notes |
| Transactions |
Fewer than 250,000 transactions, or if using Sage Accounts 2014 or below, fewer than 100,000 transactions |
Once you reach 80% of the recommendation, the feature notifies you of this in the data management feature (200,000) |
| Invoices |
Fewer than 50,000 invoices |
Once you reach 80% of the recommendation, the feature notifies you of this in the data management feature (40,000) |
| Sales |
Fewer than 50,000 sales orders |
Manual checks |
| Purchase |
Fewer than 50,000 purchase orders |
Manual checks |
| Customer |
Fewer than 5,000 customer records |
Once you reach 80% of the recommendation, the feature notifies you of this in the data management feature (4000) |
| Supplier |
Fewer than 5,000 supplier records |
Once you reach 80% of the recommendation, the feature notifies you of this in the data management feature (4000) |
| Product |
Fewer than 20,000 product records |
Manual checks |
| Project |
Fewer than 2,000 project records |
Manual checks |
To check these, click Help then click About. The number of records appear in the Data Information section.
If you have more than the recommended number of transactions or records, we recommend that you reduce the numbers to fewer than those specified above. You can delete old invoices and use the Clear Audit Trail option to remove old transactions.
If you have more than the recommended number of transactions or records, we recommend that you reduce the numbers to fewer than those specified above. For further information about reducing the number of records, please refer to the following articles:
3. Check each computer meets the recommended system requirements and has the latest build of the software installed
These are sage’s minimum system requirements. This spec is for a one to two user license. The greater the spec of the machines the better the performance will be.
- You must check this on every computer that uses Sage Accounts.
- Make sure you are using the latest build for your software version.
- Ensure you install all the latest Microsoft service packs and updates available.
4. Where is the issue?
Is the software slow when running one specific process or does it run slowly in all areas?
A – Software slow in one area
If a particular module of the software is affected, performance can be improved by re-indexing that module.
To take a backup of your data, in Sage Accounts, click File then click Backup.
Click File then click Maintenance.
If prompted to close any other windows, click Yes.
Click Reindex, select the affected module and click OK then Yes.
Click Compress Now and click Compress.
Click OK, Click Close and click Close again.
B – Software slow in all areas
Re-index and compress the data
Performance can be improved by re-indexing the data.
If you are using Sage Accounts 2012 (v18) or above.
If you are using any other version of Sage Accounts
To take a backup of your data, in Sage Accounts, click File then click Backup
Click File then click Maintenance.
If prompted to close any other windows, click Yes.
Click Reindex, select the affected module and click OK then Yes.
Click Compress Now and click Compress.
Click OK, Click Close and click Close again
5. If Sage accounts is installed on a network, ensure that Sage Accounts uses a UNC path to access the data
You must do this on every computer that accesses Sage Accounts.
If the Sage Accounts data on the server is accessed through a mapped network drive, we advise changing this to a UNC path. The current path to the data can be found in Sage Accounts by clicking Help then About and noting the data directory.
a. Browse to the Company file:
| Version |
Company file location |
| v29 |
C:\ProgramData\Sage\Accounts\2023 |
| v28 |
C:\ProgramData\Sage\Accounts\2022 |
| v27 |
C:\ProgramData\Sage\Accounts\2021 |
| v26 |
C:\ProgramData\Sage\Accounts\2020 |
| v25 |
C:\ProgramData\Sage\Accounts\2019 |
b. Double-click the Company file and choose Open with Notepad.
c. Change the paths in the Company file to point to the new data location on the server. You must enter the relevant UNC path for this. For example, if your server is called Server and your shared folder is called Sagedata, the UNC path is \\Server\Sagedata
d. Click File, click Save then click File and click Exit.
6. Check your data
To check your software isn’t running slowly due to data corruption, run the Check Data option.
Open Sage Accounts and log into the company experiencing the performance issues.
Click File, click Maintenance and then click Check Data.
If there are errors in your data these must be fixed before you do any more processing.
Click here for information about how to fix any errors, warnings or comments in the data
Please contact us on Ph: 051-395900 for a quote to send ‘unfixable errors’ for repair.
If you’ve more than one company on Sage Accounts, you must check each company separately.
If there are no errors in your data, continue with troubleshooting.
7. Check for .s50 files in Accdata
An excessive volume of .s50 files in the Accdata folder may cause performance issues. These are temporary files and can be safely deleted.
- Open your company data and click Help then click About and click the Data Directory.
- Delete any files with the extension .s50.
8. File locking
Do you have a dedicated server computer on your network, that is a computer that holds your data centrally?
A. (continued) – Check for file locking
If files are held open on your server computer for longer than necessary this can cause performance issues with Sage Accounts. To check if this is an issue:
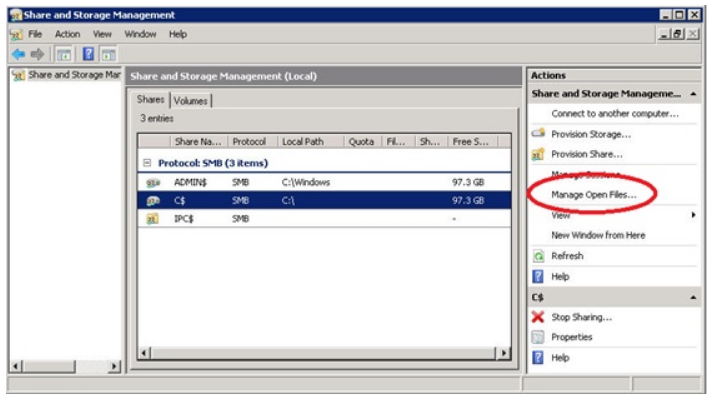
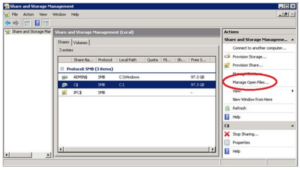
a. Click Start, then click Administrative Tools, click Share and Storage Management and click Manage Open Files.
This lists all the files open on your server including sage Accounts Data files.
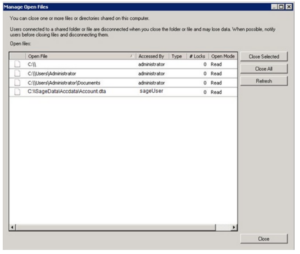
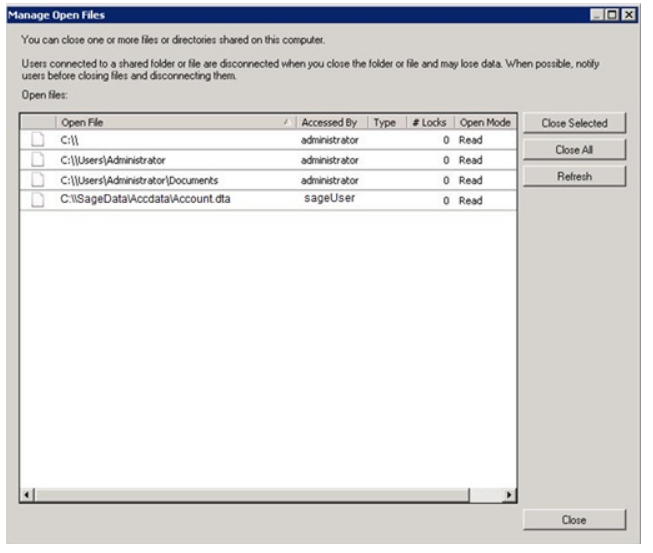
b. Close Sage 50 Accounts on all client computers.
The Sage data files displayed within Manage Open Files should disappear in 2 seconds. In some cases, depending on other tasks your server is running, this can take up to 5 seconds. Any extra delay in these files closing could indicate that SMB 2.0 or SMB 3.0 is the cause of your performance issues.
Click here for more advice about SMB and Sage Accounts
If the files close within 5 seconds, Continue Troubleshooting
9. Antivirus software and scheduled tasks
If your computer is running antivirus software, you must configure this so it doesn’t conflict with Sage Accounts.
Before making any changes to your antivirus software or scheduled tasks, you should speak to your local IT.
If the issue happens at specific times of the day or on specific days of the week, check your scheduled tasks and amend any that are scheduled when the issue occurs:
- Click Start then click All Programs and click Accessories.
- Click System Tools then click Task Scheduler and change the time on all relevant scheduled tasks.
10. Sage user-specific issues
Try to recreate the performance issues using a different Sage user.
a. Click File then click Log Off.
b. Enter a different logon.
c. Recreate the process that caused the performance issue.
If you’re using the Manager logon, try to create the performance issues as a standard user.
Does the problem happen when using a different Sage logon?
If you only have one Sage logon, to create a new logon, click Settings then click Access Rights and click New.
11. Fixing Sage user-specific issues
If the issue affects specific Sage users, delete any files held in the Criteria folder and any user files listed in the Accdata folder.
Sage Accounts v21 and above – If you need to change any files in the Accdata folder, first you must ensure that you either stop the Data Service or lock Sage Drive if in use. For details of how to do this, please refer to article 32988.
Browse to the Data Directory and open the Accdata folder, then delete any files from the list below. To find the Data Directory, from within Sage Accounts, click Help then click About and click Program Details. :
USERNAME.BKC
USERNAME.BKI
USERNAME.CPI
USERNAME.CPC
USERNAME.CSI
USERNAME.CSC
USERNAME.DPC
USERNAME.DPI
USERNAME.FIC
USERNAME.FII
USERNAME.IVC
USERNAME.IVI
USERNAME.NMC
USERNAME.NMI
USERNAME.PCC
USERNAME.PCI
USERNAME.PDC
USERNAME.PDI
USERNAME.PPC
USERNAME.PPI
USERNAME.PPQ
USERNAME.PRC
USERNAME.PRI
USERNAME.PRQ
USERNAME.SKC
USERNAME.SKI
USERNAME.SLC
USERNAME.SLI
USERNAME.SPC
USERNAME.SPI
Browse to the Criteria folder. The criteria folder is in the same location as your data folder. For example, if your data folder is, s:\sagedata\company.000\accdata, your criteria folder is, s:\sagedata\company.000\criteria
- Delete any files held within the Criteria folder.
- Close and reopen Sage Accounts.
- Test to see if the issue persists.
If the performance issues persist, create a new Sage logon for the affected user.
Log into the software with the username Manager and click Settings then click Access Rights, click New and click create a new user then click Save.
Click File then click Log Off. Enter the newly created username and try to recreate the performance issues.
12. Windows user-specific issues
Try to recreate the performance issues using a different Windows user.
If the problem is happening for specific Windows users, you must speak to your IT administrator for further support. The following guide from our help centre will help them to troubleshoot the issue.
If the problem is happening for specific Windows users, start the computer in Safe Mode.
Press F8 repeatedly as the computer starts and from the Advanced Boot Options, choose Safe Mode.On some computers you must press the F5 or F8 key when a cursor appears at the top left-hand side of a blank screen.
Open Sage Accounts and try to recreate the issue.
When your computer runs in Safe Mode, only the essential processes run in the background. If the problem does not happen when your computer is running in Safe Mode, this suggests that one of the non-essential processes is conflicting with Sage Accounts.
The most common example of this is antivirus software. If your computers are running antivirus software, you must configure this on all of your computers so it doesn’t conflict with Sage Accounts.If the problem persists it is likely that a different non-essential process is conflicting with Sage Accounts. We recommend that you refer to your network administrator.
Step 13 – Test the network transfer speed outside of Sage Accounts
To do this, you must copy the Reports folder from the client PC to the root of the shared folder on the server PC and time how long it takes to complete.
The standard location for the Reports folder is:
| Version |
Company file location |
| v27 |
C:\ProgramData\Sage\Accounts\2021\Company.000 |
| v28 |
C:\ProgramData\Sage\Accounts\2022\Company.000 |
| v29 |
C:\ProgramData\Sage\Accounts\2023\Company.000 |
|
|
- On the client PC, open Sage Accounts.
- Click Help, then click About. In the Program Details area, make a note of the Data Directory.
- Open Windows Explorer and browse to the Reports folder.
- Right-click the folder, then click Copy.
- Browse to the route of the local disk on the server, then click Edit, then click Paste.
- Time how long it takes to complete the process.
- Repeat steps 4 and 5 two more times and calculate the average time taken.
Because the first transfer should take longer, you must only use the average of the second and third file transfers.
On a network which runs at 100 Mbps, the folder should transfer in 30 – 40 seconds. On a network which runs at 1 Gbps, the folder should transfer in 15 – 20 seconds.
You should now repeat the process to time how long it takes to copy the file from the server back to the client PC.
If copying the file in either direction takes longer than 80 seconds on a 100 Mbps network or 40 seconds on a 1 Gbps network, this is slower that you would expect and is impacting the performance of Sage Accounts. Until the network transfer speed improves, Sage Accounts will continue to run slowly. Unfortunately, we are unable to provide any further advice about what may be causing this and how to resolve it. We recommend that you refer to your network administrator for further advice.
If the network transfer speed is OK, click Next.
14. Move the data to a new location
To relocate the data
a. Create a new folder on your server > share the folder and ensure that all relevant users have Modify permissions allowed.
If you are using a Small Business Server, you must create the new folder on a different drive to the operating system.
b. Browse to the existing Sage Accounts data directory on your server.
To check the data directory, open Sage Accounts and click Help, then About. The data directory is shown in the Program Details area. Copy the following folders:
Copy the following folders:
Depending on your version, some of these folders may not exist.
• Accdata
• Archives
• Attachments
• Bitmap
• Configs
• Criteria
• Defaults
• Exports
• Fax
• HMRCSubmissions
• Imports
• Invoices
• Journals
• Labels
• Layouts
• Letters
• Memo
• Reports
• Taskopt
• Template
• TMail
• VATRtns
c. Paste these folders into the new folder created in step 15a
To connect to the data in the new location
Browse to the following folder:
| Version |
Company file location |
| v27 |
C:\ProgramData\Sage\Accounts\2021\Company.000 |
| v28 |
C:\ProgramData\Sage\Accounts\2022\Company.000 |
| v29 |
C:\ProgramData\Sage\Accounts\2023\Company.000 |
|
|
d. Locate and double-click the Company file, then click Open with Notepad.
e. Note the current location of the data.
f. Amend the relevant line in the Company file to the new location of the data.
g. Click File, then click Save.
h. Click File, then click Exit.
i. Open Sage Accounts and try to recreate the issue.
If the problem persists, undo the changes made to the Company file then click Next.
15. Further Troubleshooting
a) Log onto Sage (with the persons username) and flick around to see the issue. (Ask the user which areas are the worst/worse – is there a particular problem?)
b) Close ALL OTHER PROGRAMS and see if the problem is still there. If problem is gone, it’s a local resources issue.
c) Log into Sage with a different username and see is the problem still there.
d) Log on to the PC as a different network user to see if the problem is still there.
e) Check the PC resources. (Sage recommend 4 GB Ram and 1GB Net Speed).
f) Check if PC is logged onto Domain or Workgroup. (Sage50 doesn’t really like workgroups.)
g) Turn off the check for duplicates setting inside Sage.
h) Untick “Allow Collection Of Usage Data” in Tools\Options
i) Check that the local copy of Sage50 is not running an auto backup & check data (for users experiencing speed issues at a particular time of the day) [**Only Version 21 & Upwards**]
a. To do this log on as manager user, click File\Schedule Backup. Turn off the backup for any company other than live companies.
j) Check that the AV has local Sage program files, sage common files and sage network drive excluded. (For a quick check – Quit the AV altogether and see if the problem still exists).
k) Check volume of data in help\about inside Sage. Sometimes the data has become large and needs to be cleared down.
a. Send screenshot to support@pimbrook.ie if you need it looked at.
l) Check the file sizes in the accdata folder in the Sage data location – this can show the presence of other data volumes like despatch dockets and stock transactions that are not shown in help\about.
m) To investigate if the problem is a client server issue at a particular PC – a copy of the data can be put on the local drive of the PC in question – then log in and see if the problem still exists.
n) An alternative configuration is to put the data permanently on a PC. Share the location, link the other PCs to the host PC. Make sure that backups are not saved to the local drive.
o) Safely Remove\Copy Out the Following Files from AccData Folder:
a. Search Criteria Files: http://ask.sage.co.uk/scripts/ask.cfg/php.exe/enduser/std_adp.php?p_faqid=34474 (Click Show List button in there)
b. S50 Files: http://ask.sage.co.uk/scripts/ask.cfg/php.exe/enduser/std_adp.php?p_faqid=15770
p) Are all latest patches applied? (Click Help\About)
q) Go through this solution from the Sage Help Centre: http://ask.sage.co.uk/scripts/ask.cfg/php.exe/enduser/std_adp.php?p_faqid=15770 (Long process….)
r) Recurring corruption – Turn on auto backups to backup at lunchtime and night time, that way they only lose half a days work.
 NOTE: To link computers in the same location, we recommend using a local area network where possible rather than Remote Data Access.