Sage 50 – Audit Trail Import
Sage 50 – Audit Trail Import
To save time entering data into Sage Accounts, you can import data using either Comma Separated files (*.csv) or Microsoft Excel spreadsheets (*.xls and *.xlsx).
Transactions that can be imported include
- BP – Bank payment.
- BR – Bank receipt.
- VP – Credit card payment.
- VR – Credit card receipt.
- CP – Cash payment.
- CR – Cash receipt.
- SI – Sales Invoice.(Batch)
- SC – Sales Credit.
- SA – Sales payment on account.
- PA – Purchase payment on account.
- SP – Sales payment.
- PR – Purchase receipt.
- PI – Purchase Invoice.(Batch)
- PC – Purchase Credit.
- JC – Journal credit.
- JD – Journal debit.
Before importing into Sage Accounts, you need to prepare your data in a csv or excel formatted file. There are three ways to do this:
1. Use the file Import Templates (Recommended)
These are excel files that are formatted so they’re automatically recognised when importing. You can only import Microsoft Excel worksheets if you’ve a compatible version of Excel installed for the version of Sage Accounts you’re using
Excel files don’t need to be in any specific order as when you import the file you can choose which column you want to import into each field in Sage Accounts.
To help you, we’ve created some Excel templates you can use to enter the data you want to import. These templates are held in the Import Templates folder in the program directory: C:\Program Files\Sage\Accounts by default. To check your program directory:
Click Help and click About then find the Program Details section. Open the program directory and in there you find a folder called Import Templates and the Audit Trial Transaction Full Template is used to import transactions into Sage Account data
The templates include tips indicating the content that should be included in each column. Compulsory fields are highlighted in blue and optional fields are highlighted in yellow. As in the screen below

2. Export your data and re-Import the data
If you want to amend multiple fields in your records, in some modules you can export your current data, amend the required fields and then re-import the data
3. Comma-separated (*.csv) files
Comma-separated values (CSV) means that every item of data is separated by a comma, and each line of the file represents one record. For example, a typical customer record in CSV format would look like this: PIMBRK001.Pimbrook Software, Seapoint,Riverstown, Waterford,John Smith,051359900
The data for each field in your CSV file must be entered in an exact order for it to be accepted into Sage Accounts.
File format
| Field | Type | Size | Left Blank | Format | Excel Column | Transaction CSV |
| Transaction Type | Text | 2 | No | This must be BP, BR, CP, CR, VP, VR, JC, JD, SI, SC, SA, SP, PI, PC, PA and PR. | A | CSV |
| Account
(Customer, Supplier or Bank Account Reference) |
Text | 8 | Yes, but only for JC and JD transactions | Account reference must already exist in your Sage Accounts data | B | CSV |
| Nominal Code | Text | 8 | No | The nominal code must already exist in accounts data | C | CSV |
| Department | Integral | 3 | Yes | Must be a number between 0-999 with no decimal places | D | CSV |
| Date | Date | 10 | Yes- the current program date is used | This must be in format
DD/MM/YYYY |
E | CSV |
| Reference | Text | 30 | Yes | F | CSV | |
| Details | Test | 60 | Yes | G | CSV | |
| Net | Decimal | 11 | No | 8 digits + 2 decimal places. | H | CSV |
| T/C Tax Codes | Integral | 3 | Yes- Tax code T0 is used | This must be between 0-99 | I | CSV |
| Tax | Decimal | 11 | Yes, however, if left blank the transaction imports with a VAT value of 0.00. | 8 digits + 2 decimal places | J | CSV |
| Exchange Rate | Decimal | 11 | No. If importing Base currency transactions the exchange rate is 1. | 8 digits + 2 decimal places | K | CSV |
| Ex.Ref | Text | 30 | Yes | L | CSV | |
| Username | Text | 32 | Yes | M | CSV | |
| Project Ref | Text | 12 | Yes | Up to 12 characters with no spaces. The project must already exist within the accounts data. | N | CSV |
| Cost Code | Text | 8 | Yes | Up to 8 characters. The cost code must already exist within the accounts data. | O | CSV |
Import your data file
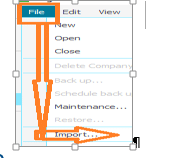
1. On the menu bar click File then click Import.
2. If required, click Backup to back up your data, once complete, click Next.
3. In the Data type window, select the type of data you want to import then click Next
 .
.
4. In the Data source window, select the format of the data you’re importing
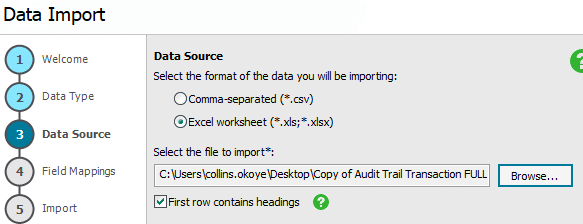
5. If the first row of your data contains headings, select the First row contains headings check box.
6. Click Browse and locate and select the file to import then click Open.
7. If your import file contains multiple worksheets, choose the required worksheet from the drop-down list.
8. Click Next. To link the imported data to the correct fields in Sage Accounts, complete the Imported Field column as required, choosing the relevant field from the drop-down list. Compulsory fields are marked with an asterisk, for these you must select an Imported Field.
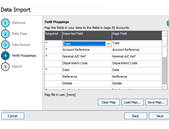
Note: If required, you can use the Load Map and Save Map options to import the default or previously saved mappings
9. Once all of the required fields are mapped, click Next, check the summary information is correct, and then click Import or Finish.
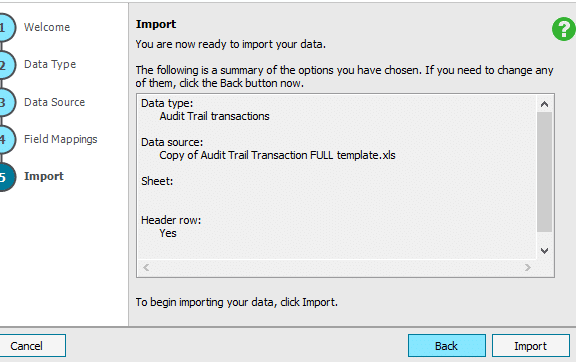
If the import is successful, a list of transactions imported appears in the Record Imported pane. Click Close.
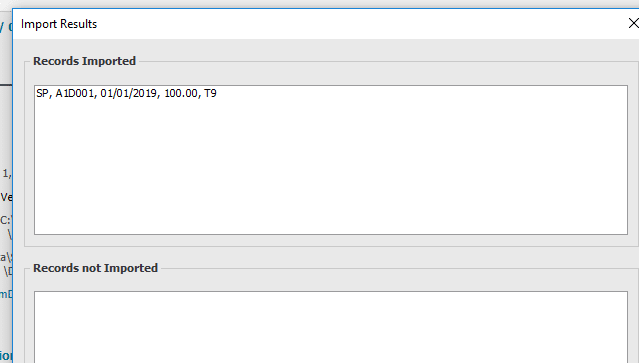
If the import is unsuccessful, a list of import errors appear in the Records not imported pane. Click Edit import to amend the original import file, click Close, and then attempt to import again
Exceptions
Not all transactions types can be imported into Sage Account
- Charities – you can’t import a transaction with a fund reference. As a workaround, on all transactions except for journals, you can import the transaction and then add the fund reference in Corrections.
- You can’t import the following foreign currency transaction types:
BP – Bank payment,BR – Bank receipt,VP – Credit card payment,VR – Credit card receipt,CP – Cash payment,
CR – Cash receipt,SR – Sales receipt,PP – Purchase payment,SA – Sales payment on account,PA – Purchase payment on account,SP – Sales payment,PR – Purchase receipt,SD – Sales discount,PD – Purchase discount,
JC – Journal credit,JD – Journal debit. They will have to be manually entered
However, you can import the following foreign currency transaction types:
- SI – Sales invoice.
- SC – Sales credit.
- PI – Purchase invoice.
- PC – Purchase credit.
Note
When you import transactions, each transaction imports as an individual header transaction – you can’t import a grouped transaction. This means that if you run grouped statements, every line of each invoice appears separately on the statement
Allocations
Because Sage Accounts can’t import transaction allocations, you can’t import transaction type’s sales receipt (SR), purchase payment (PP), sales discount (SD) and purchase discount (PD). As a workaround, you can change them to the following transaction types and allocate them manually or automatically using the allocation wizard
- Sales receipt, SR – import as sales payment on account, SA.
- Purchase payment, PP – import as purchase payment on account, PA.
- Sale discount, SD – import as sales credit, SC.
- Purchase Discount PD…import as purchase credit PC
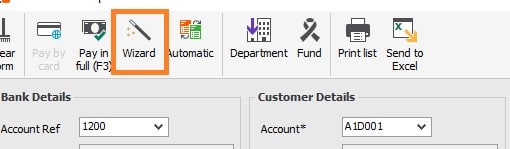
Automatic allocation using the Wizard
The wizard can be found within the Customer Receipt and Supplier payment window
The wizard is typically used to pay invoices ,allocate Sales and purchase invoices, Credit notes and Payment on account
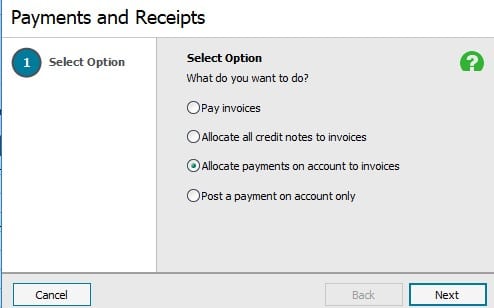
However it can also be used to allocated Sales Payment against Invoices, credit notes and payment on account
Sales Payment (SP)
Are created when you give a customer monetary refund and Purchase Receipt (PR) when a supplier gives you monetary refund
Once imported using the a CSV file or Excel import , you can use the wizard selecting either Pay invoices, Allocate credit notes or payment on account clicking next to see all transactions and then matching it against the imported sales payment .
Steps
1. Select Pay invoices

2. Enter amount, account and date

3. Make sure the amount is correct for both SP and SI

You can use a 3rd party software to allocate payments as another option for allocating payments. For details on how to use this click here.