New in Sage 50 Accounts v24.2, you can now edit or delete items in your archive files. This feature was added to help you with the General Data Protection Regulation (GDPR).
Edit your archived data
1. Click File then click Open and click Company Archive.
2. From the list of archived data, select the archive data you want to edit then click Open.
If access rights were set up on the company prior to archiving the data, you need to log into the archive with the same user name and password that you used to access the company data at the time.
You can now edit customer, supplier and subcontractor account details, or delete these records in line with the normal deletion rules.
Quotations, invoices, credit notes, sales orders and purchase orders can also be deleted.
You can also run the Clear Audit Trail routine within the archive.
3. To return to your company data, click File, choose Open then click Open Company Data.
Add social media links to your customers and suppliers
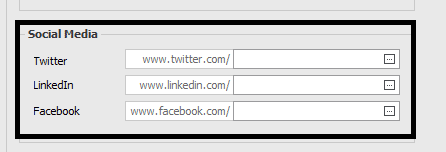
In Sage 50 Accounts v24.2 and above, on your customer and supplier records you can add links for the following social media sites:
Twitter
LinkedIn
Facebook
Add social media links to your record
1. On the navigation bar click Customers or Suppliers.
2. Select the required record and click Edit.
3. On the Details Tab, In the Social Media section enter the required link or username, for example https://twitter.com/pimbrook_sw then click save.
If you enter the full path, it is shortened to just the username.
4. To visit the site, re-open the record and click the button next to the required link.
Download and run the Aged Reconciliation reports (4)
If the previous steps have not highlighted the discrepancy, it is likely that it is caused by the allocation dates on some transactions.
For example, a PI dated after the report date, has been allocated to a PC with an allocation date prior to the report date. The Aged Reconciliation reports highlight any transactions with allocation problems or links removed.
For a more detailed explanation of link removed transactions, please refer to article 14578.
A journal has been posted to the Debtors Control Account and this will not wash out so it has to be reversed or highlighted to prove the difference
A Receipt has been allocated to an invoice with a future date.
To find out if a Journal has been entered, go to Nominal Reports/Day Books and select Day Books: Nominal Ledger. When the Criteria box appears, put in the dates and select 1100 Debtors Control Account. If the report is blank then proceed to Future Allocations Query.
To find out Future Allocations, go to Customer Reports/Aged Debt Rec Reports, if you do not have this selection of reports contact Support.
Run the various reports and it will highlight any transactions that were allocated after the month end/year end date. You can fix the dates via Transactions by clicking Unallocate and then allocate again with the correct date.
If you’re using Microsoft Outlook, when you try to email documents from Sage Accounts or Sage 50 Payroll one of the following message may appear. These can be due to environmental settings or report specific issues.
‘Unable to send all emails.’
‘ExtendedErrorCode.COMError: “Generic COM Error’
‘Failed to output to email’
Not using Microsoft Outlook? Check your SMTP settings and check that your webmail password is correct. For information about SMTP settings in Sage Accounts, refer to article 12659.
Check you use a compatible version of Microsoft Outlook
1. Check your version of Outlook is compatible with your Sage software and you’re using the desktop version and not cloud based.
If you don’t have a compatible version of Outlook, to email from your Sage software use SMTP settings instead.
2. Install all updates for the version of Outlook you’re using. Read more >>
3. Try emailing your document again.
Check Run as administrator settings are the same for Outlook and your Sage software
1. Close all software, right-click the Outlook shortcut then click Properties.
2. Click the Compatibility tab, check if the Run this program as an administrator check box is selected or clear, click OK.
3. Right-click the Sage software shortcut then click Properties.
4. Click the Compatibility tab, set Run this program as an administrator to be the same as Outlook, click OK.
5. Try emailing your document again.
Check Microsoft Outlook opens correctly
1. Close and reopen Microsoft Outlook and check that it opens correctly.
2. Right-click any file on the computer, for example, a Word document, click Send To then click Mail Recipient.
If nothing happens or an error appears, proceed to the following section.
Set Outlook as the default mail provider
1. Press the Windows key + R, type control /name Microsoft.DefaultPrograms then click OK.
2. Click Set your default programs, click Outlook (desktop), click Set this program as default then click OK.
3. Right-click any file on the computer, for example, a Word document, click Send To then click Mail Recipient.
If a new Outlook email window appears, Outlook is now set as the default mail provider and you should try emailing your document again. If it doesn’t work, proceed to the following section.
If nothing happens or an error message appears, Outlook is not correctly configured as the default mail provider and you should contact your local IT support to carry out a repair install of Microsoft Outlook
To provide the best experiences, we use technologies like cookies to store and/or access device information. Consenting to these technologies will allow us to process data such as browsing behavior or unique IDs on this site. Not consenting or withdrawing consent, may adversely affect certain features and functions.
Functional
Always active
The technical storage or access is strictly necessary for the legitimate purpose of enabling the use of a specific service explicitly requested by the subscriber or user, or for the sole purpose of carrying out the transmission of a communication over an electronic communications network.
Preferences
The technical storage or access is necessary for the legitimate purpose of storing preferences that are not requested by the subscriber or user.
Statistics
The technical storage or access that is used exclusively for statistical purposes.The technical storage or access that is used exclusively for anonymous statistical purposes. Without a subpoena, voluntary compliance on the part of your Internet Service Provider, or additional records from a third party, information stored or retrieved for this purpose alone cannot usually be used to identify you.
Marketing
The technical storage or access is required to create user profiles to send advertising, or to track the user on a website or across several websites for similar marketing purposes.