• New Sage Payroll Update v27.1 Released
    Includes ERR and CWPS enhancements
  • New Sage Payroll Update v27.1 Released

KB Category: Sage 50 Reports

Calculate the manual figures for your VAT Return and RTD – Brexit (ROI)

Calculate the manual figures for your VAT Return and RTD – Brexit (ROI)


To make it easier for you we have created a report to help you calculate the figures you need to add to the VAT Return and RTD.

To download and install

  1. Backup your Sage 50
  2. Click Download on the report backup from here.  The file either automatically saves to your Downloads folder or you are prompted to save the file.
  3. If prompted to save the file, browse to where you want to save it, for example, the Windows desktop, then click Save.
  4. Open Sage Accounts, on the menu bar click File, then click Restore.
  5. Click ;Browse, browse to where you saved the file, then double-click the file – postponed-brexit.001.
  6. Below ;Description of data to be restored, check that it shows the following: Report/Layout download
    Backup of: – Report files
  7. To install the report, click OK .When a message appears advising you are about to overwrite data held in your company, click; Yes. As this backup only contains a single report, no data is overwritten.
  8. Click; OK then log into Sage Accounts.


Calculate the manual figures for your VAT Return and RTD

  1. Click Suppliers then click Clear to make sure no records are selected.
  2. Click Reports then click My supplier reports and select the Postponed accounting transaction totals by tax code report.
  3. Click Preview and select the following criteria:
    Supplier Ref Leave this as it is.
    Transaction Date Enter the dates of the VAT period you are reporting for.
    Tax code (To to T99) Enter the Tax code you want to report for. For example T39.
  4. Click OK.
  5. From the report take the Invoice NET balance – Credit NET balance value and manually add it to the following boxes for the relevant tax code on you RTD before submitting:
    Tax code Description Boxes
    T39 Standard rate ROW import (Resale) Postponed VAT P2 / Z2 / PA2
    R1 / Z3 / PA3
    T40 Standard rate ROW import (Non resale) Postponed VAT P2 / Z2 / PA2
    R2 / Z5 / PA4
    T41 Zero rate ROW import (Resale) Postponed VAT D2 / Z2 / PA2
    J1 / Z3 / PA3
    T42 Zero rate ROW import (Non resale) Postponed VAT D2 / Z2 / PA2
    J2 / Z5 / PA4
    T43 Reduced rate ROW import (Resale) Postponed VAT AC6 / Z2 / PA2
    AH5 / Z3 / PA3
    T44 Reduced rate ROW import (Non resale) Postponed VAT AC6 / Z2 / PA2
    AH6 / Z5 / PA4
    T45 Second reduced rate ROW import (Resale) Postponed VAT AC6 / Z2 / PA2
    AH5 / Z3 / PA3
    T46 Second reduced rate ROW import (Non resale) Postponed VAT AC6 / Z2 / PA2
    AH6 / Z5 / PA4
    T47 Livestock rate ROW import (Resale) Postponed VAT C6 / Z2 / PA2
    H5 / Z3 / PA3
    T48 Livestock rate ROW import (Non resale) Postponed VAT C6 / Z2 / PA2
    H6 / Z5 / PA4
    T49 Flat rate compensation ROW import (Resale) Postponed VAT B6 / Z2 / PA2
    G5 / Z3 / PA3
    T50 Flat rate compensation ROW import (Non resale) Postponed VAT B6 / Z2 / PA2
    G6 / Z5 /  PA4
  6. From the report take the Invoice VAT balance – Credit VAT balance value and manually add it to the following box on you VAT Return before submitting:

7. PA1

Sell goods to the UK

For businesses selling goods to the UK, excluding those using the Northern Ireland protocol, you should now treat this as a sale to a non-EC country.

For this you would normally use the zero rated export of goods to customers outside EC tax code, T14.

Trading goods with Northern Ireland – Northern Ireland protocol

When trading goods with Northern Ireland, to avoid a hard border, the Northern Ireland protocol has been introduced.

Buy goods from Northern Ireland

Under the Northern Ireland protocol, buying goods located in Northern Ireland should continue to be treated like intra-community acquisitions after 1 January 2021.

Sell goods to Northern Ireland

Under the Northern Ireland protocol, selling goods to Northern Ireland should continue to be treated like intra-community dispatches  and distance sales after 1 January 2021.


Buy and sell services

There is no change in the way you buy and sell services to and from the UK.   However, you must change your vat codes to outside the EU

e.g. If you are selling a service currently they should be using T22 Sales of services to VAT registered customers in EC which should now be T14 Zero rated export of goods to customers outside EC.  This would be the same for T23 Zero rated export of goods to customers outside EC.

Migration from (Software) to Sage 50 – Checklist

Migration from (Software) to Sage 50-Checklist


Install Software – Checks

  1. Check Regional Settings are correct
  2. Anti Virus Software
  3. UAC Turned Off
  4. Install and Configure Software
  5. Ensure Tax codes are Correct (Irish Settings)
  6. Is Foreign trader required to be activated
  7. Have they any UK companies – activate MTD
  8. E-banking set up
  9. Set up email for basic layouts
  10. Set financial year

Software Migrating from (Software)

  1. Export Stock records and opening stocktake if needed. (Import to Sage 50 section as well)
  2. Get copy of P&L and B/S as well as the TB (could get extra paid job creating new COA at very least)..I know this COA is in your Checks section
  3. Agree mapping of Trial Balance with client from existing Nominal codes to Sage 50 codes and Enter to Sage 50.


Software migrating from (Software)

  1. Export Customers from (Software)
  2. Export Suppliers from (Software)
  3. Export Nominal from Sage one
  4. Report on outstanding transactions in the Bank
  5. Export Opening balances for Customers
  6. Export Opening balances for Suppliers
  7. Export Trial Balance


Sage 50

  1. Import Customers to Sage 50
  2. Import Suppliers to Sage 50
  3. Import Nominal to Sage 50
  4. Enter outstanding Bank transactions
  5. Import/Enter Opening balances for Customers
  6. Import/Enter Opening balances for Suppliers
    1. Do Journal to cancel out he suspense account entries after entering the opening balance
  7. Enter Trial Balance


Checks
  • Cross check that everything Balances
  • Configure COA
  • Report Design

How to add total average days to pay to the Time Taken To Pay Sales Invoices report and the Time Taken To Pay Purchase Invoices report

How to add total average days to pay to the Time Taken To Pay Sales Invoices report and the Time Taken To Pay Purchase Invoices report


The following two reports show how long it’s taken for an invoice to be paid and calculates the average number of days taken to pay per customer or supplier.

  • Customers > Reports > Credit control reports > Time Taken To Pay Sales Invoices report.
  • Suppliers > Reports > Credit control reports > Time Taken To Pay Purchase Invoices report.

A common request is to add a total to these reports to show the average number of days taken to pay across all invoices. This article takes you through how to add a total for the average days to pay invoices on the Time Taken To Pay Sales Invoices report and also the Time Taken To Pay Purchase Invoices report as the method is the same.


Open the report in Sage Report Designer


1. Customers or Suppliers > Reports > Credit control reports.

2. Select the required report > Edit.


Add the average total


1. ACCOUNT_REF Footer > right-click the expression Average_Days_To_Pay > Copy > Report Footer > right-click > Paste.

2. Properties pane > Reset Section > check that Report Footer is selected.


Save the report

1. Report menu > Report Properties > enter a new report name and description > OK.

Report Designer v1.3 and below – Report Explorer pane > select report name at the top > Properties pane > Name > enter a new report name > Enter.

 You can check your Report Designer version in Help > About > Application > File Version. 

2. File > Save As > select correct folder > File name > enter a new file name > Save.

3. File > Exit.


Making Tax Digital (MTD) – What to do next?

Making Tax Digital (MTD) – What to do next?


1. Check Sage Accounting software is MTD compliant (Sage 50 cloud Accounts V24.2) Pimbrook KB 5449 

2. Prepare Data for MTD returns SKB 41887

3. Before you can start submitting VAT Returns under MTD you must prepare your data to ensure that the values you submit under MTD are correct. This includes:

  • Ensuring you’re using the correct VAT settings. SKB 36914.

Note : do not tick Enable Making Tax Digital until you are ready to make your first submission.

  • Ensuring you’re using the correct tax codes. – Default Tax Codes
  • Reconciling transactions that were included in previous VAT Returns submitted to HMRC.
  • Ensuring all transactions for the current VAT period are entered in Sage 50 Accounts.
  • Ensuring any late entries from the previous VAT period are entered in Sage 50 Accounts

You can get a Detailed instructions on how to Prepare your data to start submitting VAT Returns from Sage 50 Accounts – UK 

4. Register with HMRC for MTD SKB 42782 – must have software and data ready before you sign up as once registered your next return must be via the MTD system.

5. Tick Enable Making Tax Digital when you are ready to make your first submission

6. On the menu bar click Settings, click Company Preferences then click the VAT tab

7. Put tick in box Enable Making Tax Digital for VAT submissions.

8. Calculate and Submit VAT return SKB 41886

Making corrections to the current period (in Sage Payroll 2019)

Making corrections to the current period (in Sage Payroll 2019)

We all know, mistakes can happen, and processing payroll is no exception. This article explains how to handle corrections in the current pay period.

If you need to make corrections to values in a previous pay period, please ignore the steps detailed in this article. Instead you should refer to article 6909 for guidance.


If you haven’t sent a payroll submission to Revenue for this period yet

The first thing you need to do is check the payroll status at the bottom of your window. If it reads:

  • End Of Period (EOP) – You’ll need to rewind the EOP process, then make the necessary changes to the relevant employee records and/or timesheets. Next you must post the EOP values again and then produce the Gross to Nett report. Check that all employees that should be paid this period are appearing on the report and that their values are correct. Once you’ve done this, you can send your payroll submission to Revenue.
  • Time and Pay Calculated or Start Of Period – Make the necessary changes to the relevant employee records and/or timesheets. Complete the rest of your payroll processing for this period as normal then post the EOP values. Once you’ve done this, you can send your payroll submission to Revenue.


If you’ve already sent a payroll submission to Revenue for this period

If you make any change to the current pay period after you’ve sent your initial payroll submission to Revenue, you must use the Re-Send Payroll Submission option to let Revenue know about these changes. The corrected payroll submission will replace the incorrect version that Revenue had previously received.


Using the Re-Send Payroll Submission option


1. Do one of the following:

  • From the menu bar at the top of the window, click Direct Payroll Reporting, point to Payroll Submission, then click then click Re-Send Payroll Submission.
  • From the process map in the centre of Sage Payroll, click Send Payroll Submission then click Yes when prompted.

2. If your Revenue Online Service (ROS) login details already appear on-screen, skip to step 7.

3. Under ROS Digital Certificate, click Browse.

4. Browse to and select your ROS Certificate (.P12) file, then click Open.

5. Enter your ROS digital certificate password in the box provided.

6. If relevant, click the Save password to Sage Payroll check box.

7. Check the ROS login credentials are correct. Edit if required.

8. To proceed, click Next.

9. Check the information is correct within the Review Details window. To view a detailed breakdown of the values per employee, click Export Details.

10. Once you’re happy with the details, to proceed, click Submit.

Please note that once you click Submit, this process can’t be reversed or stopped.

11. Once the amendment submission is successfully received by Revenue, a confirmation window appears. To produce a copy of the submission log for your records, click Export Details then to:

  • Print the report, click the Printer button.
  • Save a PDF copy of the report, click the Save button.

To close the report, click X at the top right-hand side of the window.

12. To close the Send Payroll Submission window, click Finish.

If you want to check or review the previous submissions you’ve made to Revenue, you can do this using the View Payroll Submission Log option. Read more >


Check if you’re logged in to your computer as an administrator

Check if you’re logged in to your computer as an administrator


Before you install software or updates on your computer, you must check that you’re logged in to Windows as an administrator. This ensures you have enough access to add, change or remove files on your computer.

Check your Windows version


  1. Press the Windows key + R, type winver then click OK.
  2. In About Windows check your Windows version, then refer to the relevant section below.


Windows 10 and Windows 8


  • Press the Windows key + R, type netplwiz then click OK.If the User Accounts window appears, you are logged in as an administrator.If you’re prompted to enter your credentials, you’re not logged in as an administrator. To find out your administrator login details, please speak to your IT support.


Windows 7


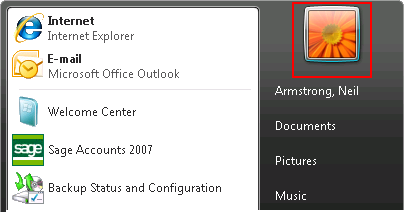
1. Click the Windows Start menu then click the user account picture.

If your computer is not a member of a domain, the user status appears below the user name.


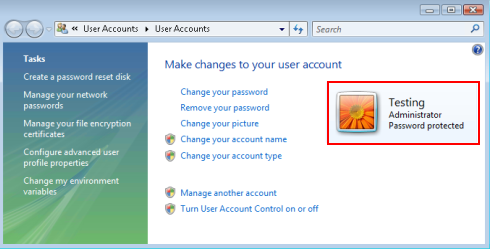
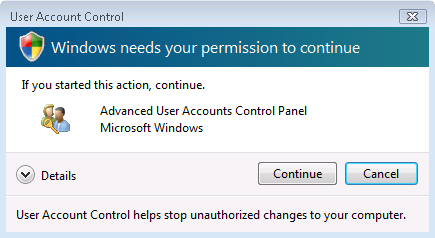
2. If your computer is a member of a domain, to check the user status, click Manage User Accounts.


3. If you are logged in as an administrator, the following window appears.


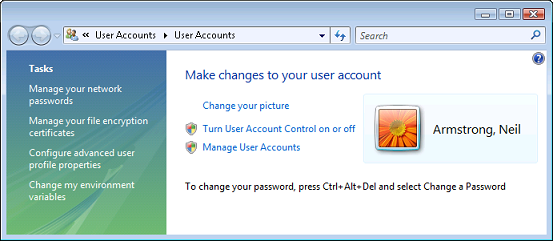
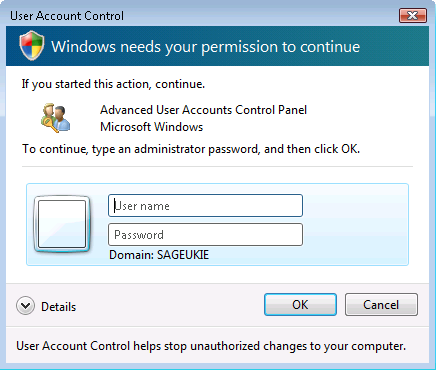
4. If you’re not logged in as an administrator, the following window appears. To find out your administrator login details, please speak to your IT support.


If the administrator access is hidden


If the default administrator account for your computer doesn’t appear when you start your computer, you can enable this account.

1. Right-click the Windows Start button then click Command Prompt (Admin).

Windows 8 or below – Click the Windows Start button, in the search box type CMD then right-click cmd.exe and click Run as administrator.

2. Type net user administrator /active:yes then press Enter.

3. Type Exit then press Enter.

The administrator account is now visible when you restart the computer, by default it has no password.

To turn the administrator account off, repeat the above steps, replacing active:yes with active:no


Sage Report Designer features – Quick guide

Sage Report Designer features – Quick guide

Sage Report Designer contains many features designed to help you amend and design reports within Sage Accounts.

This article provides quick steps for the most commonly used features, plus links to the more detailed articles available in Ask Sage.

Sage Report Designer desktop

The Sage Report Designer desktop displays the Designer view of the report, showing the sections, text and variables which make up the report. To the left and right of the report design are various panes which provide much of the functionality within Sage Report Designer.

If any of the panes mentioned in this article are not visible, open the View menu and select the required pane. If the pane doesn’t appear, you can reset the Report Designer view to its default.

The following panes are available:
  • Dynamic Help pane – This pane simplifies the process for common report changes by guiding you through the steps required. You can use it to add new objects such as text or images to your report, and also to amend existing objects. For information about how to use Dynamic Help, please refer to article 29329.


  • Variables pane – This displays the tables and variables that are available to add to the document, and any saved snippets. To add a variable to your document, simply click and drag it onto the design area.
  • File Explorer pane – This shows your report folders and the documents they contain. You can open a document in Sage Report Designer by double-clicking the report title in the File Explorer pane.


  • Properties pane – This shows the object properties and conditional formatting options available for the object currently selected in the design area or Report Explorer pane. If no object is selected, it show the main document properties.


  • Report Explorer pane – This shows the structure of the document, with the name of the report, sections on the report and the variables and other objects each section contains.

For information about the additional menu options in Sage Report Designer, please refer to article 27235.

Features

To add bar codes

This feature is available in Sage 50 Accounts 2010 and above and Sage Instant Accounts v16 and above.

  1. Toolbox menu > Add Barcode > click on the design and draw to required size then release.
  2. Expression Editor window > Fields pane > browse to and double-click the required variable to display the bar codes, for example, STOCK.BARCODE > OK.

To return to the mouse pointer, from the Toolbox menu choose Pointer.

For further information about adding bar codes, please refer to article 24964.

To add boxes

  • Toolbox menu > Draw Box > click on the design and draw to required size then release.

To return to the mouse pointer, from the Toolbox menu choose Pointer.

For further information about adding boxes, please refer to article 12639.

To add conditional properties

  • Select the object > Properties pane > Conditional Formatting > click the finder button > enter the conditional formatting as required > OK.

For further information about Conditional Formatting, please refer to article 12679.

To add criteria

  • Report menu > Criteria > New Criteria.

For further information about setting criteria, please refer to article 25638.

To add email settings

  • Report menu > Email Settings > enter the required email settings > OK.

For further information about email settings in Sage Accounts 2013 and above, please refer to article 29207. For further information about email settings in Sage Accounts 2012 and below, please refer to article 12659.

To add expressions

  • Toolbox menu > Add Expression > click on the design > enter the required expression > OK.

To return to the mouse pointer, from the Toolbox menu choose Pointer.

For further information about creating user defined calculations, please refer to article 12650.

To add filters

  • Report menu > Filters > enter the required filter > OK.

For further information about filters, please refer to article 12648.

To add groups

  • Sections menu > Add Section > Group Header And Footer > enter the variable for the required group > OK.

For further information about adding groups, please refer to article 12654.

To add images

Tip: A linked image links back to the original image file, so any subsequent changes to the original file are reflected in your document. An embedded image remains the same on your document, even if the original file is later amended.

  • Toolbox menu > Add Image / Logo > click on the design > select Browse my PC or network for an image > select or clear the Store the image in the report check box as required > OK > browse to and select the image file > Open.

To return to the mouse pointer, from the Toolbox menu choose Pointer.

For further information about adding images, please refer to article 12676.

To add lines

  • Toolbox menu > Draw Line > click on the design and draw to required size then release.

To return to the mouse pointer, from the Toolbox menu choose Pointer.

For further information about adding lines, please refer to article 12639.

To add page headers and footers

  • Sections menu > Add Section > Page Header And Footer.

For further information about adding sections, please refer to article 12661.

To add sorts

  • Report menu > Sorts > Add > enter the required sort > OK > OK.

For further information about sorts, please refer to article 12641.

To add sub reports

This feature is available in Sage Accounts 2011 and above.

  • Toolbox menu > Add Subreport > click on the design > complete the report wizard.

To return to the mouse pointer, from the Toolbox menu choose Pointer.

For further information about adding a sub report, please refer to article 26016.

To add text

  • Toolbox menu > Add Text > click on the design > enter the required text.

To return to the mouse pointer, from the Toolbox menu choose Pointer.

For further information about adding text, please refer to article 12638.

To add variables

  • Variables pane > expand the table > drag and drop the required variables onto the design.

For further information about adding variables, please refer to article 12638.

To change group or section properties, including section filters

  • Report Explorer pane > select the required section > Properties pane > click the relevant option.Tip: The properties are different for headers and footers. Most group properties such as sorts are held in the header properties.

For further information about changing section properties, please refer to article 12662.

To change page margins

  • File menu > Page Setup.

For further information about the page setup window, please refer to article 12585.

To change paper size and orientation

  • File menu > Page Setup.

For further information about the page setup window, please refer to article 12585.

To change print adjustments

  • Tools menu > Options > Printer Offsets tab.

For further information about Printer Offsets, please refer to article 12586.

To change print setup

  • File menu > Page Setup > Printer > Properties.

For further information about the page setup options, please refer to article 12585.

To change printer

  • File menu > Page Setup > Printer > Name > choose the new default printer.

For further information about the page setup options, please refer to article 12585.

To change properties of an object

  • Select the object > Properties pane > click the required option.

For further information about object properties, please refer to the following articles:
12646 Report Designer – How to amend date or time object properties
12658 Report Designer – Numeric Formatting
12584 Report Designer – How to create and use styles

To move an object

  • Click and drag the object, or select the object and use the arrow keys on the keyboard.

For further information about moving objects, please refer to article 12647.

To rename a report

  • Report menu > Report Properties > enter a new name and description > OK.

For further information about renaming a report, please refer to article 16965.

To save

  • File menu > Save.

To save as

  • File menu > Save As.


Download and install the Report Designer v4.0.140 update

Download and install the Report Designer v4.0.140 update

The Report Designer v4.0.140 update is available for Sage 50 Accounts v23.2 and v24.0, and Sage 50 Payroll v23.0.101 and above.

This update improves the functionality for sending Sage reports to Excel. Once you install the update, the Report Browser window contains the following three options for sending reports to Excel:

  • Export – Choose from a list of file types and save the report to a specified folder.
  • Report to Excel – Exports the report to Excel in the same format as the report preview.
  • Data to Excel – Exports the report data to Excel, placing the information in columns ready for further analysis.


Download it


1. On the computer that has Sage 50 Accounts or Sage 50 Payroll installed, click the download link below.

Download Report Designer V4 update

Depending on your Internet browser, the file saves to your Downloads folder or you’re prompted to save the file.

2. If prompted to save the file, browse to where you want to save it, then click Save.


Install it


1.Browse to your Downloads folder, or the folder where you saved the download.

2. Double-click the downloaded file, Sage.ReportDesigner.Update.4.0.140.msi