How to manually backup and manage your data
How to manually backup and manage your data
It is recommended that data backups are taken on a regular basis preferably last thing before you close your Sage 50 Accounts or first thing in the morning,
this is purely to ensure that your data is fully protected should anything happen. For disaster recovery, if your IT are not backing up your server then it’s
strongly advised that at least one of these backups are taken to an external device such as an external drive, Drop Box, One Drive or Google Drive etc.
Not only are daily backups recommended but Sage also recommends that backups are taken before running any large process for example:
- Running your VAT return
- Running your RTD
- Bank Reconciliation
- If you run supplier e-payments
- Running your Year End
- Importing into Sage 50
On your Backup screen you’ll have a number of options that you can include on your backup. If you have any custom layouts or reports, it’s highly recommended
that you take at least one backup of these layouts and reports without including your accounts data. That way should anything happen to your layouts or reports
you can easily restore your reports backup only without overwriting your accounts data.
At the time of the data backup it is recommended that you run a data check to ensure that the data you are backing up is healthy. If the data backup should
return any errors you should contact your support immediately.
This Pimbrook Article will guide you through the following:
- Taking manual data backups and check data
- Restoring backups
Taking manual data backups and check data
- Log into your Sage 50 accounts and on the top left menu bar click on ‘File’ and select ‘Backup’ on the drop down menu
- A ‘Confirm’ screen will open asking if you wish to check your data. Click ‘Yes’ on this screen for Sage 50 to run a health check on your data. Once completed
it should open another ‘Check Complete’ screen confirming that there are no problems to report on. - Click ‘OK’ on the ‘Check Complete’ screen and the ‘File Maintenance Problem Report’ Summary screen will open as seen in the diagram below. This screen
should list no errors or warnings,
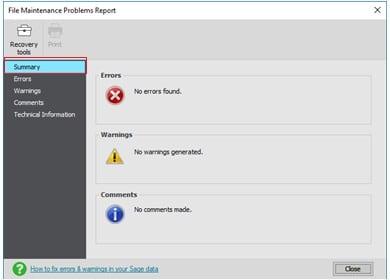
If Errors are being reported
If the ‘Summary’ screen is reporting errors you will need to call your ‘Support’ team immediately. Errors can effect the performance of your data.
If Warnings are being reported.
If your data is reporting warnings they should be investigated. You can see the list of warnings being reported on in the tab ‘Warnings’ on the left hand panel.
Once you are satisfied that there are no errors and warnings have been investigated, you can click ‘Close’ on the ‘File Maintenance Problem Reporting’ screen
the ‘Backup’ screen will open automatically.
Important note: You can run separate Data Checks outside of the Backup process by selecting ‘File’ and ‘File Maintenance’ and on the
‘File Maintenance’ screen selecting ‘Data Check’.
The manual backup screen
The manual backup process allows you to determine what your backing up and where your backing up to. On the ‘Back up’ screen there
are 2 tabs, ‘Back up Company’, ‘Previous backups’: (if your running Sage 50 v23 or below you will have an additional tab called Advanced options)
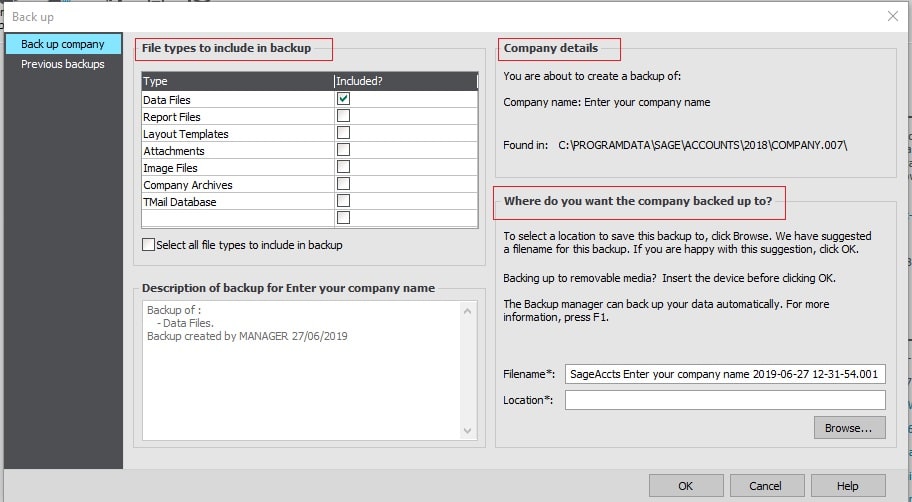
*The ‘Back up Company’ tab is divided into 3 sections:
Company details: This is a summary of the name of the company you are about to backup and the location of where company data is stored.
Where do you want the company backed up to? This section allows you to chose the location to backup to and the name of the file.
File types to include in backups: In version 23 and below this is under the Advanced Options tab. This section allows you to select what you
want to backup, Data Files is your company data but if you wish to backup for an example your reports and layouts, untick the ‘Data Files’
and tick Reports Files and Layout templates. When you click ‘OK’ you will be taking a reports ony backup. This is handy should something happen to your
reports you can easily restore the Reports backup without effecting your data.
Description of backup for Enter your company name: This is a description of what the backup file will include along with the Sage 50 Accounts user and date
Important note: if you are taking a reports only backup where the ‘Data Files’ type is unticked. Please remember on your next back to ensure that ‘Data Files’
are selected otherwise you will not be backing up your accounts data.
*Previous Backups’ tab lists all the manual backups that you’ve taken on your machine. You can remove old entries from your list
by selecting the Delete button.
Restoring backups
A data restore will overwrite your existing data and should only be done with caution. Before you run any restore we advise that you take a backup of
your data. To restore you a backup file you will need to:
- Click on ‘File’ on the top menu bar and select ‘Restore’ from the drop down menu
- Click the ‘Browse’ button to locate the backup that you wish to restore
- Once you have selected the backup, check the details in the description box ‘Description of data to be restore for:’
- Once you are happy that this is the correct backup to restore click on the ‘OK’ button for Sage to begin the restore process.
(SD)