Sage Micropay CSO setup
Sage Micropay CSO setup
If the Central Statistic Office (CSO) has selected your company for participation in their survey and you haven’t yet setup CSO reporting in Micropay, this document
will explain how to set this up. Once you have completed the setup you can generate the following CSO survey reports.
- Earnings, hours and employee cost survey (NHECS)
This report monitors change in labour costs in Ireland and across the EU and must cover all payrolls belonging to the same tax registration and is
submitted quarterly to the CSO - National employment survey (NES)
The (NES) reports on statistical employment information from business that have more than three employees. This report must cover all payrolls
belonging to the current company and be submitted annually to the CSO at the end of the calendar year.
There are 3 steps to setting up CSO reporting in Sage Micropay, Activate the CSO reporting feature, Set up your payments for CSO reporting and Setup you
employees for CSO reporting.
Step 1 – How to activate the CSO feature in Sage Micropay
- On the top menu bar click on Company/Payroll and select on ‘Company Details’.
- On the ‘Company Details’ screen click on the tab ‘CSO’
- On the ‘CSO’ tab enter in your company’s central business register (CBR) number into the ‘CSO CBR Number’ box and click ‘OK’. (If you are unsure of this
number please contact the Central Statistic Office)
This process must be completed on each of your payrolls in order to activate the CSO feature.
Step 2 – How to setup your payments for CSO reporting
Once you have activated the CSO feature in Step 1 you are now ready to start configuring your Payments for CSO reporting. You don’t need to
specify CSO settings for the following payment types: Redundancy, illness benefit, Benefit in Kind (BIK), maternity benefit and paternity benefit.
- On the menu bar, click Company/Payroll then click Payments. This will list all the payments entered in Sage Micropay
- Select a payment that’s subject to CSO reporting and click ‘Edit’.
- Under ‘CSO Statistical Reporting, complete the following information:
EHECS Type Choose the relevant CSO type for this payment. If you are unsure please contact the Central Statistic Office for assistance
Hours Multiplier Enter the CSO hours multiplier value. This helps to ensure that the hours you record in the EHECS report is accurate
NES Type Select the NES type for the payment if applicable. - Click ‘Save’ to save your changes.
- Repeat steps 2 to 4 for all relevant payments then click ‘Close’.
- Repeat all the above steps in each of your payrolls.
Step 3 – How to setup your employees for CSO reporting
Once you have added the CSO details to your payments you will now need to add the CSO categories to each of your employees on your payrolls, to do this:
- Open your employees record by clicking on the ‘Edit Employee’ icon on your process map or by clicking on ‘Processing’ on the top menu bar
and select ‘Edit Employee’. - Select the employee that you wish to add the CSO details to and click on the ‘CSO’ tab.
- If your employee needs to be excluded from the CSO report, tick the ‘Exclude Employee from CSO Reports’ box and then click ‘Save’.
- To include this employee in the CSO report, complete the following information:
* Occupation Status
* Type of Employment Contract
* CSO Occupation Category
* Hours per Working Day
* Contracted Hours - Click ‘Save’ to save your changes.
- Repeat steps 2 to 5 for all employees on your payroll.
- Repeat the steps above for all your payrolls.
Please note, if you are setting up the CSO feature mid year, you must delete all entries on the CSO History table and then repopulate it. This is because
the CSO History was populated before you made any amendments to the CSO details. Once you click on the button ‘Fil in Blank History’ Sage
Micropay will re populate the CSO history table with the new information that you have entered against the employee.
How to Delete the Existing CSO history
In the Employee Details on the CSO tab click onto the CSO entry line and press F5 on your keyboard to delete each of the lines.
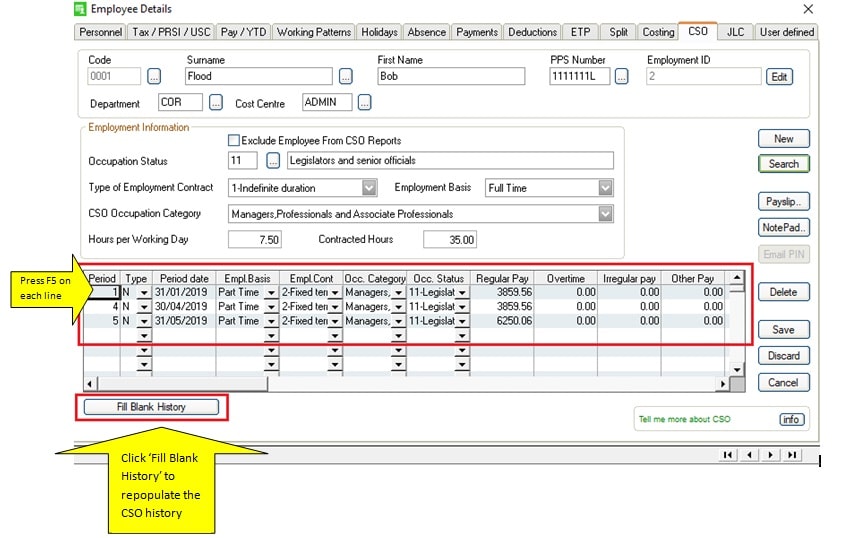
Once you have cleared out the old CSO History click on the ‘Fill Blank History’, Sage Micropay will repopulate the CSO history with your amended
details.
Click ‘Save’ to save your changes.
(SD)