CWPS – New Calendar Year 2020/2021 and Rate Changes (From 1st Oct 2020 – Version 23.4)
The Calendar year for the Construction Workers Pension Scheme changed back in 2019. In previous years it has been a ‘Jan – Dec’ year. From 1st October 2019, it changed to an ‘Oct – Sept’ year. Due to the new CWPS calendar year, the CWPS Rates will be changing annually on the 1st of October.
V23.4 supports those increases to the Construction Workers Pensions Scheme (CWPS) which come in to effect from 1st of October 2020. When installed, the update will immediately apply changes to the necessary rates. If this applies to your payroll, then this update will help you to remain compliant. Please note though, that this update will need to be installed on a particular period so as not to apply the increases too soon.
You will need to carry out the following steps to complete the update:
- Choose the Appropriate Period to Run the Update
- Backup Your Payroll
- Download & Install The Update prior to setting your ‘Applicable Period’
- Set up the new CWPS Calendar prior to setting your ‘Applicable Period’
- Set your Applicable Period (‘Period Date’ must be on or after 28/09/2020)
- Browse The New Rates & Check Categories
- Clear the CWPS Balance History
- Run your CWPS Report (1-52) to confirm it is blank.
- Process Timesheets
- Check CWPS Report to confirm rates used are correct.
Steps 1-8 are detailed below:
1. Choose the Appropriate Period to Run the Update:
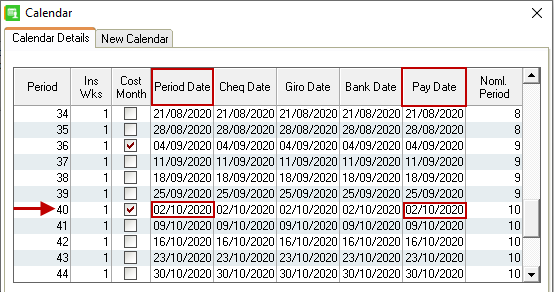
If the change in CWPS rates effect your payroll, then it is imperative that you install the update at the appropriate time. At the moment you install the update, the CWPS Rates will change in your payroll software. As the rate increase is only applicable from 1st of October 2020, ideally you should wait to install the update, until ‘End Of Period’ of your last September payroll. That is, the last September payroll where ‘Pay Date’ is a September 2020 Date (See ‘Pay Date’ in Image Below).
You can check this in advance, by clicking the ‘Company/Payroll’ menu at the top of the screen, and choosing ‘Calendar’. In the example below, as the applicable period is Period 40, it would be appropriate to run the update and set up the new CWPS Calendar at End of Period 39. This way the new rates and new CWPS Calendar will exist before setting the first CWPS Period (CWPS Week1).
Your payroll(s) may differ to this example, so check the calendar in each of your payrolls, before processing timesheets.
2. Backup Your Payroll
- We recommend to take a backup of your payroll data, in your usual manner, before running an update.
- It may also be advisable to print off your CWPS Report for CWPS Weeks 1-52, prior to making the necessary changes to CWPS, as this report will be cleared later in the process.
3. Download & Install The 23.4 Update prior to setting your ‘Applicable Period’:
As per step 1 above, make sure you have chosen the correct moment to install the 23.4 update, as the CWPS Rate changes must not be used until your appropriate period. Once you have identified the moment you need to run the update in, you can click the link below to download the update. Run the update in the usual manner.
Click Here to Download the Sage Payroll Software Update 23.4 (225mb)
4. Set up the new CWPS Calendar:
In order to comply with the new CWPS calendar year format, you will need to set up a new CWPS calendar. To do this:
- Click on ‘Company/Payroll’ menu.
- Choose the ‘Construction Workers Pension’ option.
- In the window that is presented click on the ‘Calendar’ tab.
- In here click on the ‘Create New Calendar’ button.
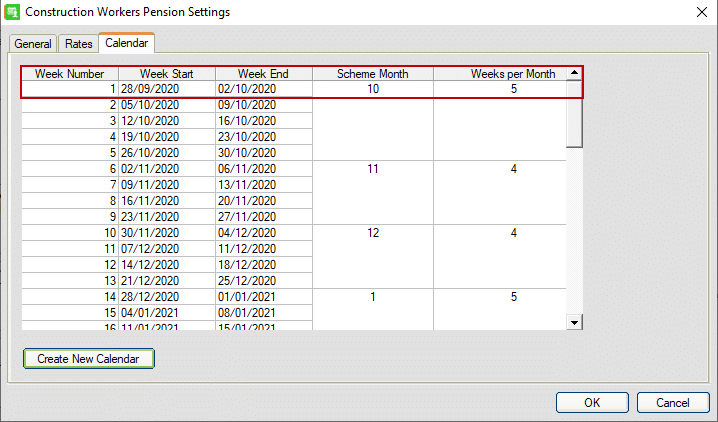
- Enter the start date of 28/09/2020 (This is the Monday of the first week of the new CWPS calendar).
- Click ‘Create’
- Click ‘OK’
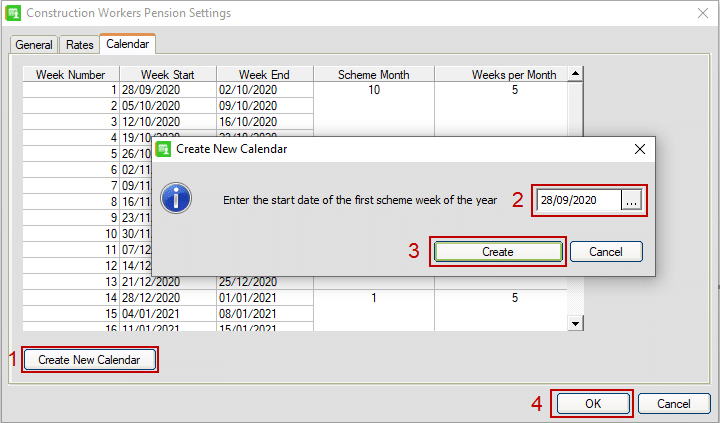
The new Calendar should look like this:
5. Set your Applicable Period:
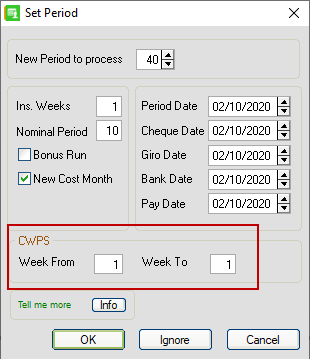
Set you applicable period number. ensure that your ‘Period Date’ is on or after 28/09/2020. This date (28th Sept) is the start date for the new CWPS Calendar. If your period date is prior to this, your CWPS contributions may not report into the correct period. In the example above, this is period 40. Your applicable period may differ to this.
Note On ‘Set Period’: When you click ‘Set Period’ make sure that the ‘Week To’ and ‘Week From’ fields in the ‘CWPS’ area of the screen are: both equal to ‘1’ if running a weekly payroll, or show From ‘1’ To ‘5’ if running a monthly payroll. If this is not correct, then your CWPS data may report to the incorrect CWPS ‘Pay Week’.
6. Browse The New Rates & Check Categories:
After you have set the period, browse the CWPS categories & new rates under the ‘Company/Payroll’ menu – ‘Construction Workers Pension’ option. The new rates are listed here.
There are only three Active Categories: POC (Pension Only no DIS), SPB (Pension/Sick Pay) and SPI (Standard Contrib + Industry Additions). Other earlier categories are no longer in use: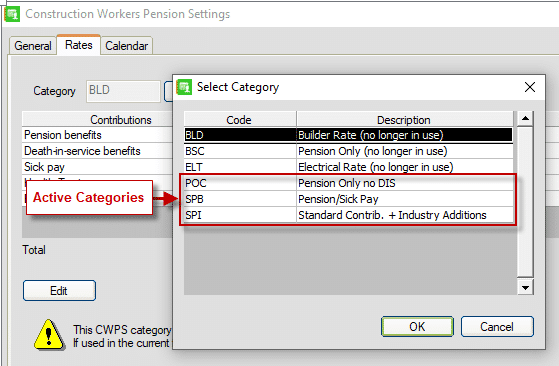
It is also advisable to browse your employees, and ensure that they are assigned to the correct category. To do this:
Choose the relevant employee in ‘Employee Details’, Click ‘Deductions’ Tab, Under ‘Construction Worker’s Pension Scheme’ select the correct category from the drop down list. Click Save.
7. Clear the CWPS Balance History:
- From the menu bar at the top of your window, click Year End then click New Construction Pension Year.
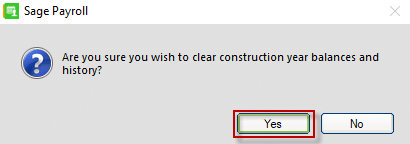
- When you receive the prompt to clear the balances and history, to continue, click Yes.
8. Run your CWPS Report (New Year 1-52) to confirm it is blank:
- Click ‘Other Reports’
- Choose ‘Construction Pension’ on the left hand side.
- Click ‘Preview’
- There should be no data for any ‘Pay Weeks’ in the report.
9. Process Timesheets:
- Once you have carried out steps 1-8 above, you can continue to process your timesheets & do End Of Period as normal.
10. Check CWPS Report to confirm rates used are correct:
- Check your CWPS Report after EOP to view contributions at new rates for CWPS Week1. Ensure the rates are correct before completing CWPS Week1 in your payroll, as if they are not correct, you will need to re-process at the correct rates.
