• New Sage Payroll Update v27.1 Released
    Includes ERR and CWPS enhancements
  • New Sage Payroll Update v27.1 Released

KB Category: PAYE Modernisation/RTI (Real Time Returns)

PRSI Exemption feature [V21.1 and Higher]

Sage Payroll – PRSI Exemption

PRSI Exemption feature Director (Required for PAYE Modernisation returns)

Most employees (aged between 16 and 65) make social insurance contributions. The amount they pay is based on their earnings each period and the type of work they do. For this reason, it is called Pay Related Social Insurance (PRSI).

As an employer, you must deduct PRSI contributions directly from your employees’ wages. However, if the Department of Employment Affairs and Social Protection authorises you to not deduct PRSI from an employee’s pay, you must mark the employee as PRSI exempt within your Sage Payroll software.

Before you begin, check your version is 21.1 or higher. You can find this in the top left-hand corner of your software. If it’s not, please install the latest update now.


To mark an employee as PRSI exempt within their record

  1. On the menu bar, click Processing then click Employee Details.
  2. Next to the Surname box, click browse  and click the relevant employee.
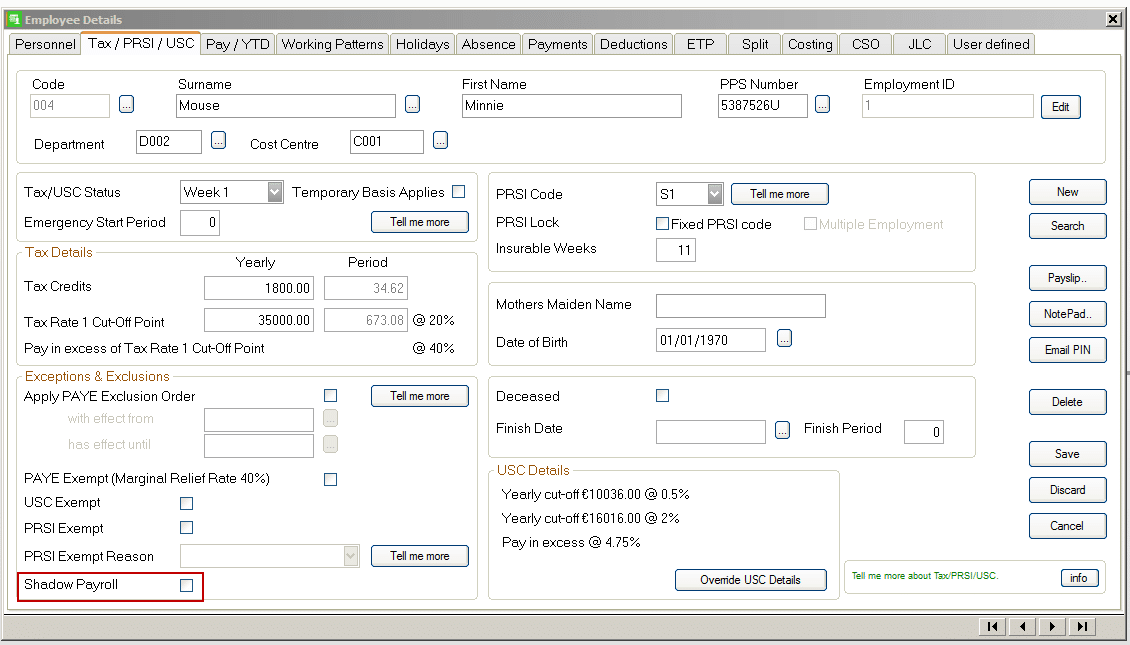
  3. Click the Tax / PRSI / USC
  4. Under Exceptions & Exclusions, select the PRSI Exempt check box.
  5. From the PRSI Exempt Reason drop-down list, click one of the following:
A1 Portable Doc If the employee holds an A1 portable document from an EU member state, click this option.
Soc Sec Bilat Agree If the employee holds a certificate of coverage under the Social Security Bilateral Agreement, click this option.
Exempt posted Ees If the employee holds a notification of exemption for posted workers (other than the two mentioned above), click this option.
Family member If the employee is employed by a family member, click this option.
Under 16 If the employee is under 16 years of age, click this option.
Social Welfare If the employee works for a social welfare scheme, click this option.
Other If none of the exempt reasons above apply, click this option.


1. If you chose the PRSI Exempt Reason ‘Other’, you must now select either M or NA in the PRSI Code If unsure, please contact the Department of Employment Affairs and Social Protection.
If you chose another PRSI Exempt Reason, your Sage Payroll software automatically updates the employee’s PRSI Code to match the chosen exempt reason. You don’t need to do anything else.

2. Click Save.
3. Repeat steps 2 to 7 for any other employees you want to mark as PRSI exempt, then click Cancel.

If the PRSI exemption started on a date that fell in a previous period, you may need to manually refund overpayments of PRSI back to the employee. Read more >


Option to indicate if an employee is being paid via a Shadow Payroll [V21.1 and Higher]

Option to indicate if an employee is being paid via a Shadow Payroll (Required for PAYE Modernisation returns)

Shadow payroll is a term used to report compensation data that is actually paid from another country. If you have an employee on assignment in a foreign country, their wages may need to be reported in both the home and host countries via a shadow payroll. If relevant, select this check box to indicate that the employee is being paid via a shadow payroll.

  1. Select Employee Details and Tax/PRSI/USC
  2. Tick the Box for Shadow Payroll


Click here to view the new features in V21.1


More Information on the Shadow Payroll

Support Employment IDs for existing, new and reinstated employees (Required for PAYE Modernisation returns) (V21.1)

Support Employment IDs for existing, new and reinstated employees (Required for PAYE Modernisation returns)


Within the Employee Details window of Sage Payroll (v21.1 or higher), there is a field titled Employment ID. This holds a unique value for each separate employment for an employee and is a requirement for Revenue’s PAYE Modernisation Project which comes into effect from 1 January 2019.


To save you time, Sage Payroll has automatically allocated each of your employees with a default Employment ID value of 1. You should only change the Employment ID value for an employee, if one or both of the following scenarios apply:


  • The employee has multiple employments with your company.
  • The employee left and re-joined your company in the same tax year.

To change an employee’s Employment ID

  1. Open Sage Payroll 2018 and log into the payroll as normal.
  2. Check your version number is 21.1 or higher. You can find this in the top left-hand corner of your software. If it’s 21.0 or lower, you must install the latest Sage Payroll (Micropay) update
  3. On the menu bar, click Processing then click Employee Details.
  4. Next to the Surname box, click browse  and click the relevant employee.
  5. Next to the Employment ID box, click Edit.
  6. In the New Employment ID isbox, enter a value using any combination of the following:
  • Upper and lower case letters.
  • Digits 0 to 9, and the following special characters – \ _

The New Employment ID must be different to the value that is held in the Current Employment ID box. Also, the following special characters cannot be used:

^ & ‘ @ * £ € { } [ ] . ? , $ = “! # ( ) % . + ~

  1. Once you’ve entered the new employment ID, click Change.
  2. Click Save.
  3. Repeat steps 3 to 8 for each employee you need to edit the Employment ID for, then click Cancel.


Click here to view the new features in V21.1

Generate an employee list for Revenue

Sage Payroll – Knowledgebase

Generate an employee list for Revenue


PAYE Modernisation comes into effect from 1 January 2019. To help prepare for this new legislation, the Revenue will ask you for a listing of all employees in your company for their Data Alignment exercise.

Within Sage Payroll (previously known as Micropay), you can generate the Employee List to ROS file. You can then submit this XML data file to Revenue via their website.

Generate the Employee List to ROS file

1. Open Sage Payroll 2018 and log in to a payroll as normal.

2. Check your version number is 21.1 or higher. You can find this in the top left-hand corner of your software. If it’s 21.0 or lower, you must install the latest Sage Payroll (Micropay) update

3. On the menu bar, click Reports then click Payroll Reports.

4. Click the Company

5. Under File Exports, click Employee List to ROS

Generate an Employee List

6. For each payroll you want to include in the report, select the Include check box and enter the password if required.

Generate an Employee List

7. To proceed, click Continue.

If any issues are found in your data, an Errors and Warnings window appears. You must resolve all errors before you can proceed with creating the return. 

8. Browse to where you want to save the XML data file, then click Save

.Generate an Employee List

The Employee List to ROS – Complete window now appears.

9. Click View File Summary, then check the values are correct for each employee on this report.

10. To print a copy of this summary report for your own records, click File then click Print.

Ensure your printer details are correct, then click Print again.

11. To close the summary report, click File then click

12. Select the Open folder containing Employee List File check box, then click Done.

The location where the XML file is saved now opens automatically in Windows Explorer.

13. To close the Payroll Reports window of Sage Payroll, click Cancel.


Click here To watch a video – Generate an employee list for Revenue