• IMPORTANT – Ensure you are using the correct PRSI rates
    Check PRSI rates in Sage Payroll
  • Payroll Year End Webinars
    A step by step guide to running your Payroll Year End on Sage Payroll Software
  • IMPORTANT – Ensure you are using the correct PRSI rates
  • Payroll Year End Webinars

KB Category: New Feature

Making Tax Digital (MTD) – What to do next?

Making Tax Digital (MTD) – What to do next?


1. Check Sage Accounting software is MTD compliant (Sage 50 cloud Accounts V24.2) Pimbrook KB 5449 

2. Prepare Data for MTD returns SKB 41887

3. Before you can start submitting VAT Returns under MTD you must prepare your data to ensure that the values you submit under MTD are correct. This includes:

  • Ensuring you’re using the correct VAT settings. SKB 36914.

Note : do not tick Enable Making Tax Digital until you are ready to make your first submission.

  • Ensuring you’re using the correct tax codes. – Default Tax Codes
  • Reconciling transactions that were included in previous VAT Returns submitted to HMRC.
  • Ensuring all transactions for the current VAT period are entered in Sage 50 Accounts.
  • Ensuring any late entries from the previous VAT period are entered in Sage 50 Accounts

You can get a Detailed instructions on how to Prepare your data to start submitting VAT Returns from Sage 50 Accounts – UK 

4. Register with HMRC for MTD SKB 42782 – must have software and data ready before you sign up as once registered your next return must be via the MTD system.

5. Tick Enable Making Tax Digital when you are ready to make your first submission

6. On the menu bar click Settings, click Company Preferences then click the VAT tab

7. Put tick in box Enable Making Tax Digital for VAT submissions.

8. Calculate and Submit VAT return SKB 41886

Making corrections to the current period (in Sage Payroll 2019)

Making corrections to the current period (in Sage Payroll 2019)

We all know, mistakes can happen, and processing payroll is no exception. This article explains how to handle corrections in the current pay period.

If you need to make corrections to values in a previous pay period, please ignore the steps detailed in this article. Instead you should refer to article 6909 for guidance.


If you haven’t sent a payroll submission to Revenue for this period yet

The first thing you need to do is check the payroll status at the bottom of your window. If it reads:

  • End Of Period (EOP) – You’ll need to rewind the EOP process, then make the necessary changes to the relevant employee records and/or timesheets. Next you must post the EOP values again and then produce the Gross to Nett report. Check that all employees that should be paid this period are appearing on the report and that their values are correct. Once you’ve done this, you can send your payroll submission to Revenue.
  • Time and Pay Calculated or Start Of Period – Make the necessary changes to the relevant employee records and/or timesheets. Complete the rest of your payroll processing for this period as normal then post the EOP values. Once you’ve done this, you can send your payroll submission to Revenue.


If you’ve already sent a payroll submission to Revenue for this period

If you make any change to the current pay period after you’ve sent your initial payroll submission to Revenue, you must use the Re-Send Payroll Submission option to let Revenue know about these changes. The corrected payroll submission will replace the incorrect version that Revenue had previously received.


Using the Re-Send Payroll Submission option


1. Do one of the following:

  • From the menu bar at the top of the window, click Direct Payroll Reporting, point to Payroll Submission, then click then click Re-Send Payroll Submission.
  • From the process map in the centre of Sage Payroll, click Send Payroll Submission then click Yes when prompted.

2. If your Revenue Online Service (ROS) login details already appear on-screen, skip to step 7.

3. Under ROS Digital Certificate, click Browse.

4. Browse to and select your ROS Certificate (.P12) file, then click Open.

5. Enter your ROS digital certificate password in the box provided.

6. If relevant, click the Save password to Sage Payroll check box.

7. Check the ROS login credentials are correct. Edit if required.

8. To proceed, click Next.

9. Check the information is correct within the Review Details window. To view a detailed breakdown of the values per employee, click Export Details.

10. Once you’re happy with the details, to proceed, click Submit.

Please note that once you click Submit, this process can’t be reversed or stopped.

11. Once the amendment submission is successfully received by Revenue, a confirmation window appears. To produce a copy of the submission log for your records, click Export Details then to:

  • Print the report, click the Printer button.
  • Save a PDF copy of the report, click the Save button.

To close the report, click X at the top right-hand side of the window.

12. To close the Send Payroll Submission window, click Finish.

If you want to check or review the previous submissions you’ve made to Revenue, you can do this using the View Payroll Submission Log option. Read more >


Restoring a backup from OneDrive when using Sage 50cloud Accounts (V24.2)

Restoring a backup from OneDrive when using Sage 50cloud Accounts

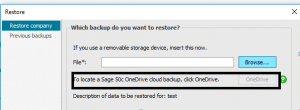
In Sage 50cloud Accounts v24.2 and above, you can easily restore scheduled backups when integrating with Microsoft Office 365.

Steps

1. On the menu bar click File then click Restore.

2. Click OneDrive then click the required backup file and click OK.

3. Click OK then click Yes, and once complete click OK.

4. Enter your Logon name and Password then click OK.


Make corrections in activity windows (V24.2)

Make corrections in activity windows


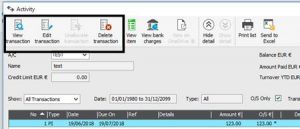
New in Sage 50 Accounts v24.2, you can now edit transactions direct from the activity windows, speeding up the corrections process and saving you valuable time.

Where to find the new options

Window Options
Click Customers, select a customer and click Activity 1.Edit transaction

2.Unallocate transaction

3.Delet transaction

Click Suppliers , select a supplier and click Activity 1.Edit transaction

2.Unallocate transaction

3.Delet transaction

Click Bank , select a bank and click Activity 1.Edit transaction

2.Unallocate transaction

3.Delet transaction

Click Nominal , select a nominal  and click Activity 1.Edit transaction

2.Unallocate transaction

3.Delet transaction


Include bank charges as you post supplier payments and customer receipts

Include bank charges as you post supplier payments and customer receipts

If you often post bank payments for bank transaction fees, the new Bank charges feature introduced in Sage 50 Accounts v24.2 makes it much quicker. You can now post a bank charge at the same time as you post the customer receipt or supplier payment, so you’re finished in half the time.

Enter your bank charge settings

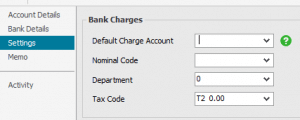
To start using bank charges, you must add bank charge settings to your bank account record. You can amend these settings at any time.

1. On the navigation bar click Bank accounts.

2. Double-click the bank account where you post your customer receipts and supplier payments.

3. Click Settings, then complete the window as follows:


Default Charge Account Click the bank account you pay your bank charges from.

This can be the current bank record or a different one, for example, if this is a foreign bank account but your charges are paid from your Sterling account.

Nominal Code Click your bank charges nominal code, for example, 7901. If required, to create a new nominal code click New.
Department Click the department you want to post bank charges to.
Tax Code The default tax code for bank charges is T2 by default, which is the Exempt VAT rate as advised by  Revenue. You can change this if required.


4. Click Save then click Close.

5. Repeat the above steps for any other bank accounts as required.

Contact your customers and suppliers using Skype for Business

Contact your customers and suppliers using Skype for Business

If you have customers or suppliers who are available to contact using Microsoft Skype for Business, in Sage 50cloud Accounts v24.2 you can now do this quickly from within the customer and supplier records.

Set up Skype for Business

To use this feature you must have Sage 50cloud Accounts and have Microsoft Office 365 with Skype for Business installed.

Set up your customers and suppliers

To use Skype you must enter Skype email addresses in your customer and supplier records.

1. On the navigation bar click Customers or Suppliers.
2. Double-click the required record and under Email1, Email2 or Email3, enter your customer’s or supplier’s Skype email address.

To add an email address to other addresses, click Address & Contacts select the required address then click Edit and enter an email then click OK and click Close.
Click Save.

Use Skype to contact a customer or supplier

1. On the navigation bar click Customers or Suppliers.
2. Double-click the required record then click Skype.

If there’s more than one email address on a record, click the required contact then click Open in Skype.


Add social media links to your customers and suppliers

Add social media links to your customers and suppliers

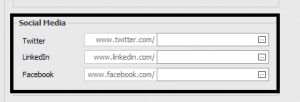
In Sage 50 Accounts v24.2 and above, on your customer and supplier records you can add links for the following social media sites:

  • Twitter
  • LinkedIn
  • Facebook
Add social media links to your record

1. On the navigation bar click Customers or Suppliers.
2. Select the required record and click Edit.
3. On the Details Tab, In the Social Media section enter the required link or username, for example https://twitter.com/pimbrook_sw then click save.

If you enter the full path, it is shortened to just the username.

4. To visit the site, re-open the record and click the button next to the required link.