AccountsMate For Sage 50 – Installation Instructions
Prerequisites
To install AccountsMate you will need the following
1. An email from Pimbrook Software with the AccountsMate installation string.
2. If this is the first installation of AccountsMate in the organisation a set up will run to link to Sage 50 and you will need to ensure the following:
- AccountsMate is run for the first time on a computer that has Sage 50 installed in order to complete its initial setup.
- You have a Sage 50 login (user & password), it is recommended to use the “manager” login details to give full access.
3. It is recommended that your Sage 50 should be the latest version for the best compatibility, but it must be at least version 26 or higher.
Installing the Software
To install the AccountsMate software application, follow these steps;
1. Click this link to download and run the installer -> AccountsMate Installer
2. Copy and paste the install string from your installation email into the Enter Install String box when prompted,
3. Click Install and confirm the organisation details.
3. The installer will download the application software and prompt for the install folder,
4. Accept the default folder (or change if required) and click Next to confirm the installation.
5. The installer will display a screen to indicate when the installation is complete.
6. Click Close.
7. There should be an AccountsMate Console icon on the desktop, click this to start AccountsMate.
Setting Up the Software (at first run only)
When AccountsMate is run for the first time, it will start a Set Up process to link with Sage 50.
The following steps are involved.
1. AccountsMate requires at least one administrator user to complete its set up. The system will ask if you want to be the administrator.
2. Click Yes to become an administrator.
3. The system will prompt to set up a link to the Sage 50 companies.
4. Click Yes.
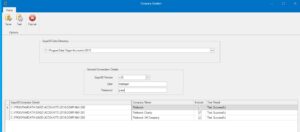
5. The system will display the Company Creation screen (see below) and scan for Sage 50 companies.
6. When it finds them it will display the available Sage 50 companies.
7. Enter the Sage 50 login User & Password (t is recommend to use the “manager” login for full access).
8. Press the Test button in the top toolbar.
9. AccountsMate will test the connection to each company included and return the Test Result. If unsuccessful, the login details are probably incorrect, try a valid Sage 50 login and test again. When AccountsMate successfully connects to a company it will display the Company Name from Sage 50, as shown in the screen sample below.
10. Ensure the companies required are ticked under the Included column, as shown above.
11. Click Save to save these settings.
12. AccountsMate will restart.
13. See our User Guide here -> AccountsMate for Sage 50 – User Guide for help with using AccountsMate.
Installation Issues
There may be issues with the installation depending on a users system environment and set up. Below are the common ones we have seen and how to address them.
Problem Finding Sage 50 Companies
AccountsMate may not be able to find the Sage 50 companies at the Company Creation screen (step 5-6 in the Setting Up section above). If this is the case the user will be allowed to browse the system to find the Company.UNC or Company file on the computer. Please ensure that AccountsMate is being run the first time on a computer that has Sage 50 installed. The user may also need to enter the version number in this case.
Setting Up AccountsMate to Run on a Computer With No Sage 50
AccountsMate can be set up to run on a PC that does not have a Sage 50 client installed. This is useful if you wish to give access to users that do not have full access to Sage 50. The following link gives instructions on this set up
AccountsMate For Sage 50 – Running on a PC without a Sage 50 Client

