• Transition from TASBooks to Sage 50
    Easy with the Right Partner and Remarkably Beneficial
  • Transition from TASBooks to Sage 50

KB Category: Sage 50 Accounts

Sage 50 Accounts

Sage Drive Issue – ‘The main site is no longer communicating with this Sage Drive Company….’ on a remote site

When opening or working in a company that’s shared using Sage Drive, the following message may appear:

‘Sage Drive
The main site is no longer communicating with this Sage Drive Company; this may mean that it has encountered an error and has chosen to work offline…’

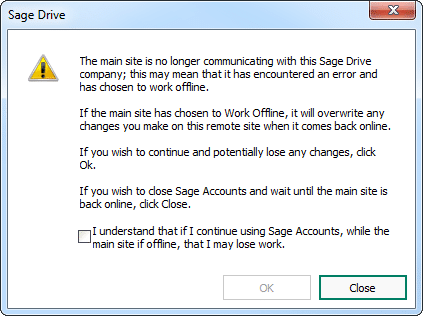
This appears on remote sites if the main computer for the Sage Drive Company isn’t currently online. For example, the computer may be switched off, or the user has chosen to work offline.

If you receive this message, we recommend that you close Sage Accounts and contact the user at the main site to check what is happening.

If main site is switched off

If the main site has logged out of Sage 50 Accounts and turned off their computer, you’re fine to work in Sage 50 Accounts at your remote site. When the main site reconnects, any changes you’ve made are synced to the main site.

To carry on posting, select the box  I understand that if I continue using Sage Accounts… check box and click OK.

If main site is switched on

If the main site computer is switched on, but no-one is logged into Sage 50 Accounts on that computer, you’re fine to work in Sage 50 Accounts at your remote site. When the main site reconnects, any changes you’ve made are synced to the main site.

You can try to refresh Sage Drive by following these steps:

  1. Click Tools, then click Sage Drive.
  2. Click Lock Sage Drive, then click Refresh Sage Drive.

To carry on posting, select the box  I understand that if I continue using Sage Accounts… check box and click OK.

If main site is switched on but offline

If the main site computer is switched on, and the user has chosen to work offline, we recommend that you stop processing at your remote site until they reconnect.

To check if they are working offline, the main site user can check if Sage Drive: Offline appears on the status bar at the bottom of Sage 50 Accounts.

Warning:

Pimbrook software strongly recommend not selecting to working offline. Any time it’s offline we suggest that everyone should stop working as this may result to loss of data.

If you continue, any changes you make from this point will be lost when the main site reconnects.

When the main site reconnects to Sage Drive, the following message appears at your remote site:

‘Sage Drive
The main site has reconnected to this Sage Drive Company.
Any changes you make now will not be overwritten by the main site.
To continue, click OK.’

Once this message appears, you should check and if necessary re-enter any postings you’ve lost.

Summary

In most cases – To carry on posting, select that  I understand that if I continue using Sage Accounts… check box and click OK.

If the main site computer is switched on, and the user has chosen to work offline, we recommend that you stop processing at your remote site until they reconnect.

Pimbrook software strongly recommend working offline. Any time it’s offline we suggest that everyone should stop working as this may result to loss of data.

Uploading data window scrolling in continuous loop with message, “Processing, please wait…”

This can happen whether you have Sage Drive set up or not.

*Please follow these steps if customer is using Sage Drive*

Reset the Sage services and processes

You must follow these steps on the computer or server where your Sage Accounts data is held. If using Sage Drive, you should carry these steps out at both the Sage Drive main site and remote site.

If you’re using a networked version of Sage Accounts, all other users must be logged out of the data.

  1. Close Sage Accounts.
  2. Hold down Ctrl + Shift + Esc to open the Windows Task Manager.
  3. Click the Processes
  4. Right-click the relevant process and click End Process then click End process.
Version Windows 7 and below Windows 8 and above
25 sg50svc_v25.exe *32

sg50CtrlSvc_v25.exe *32

Sage 50 Accounts Service v25

Sage 50 Accounts Control Service v25

24 sg50svc_v24.exe *32

sg50CtrlSvc_v22.exe *34

Sage 50 Accounts Service v24

Sage 50 Accounts Control Service v24

23 sg50svc_v23.exe *32

sg50CtrlSvc_v23.exe *32

Sage 50 Accounts Service v23

Sage 50 Accounts Control Service v23

22 sg50svc_v22.exe *32

sg50CtrlSvc_v22.exe *32

Sage 50 Accounts Service v22

Sage 50 Accounts Control Service v22

21 sg50svc.exe *32

sg50CtrlSvc.exe *32


Sage 50 Accounts Service

Sage 50 Accounts Control Service


  1. In Task Manager click the Services
  2. Right-click the relevant services and click Start Service.
v25 §  Sage 50 Accounts Service v25

§  Sage 50 Accounts Control Service v25

v24 §  Sage 50 Accounts Service v24

§  Sage 50 Accounts Control Service v24

v23 §  Sage 50 Accounts Service v23

§  Sage 50 Accounts Control Service v23

v22 §  Sage 50 Accounts Service v22

§  Sage 50 Accounts Control Service v22

v21 §  Sage 50 Accounts Service

§  Sage 50 Accounts Control Service


Close Task Manager Window.

Stop the backup manager processes

  1. Hold down Ctrl + Shift + Esc to open the Windows Task Manager then click the Processes
  2. If listed, right-click the following processes and click Stop.
  3. Sage 50 Check Data Standalone App – CheckDataStandaloneApp.exe *32Sage 50 Backup Standalone App – BackupStandaloneApp.exe *32

These services will restart automatically when your next scheduled backup runs.

Summary

  1. Stop the service on the server
  2. Check and stop any of the 3 backup manager process (i.e. checkDataStandaloneApp, BackupStanaloneApp and RestoreDataStandaloneApp)
  3. Restart the service

Uploading data window scrolling in continuous loop with message, “Processing, please wait…”

This can happen whether you have Sage Drive set up or not

*Please only follow this step if you’re not using Sage Drive*

You must follow the steps below on the computer where your data is held. If you’re using a networked version of Sage Accounts, all other users must log out of the data.

1>Press the Windows Key + R on your keyboard > enter Services.msc > OK. OR through Control panel> Administrative Tools>services

2> Scroll down find and stop the following services: Right-click the required service > Stop.

  • Sage 50 Accounts Control v23
  • Sage 50 Accounts Service v23

3> Press the Windows Key + R > browse to:

  • 32 bit operating system: C:\Program Files\Sage\AccountsServiceV23
  • 64 bit operating system: C:\Program Files (x86)\Sage\AccountsServiceV23

4> for each of the following files, right-click the file > Delete > Yes.

  • sqlite3
  • sqlite3-Shm
  • sqlite3-wal

5> Close the browser window and start the following services:

To start a service press the Windows Key + R on your keyboard > enter Services.msc > OK > right-click the required service > Start.

  • Sage 50 Accounts Control v23
  • Sage 50 Accounts Service v23

Summary

If NOT Using Sage drive

  1. Stop the services on the server
  2. Delete the sqlite3 files
  3. Restart service

Sage Drive Management Centre – Control who can access your company data

When you share your Sage 50 Accounts data in Sage Drive, you have complete control over who can access it and how. You can easily add and manage users within the Sage Drive Management Centre. (https://drive.sage.com/mc)

  1. Log in to Sage Accounts using the Manager Logon name, and related password if you’ve set one up.
  2. If the new user doesn’t already have their own Sage Accounts user name, create one now.
  3. On the menu bar, click File then click Manage Sage Drive.
  4. Enter your Sage ID email address and password then click Sign In.
  5. Click Add User  then enter the new user’s name and Sage ID email address.
  6. From the Access level drop-down, choose the access level for the new user:
Owner


Gives access to manage users in the Sage Drive Management Centre.

No remote access to your Sage Accounts data.

Owner and User Gives access to manage users in the Sage Drive Management Centre.

Gives remote access to your Sage Accounts data.

User Gives no access to manage users in the Sage Drive Management Centre.

Gives remote access to your Sage Accounts data.

Accountant To allow your accountant to remotely access your data, choose this option.

7.If you selected Owner, proceed to step 8. Otherwise select how the user can connect to your data:

User Allows the user to access the data from an installation of Sage 50 Accounts.
Mobile Sales Allows the user to access the data using the Sage 50 Accounts Mobile Sales app.
Tracker Allows the user to access the data using the Sage 50 Accounts Tracker app.
Accountant Allows your accountant to access the data using the Sage 50 Accounts Client Manager.


8. To save the settings, click Save.

9. Advise the new user what the encryption password is for your data. This is the password you used when you originally uploaded the data.

The new user receives an advising them how to connect to your company data. For the new user to connect to your data, they must install the same version of Sage Accounts that you have, or download the relevant business app. For your accountant to connect to your data, their Sage 50 Accounts Client Manager must be the same version as your Sage Accounts

To amend or remove a user’s access to your data, in the Management Centre on the right-hand side click By user, click the user name then click Edit user  or Delete user  as required.

Need more users? Upgrade to Sage 50cloud for 25 connected users or purchase additional users for your existing software

Sage Drive Issue – Waiting to Open Queue.dta

When using Sage Drive, when you open the software at either the main site or a secondary site, the following messages may appear:

  • ‘Waiting to open Queue.dta’
  • ‘Queue.dta is in use. Please wait until this file is available’
  • ‘The Sage ID user <<Sage ID email address>> on computer <<computer ID>> is currently processing at <<the main / a remote>> site.


To resolve this issue please click the appropriate options below:

Do you use Sage Drive? If Yes

Are all of your computers with a Sage installation running the latest build of your software version

If possible, restart the computer where your data is held.

If this isn’t possible, you must instead reset the Sage services and processes.

Reset the Sage services and processes

You must follow these steps on the computer or server where your Sage Accounts data is held. If using Sage Drive, you should carry these steps out at both the Sage Drive main site and remote site.

If you’re using a networked version of Sage Accounts, all other users must be logged out of the data.

  1. Close Sage Accounts.
  2. Hold down Ctrl + Shift + Esc to open the Windows Task Manager.
  3. Click the Processes
  4. Right-click the relevant process and click End Process then click End process.
Version Windows 7 and below Windows 8 and above
25 sg50svc_v25.exe *32

sg50CtrlSvc_v25.exe *32

Sage 50 Accounts Service v25

Sage 50 Accounts Control Service v25

24 sg50svc_v24.exe *32

sg50CtrlSvc_v22.exe *34

Sage 50 Accounts Service v24

Sage 50 Accounts Control Service v24

23 sg50svc_v23.exe *32

sg50CtrlSvc_v23.exe *32

Sage 50 Accounts Service v23

Sage 50 Accounts Control Service v23

22 sg50svc_v22.exe *32

sg50CtrlSvc_v22.exe *32

Sage 50 Accounts Service v22

Sage 50 Accounts Control Service v22

21 sg50svc.exe *32

sg50CtrlSvc.exe *32


Sage 50 Accounts Service

Sage 50 Accounts Control Service


5.In Task Manager click the Services

6.Right-click the relevant services and click Start Service.

v25 §  Sage 50 Accounts Service v25

§  Sage 50 Accounts Control Service v25

v24 §  Sage 50 Accounts Service v24

§  Sage 50 Accounts Control Service v24

v23 §  Sage 50 Accounts Service v23

§  Sage 50 Accounts Control Service v23

v22 §  Sage 50 Accounts Service v22

§  Sage 50 Accounts Control Service v22

v21 §  Sage 50 Accounts Service

§  Sage 50 Accounts Control Service

7.Close Task Manager window.

Stop the backup manager processes

  1. Hold down Ctrl + Shift + Esc to open the Windows Task Manager then click the Processes
  2. If listed, right-click the following processes and click Stop.
    • Sage 50 Check Data Standalone App – CheckDataStandaloneApp.exe *32
    • Sage 50 Backup Standalone App – BackupStandaloneApp.exe *32
    • Sage 50 Restore Standalone App – RestoreStandaloneApp.exe *32

These services will restart automatically when your next scheduled backup runs.

Delete the queue.dta if present in the data path  

Summary

If using Sage Drive, you should carry these steps out at both the Sage Drive main site and remote site.

  1. Stop the sage data service
  2. Check and stop any of the 3 backup manager process (i.e checkDataStandaloneApp, BackupStanaloneApp and RestoreDataStandaloneApp)
  3. Delete the queue.data in the data path on the server/Mainsite

Sage Drive Issue – ‘The Sage Drive Company you have selected is from version xx of Sage Accounts…’

When connecting to a Sage Drive company from Sage 50 Accounts on a remote site, the following message may appear:

‘The Sage Drive Company you have selected is from version [22/23/24/25] of Sage Accounts.
Please select a company in the list which is from version [25/26] of Sage Accounts.’

This occurs if you’re using Sage 50 Accounts v25 or above, but you try to connect to company data from an earlier version. To connect to data using Sage Drive, you must use the same Sage 50 Accounts version as the main site.

Before you can open the company, you must either:

  • Upgrade Sage 50 Accounts at the Sage Drive main site so it’s the same versions as the remote site:

Upgrade Sage 50 Accounts to v25 >
Upgrade Sage 50 Accounts to v26 >

  • Alternatively, install the correct lower version of Sage 50 Accounts on your computer.

Summary:

Everyone must be on same version

Sage Drive Overview

How Sage Drive for Sage 50 Accounts works

With Sage Drive you and your colleagues can access your live Sage Accounts data from remote locations using the Internet. You get the great features and reliability of your desktop software, plus the flexibility of sharing your data through the cloud.

Sage Drive is not a data backup service and should not be used as a replacement for your local computer network, you should still take regular backups of your data.

For Sage Drive to work smoothly a stable internet connection is required. Please make sure your internet connection at all sites meet the following recommended requirements:

  • Recommended download speed: 4Mbps or higher
  • Recommended upload speed: 2Mbps or higher

You can check the speed of your internet connection at various sites online, such as www.speedtest.net

Steps

1. Upload your data

The first step is to upload an encrypted copy of your Sage Accounts data to the Sage Drive cloud service.

This doesn’t move your existing Sage Accounts data. It’s still held on your computer or network, but any future changes you make to your data are also uploaded to the secure copy in the cloud.

2. Invite others to access your data

This is optional. If you have colleagues or an accountant that you want to allow to access your live data, you can invite them through the Sage Drive Management Centre.

3. Connect to your data from another location

You and any invited colleagues can now connect to your data via the Internet on any computer that has the same version of Sage Accounts installed. This gives you access to work on your data as though you were at your original data location.

4. Syncing data

As you and your colleagues work on your data, all changes are uploaded to the copy of your data in the cloud and then regularly downloaded to all other connected locations. This means you and your colleagues are always working on the latest version of your data.