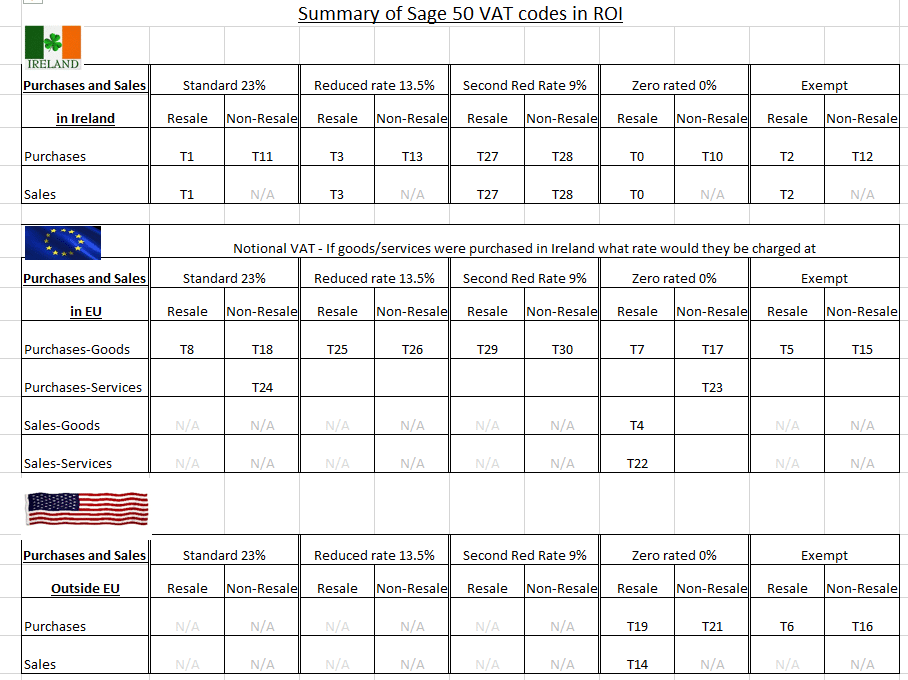
A question that can come into support related to bank reconciliation, is that balance on your last reconciled statement is different since you last reconciled.
When reconciling your bank, you are matching your entered transactions in Sage 50 to your physical printed bank statements. Sage handles these
matched transaction by flagging them in the background as being reconciled. It’s these matched transaction that make up your reconciled balance and it’s
this balance that can change. This occurs for a number of reasons such as a bank reconciled transaction is deleted or an in correct transaction was reconciled,
to a reconciled transaction becoming un reconciled.
Prior to version 25.1, you would only realise the difference when you go into your Bank Reconciliation screen and realise that the ‘Last Reconciled Balance’
is different to what you had originally reconciled. When this happened you would have to follow a lenghty process to identify what transaction was causing
the problem.
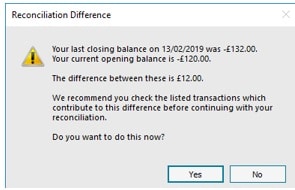
In version v25.1 when you go to enter in your new ‘Ending Balance’ and ‘Statement date’ on the Statement Summary screen’ on clicking ‘Ok’ if there is a
difference you will now get a new ‘Reconciliation Difference’ screen appearing letting you know of the difference.
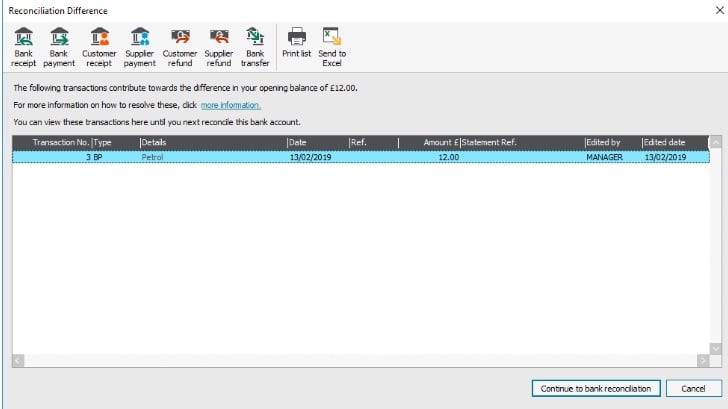
Click ‘Yes’ on the ‘Reconciliation Difference’ screen to view the transactions.
How to Correct the Difference
1) If the transaction was deleted.
How you proceed depends on what has happened to that transaction, if it was deleted you will need to re enter the transaction. To do this
you can use the buttons at the top of the ‘Reconciliation Difference’ screen, for example if you deleted a Bank Payment (BP) you will select
the icon for ‘Bank Payment’. Make sure that you enter in the exact details of the deleted transaction. Once you click ‘Save’ Sage will automatically match
this transaction on your reconciliation screen.
2) If the transaction had been un-reconciled.
If the transaction was un -reconciled, click ‘Continue to Bank Reconciliation’ button this will take you back to the Bank Reconciliation screen where you
can identify the transaction in the ‘Unmatched’ items list and select it as ‘Matched’ to be re reconciled.
3) If the Transaction was reconciled in error:
Make a note of the transaction number then click ‘Cancel’ on the ‘Reconciliation Difference’ screen. Select the ‘Transaction’ module and location the
transaction in question by looking for the transaction number in the ‘No’ column. Once you find it click on the ‘Edit’ button and untick the ‘Bank Rec.on’ tick box,
click ‘Save’, and select ‘Yes’ and ‘Yes’ again on the following screens. T
Once you have unticked your transaction as being unreconciled it will now appear on your bank ‘Reconciliation’ screen as being unmatched.
It is recommended that data backups are taken on a regular basis preferably last thing before you close your Sage 50 Accounts or first thing in the morning,
this is purely to ensure that your data is fully protected should anything happen. For disaster recovery, if your IT are not backing up your server then it’s
strongly advised that at least one of these backups are taken to an external device such as an external drive, Drop Box, One Drive or Google Drive etc.
Not only are daily backups recommended but Sage also recommends that backups are taken before running any large process for example:
Running your VAT return
Running your RTD
Bank Reconciliation
If you run supplier e-payments
Running your Year End
Importing into Sage 50
On your Backup screen you’ll have a number of options that you can include on your backup. If you have any custom layouts or reports, it’s highly recommended
that you take at least one backup of these layouts and reports without including your accounts data. That way should anything happen to your layouts or reports
you can easily restore your reports backup only without overwriting your accounts data.
At the time of the data backup it is recommended that you run a data check to ensure that the data you are backing up is healthy. If the data backup should
return any errors you should contact your support immediately.
This Pimbrook Article will guide you through the following:
Taking manual data backups and check data
Restoring backups
Taking manual data backups and check data
Log into your Sage 50 accounts and on the top left menu bar click on ‘File’ and select ‘Backup’ on the drop down menu
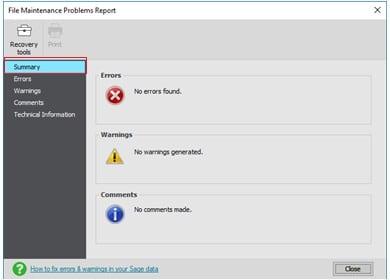
A ‘Confirm’ screen will open asking if you wish to check your data. Click ‘Yes’ on this screen for Sage 50 to run a health check on your data. Once completed
it should open another ‘Check Complete’ screen confirming that there are no problems to report on.
Click ‘OK’ on the ‘Check Complete’ screen and the ‘File Maintenance Problem Report’ Summary screen will open as seen in the diagram below. This screen
should list no errors or warnings,
If Errors are being reported
If the ‘Summary’ screen is reporting errors you will need to call your ‘Support’ team immediately. Errors can effect the performance of your data.
If Warnings are being reported.
If your data is reporting warnings they should be investigated. You can see the list of warnings being reported on in the tab ‘Warnings’ on the left hand panel.
Once you are satisfied that there are no errors and warnings have been investigated, you can click ‘Close’ on the ‘File Maintenance Problem Reporting’ screen
the ‘Backup’ screen will open automatically.
Important note: You can run separate Data Checks outside of the Backup process by selecting ‘File’ and ‘File Maintenance’ and on the ‘File Maintenance’ screen selecting ‘Data Check’.
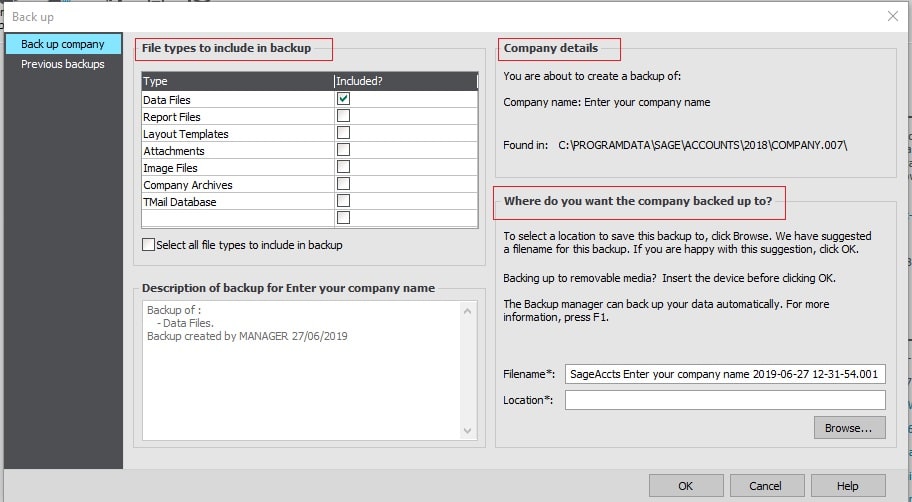
The manual backup screen
The manual backup process allows you to determine what your backing up and where your backing up to. On the ‘Back up’ screen there
are 2 tabs, ‘Back up Company’, ‘Previous backups’: (if your running Sage 50 v23 or below you will have an additional tab called Advanced options)
*The ‘Back up Company’ tab is divided into 3 sections: Company details: This is a summary of the name of the company you are about to backup and the location of where company data is stored. Where do you want the company backed up to? This section allows you to chose the location to backup to and the name of the file. File types to include in backups: In version 23 and below this is under the Advanced Options tab. This section allows you to select what you
want to backup, Data Files is your company data but if you wish to backup for an example your reports and layouts, untick the ‘Data Files’
and tick Reports Files and Layout templates. When you click ‘OK’ you will be taking a reports ony backup. This is handy should something happen to your
reports you can easily restore the Reports backup without effecting your data. Description of backup for Enter your company name: This is a description of what the backup file will include along with the Sage 50 Accounts user and date
Important note: if you are taking a reports only backup where the ‘Data Files’ type is unticked. Please remember on your next back to ensure that ‘Data Files’ are selected otherwise you will not be backing up your accounts data.
*Previous Backups’ tab lists all the manual backups that you’ve taken on your machine. You can remove old entries from your list
by selecting the Delete button.
Restoring backups
A data restore will overwrite your existing data and should only be done with caution. Before you run any restore we advise that you take a backup of
your data. To restore you a backup file you will need to:
Click on ‘File’ on the top menu bar and select ‘Restore’ from the drop down menu
Click the ‘Browse’ button to locate the backup that you wish to restore
Once you have selected the backup, check the details in the description box ‘Description of data to be restore for:’
Once you are happy that this is the correct backup to restore click on the ‘OK’ button for Sage to begin the restore process.
The Sage 50 Backup Manager in Sage Accounts v21 and above is an automatic backup tool that allows you to schedule automatic backups that will run
in the background whether you in Sage or not. You can schedule where the backup are to be taken to and how long these backups should for. This
document will explain how to setup the backup schedule and maintain it.
This backup manager also will give you an overview on the following:
The health of your data set
when the backups were taken
The number of users currently in Sage.
How to set up your Sage Backup schedule:
Long into Sage 50 as the Manager login and password
On the top menu bar click on ‘File’ and select Schedule Backups and click on the ‘Settings’ tab
Enter in your backup schedule settings:
Under the Panel ‘Backup Schedule’ you can select how often you want your backups to run and check data. This backup time is based on your server
clock and not the clock on your local PC.
Company Name: Click onto the tick boxes for the companies that you want included in the automatic backup. If you are using Sage 50 Cloud Accounts
you will need to backup your data to ‘Microsoft One Drive’, select the ‘OneDrive’ tick box for the required companies.
Sage 50c OneDrive email notification: This is only for Sage 50 Cloud accounts, if you set your backups to upload to Office 365 you can choose to receive
an email notification each time the backups have been taken. This email includes the status of the backup and whether there are any errors, warnings etc
on your data.
File type to include in the backup: You can chose the type of files to be includedin your backup. Your ‘Sage accounts’ will always be included as this is your data.
Backup Location: By default your backup files will be saved to the C:\SageBackups on the computer where your data is stored. If you data is on the server
then your backups will be saved to the server. From Sage Accounts v23 and above, you can also store your backups on any fixed drive on your server, and if
required you can specify a specific folder by clicking on the ‘Edit Folder’ button. If you’ve Google Drive, Microsoft OneDrive or DropBox, the relevant folders
appear in the drop-down for selection which will then sync to the cloud.
Server disk space limit: The automatic backups will create automatically as long as there is sufficient space on your server hard drive. By default the backup
manager will create backups as long as there is at least 20GB of space. However this disk space can be amended.
Once you have selected the appropriate settings click ‘Save’.
How to specify the number of backups to be held
To determine how long you want to keep the backups for on your system, click onto the tab ‘Backup Files’ and select from the drop down for ‘Automatically delete
backups files older than’ and select the appropriate time frame (Never delete, 1 day, 1 Week, 1 Month, 1 Year).
Please Note: that if you select ‘Never’ the backup manager will not manage the Sage Backups folder and will not delete older backup files which may
reduce the disk space on your server.
Once you have completed Backup Manager setup you should log into Sage each morning as the Manager user and view the Sage Backup schedule Overview tab,
this screen will show you the health of your data before the daily processing begins. This in turn will give you the confidence in knowing that you are working
on healthy data.
To view the Backup Manager Overview, click onto the File and select ‘Sage Backups Schedule’ and then select the tab ‘Overview’. On this you will have a panel
for each company that you’ve selected for backup and is reporting on the following:
It is reporting on each company that you have selected for backup
It is reporting on the number of users currently logged into Sage
It is reporting on the result of the data check and when the last backup was taken
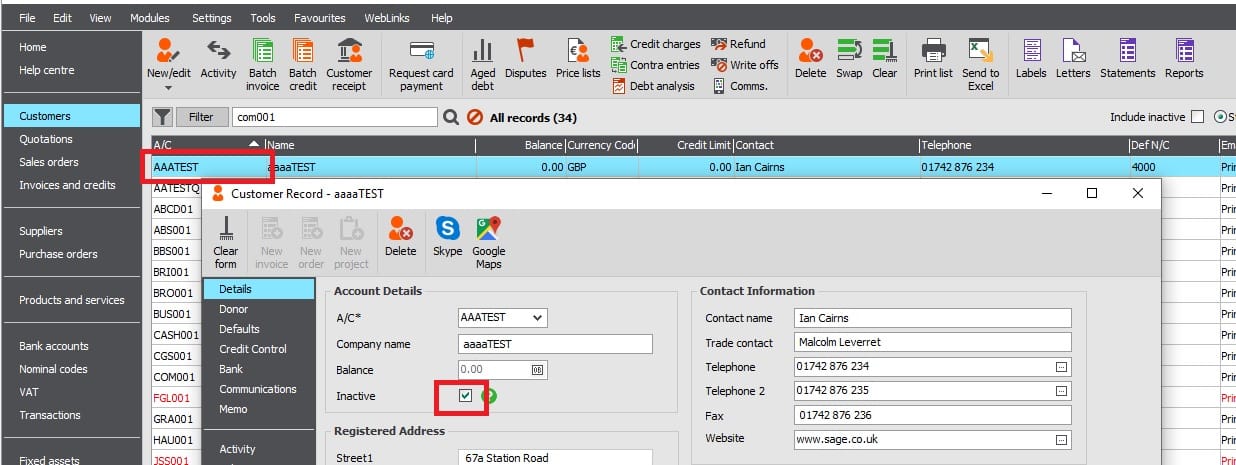
In order to keep your account records in Sage 50 tidy, Sage introduced an ‘Inactive’ flag allowing you to mark Customers/ Suppliers records and Product Codes that you no longer use as
‘Inactive’, if you are on the current version of Sage 50 (version 25) you can also mark Nominal Codes and Bank Accounts as ‘Inactive. This flag doesn’t delete your
records but instead allows you to filter out your unused or old records from your Sage 50 list view..
To flag an account as ‘Inactive’
Open the module that you wish to mark the record as inactive, if for example you wish to mark a customer as inactive then open up your ‘Customer’ module
Locate record and open it. If for example it is a customer, double click on the record in question or click on the ‘New/Edit’ icon on the top menu.
Place a tick in the ‘Inactive’ tick box, this will flag your record as being inactive. Click ‘Save’ to save your changes.
If there is a reason why you cannot mark your customer as inactive a message will appear on your screen.
Once you have marked you customer as inactive, you can simply use the filter tick box on the top right hand corner of your screen called ‘Include Inactive’. If you wish
to only view a list of your active customers then make sure that this tick box is unticked. If you whish to view all your customers including those marked as
inactive then click into the tick box for ‘Include Inactive’.
Sage 50 – How to post adjustments into a previous financial year
When you run your Year End in Sage 50, it will post journals to clear down your Profit and Loss totals to the ‘Retained Earnings’ balance sheet account.
In doing so it allows you to account for a new financial year on your Profit and Loss. However situations can arise where you may need to make
prior year adjustments. Any late adjustments should not be entered directly to Profit and Loss nominal code as it will result in a separate
‘Previous Year Adjustment’ value showing on your Balance Sheet. Also prior year adjustment will not be accounted for on your Profit and Loss
as you will have entered these after your Year End in Sage 50 was run. The steps below will expain how to make a prior year adjustment to your correct
balance sheet’Retained Earnings’ account.
Before making any adjustments in Sage 50 we first recommend that you take a data backup and print off your management reports, Trial Balance, Profit and Loss and Balance Sheet.
How to post Adjustments for a prior year
In the Nominal module click on ‘Journal Entry’ icon at the top of your screen.
Enter in a Reference and Date. We recommend that you use the last date of the previous Financial Year End.
Enter in the adjustments using the non-vatable tax code, by default this is normally T9 unless amended.
If posting a Profit and Loss adjustment, we advise that you post the values instead to your balance sheet ‘Retained Earnings’ account,
By default in Sage this nominal code 3200 unless amended. if you post only to your Profit and Loss it will not be accounted for on your management reports.
Once you have entered in your correct nominal codes, click ‘Save’ to post your adjustments.
How to identify your Retained Earnings Control account
If you are unsure of what your ‘Retained Earnings account is in Sage you can find this out by going to ‘Settings’ at the top of your Sage menu bar and clicking on
‘Control Accounts’ on the drop down list. What every nominal code is in your ‘Control Accounts’ for Retained Earnings is nominal code that Sage posted your
cleared Profit and Loss totals to.
One you have entered in your adjustments re print your management reports, you should now see that your prior year adjustment has been included in your
Retained Earnigns total on your Balance sheet report.
Important Note: Bad debt adjustments must not be posted as a journal to the debtors or creditors control accounts. Instead it should be written off in the correct
way either by manually raising a Credit Note or using the ‘Write of Wizard.
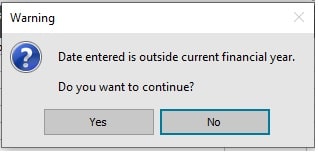
Sage 50 Date entered is outside current financial year
When entering transactions into Sage 50, users may from time to time see a warning stating that ‘the date entered is outside the current Financial Year’.
There are two reasons why this warning will appear
The entered date on the transaction is for a prior financial year. At a quick glance you can see your Financial Year Start at the
bottom right hand corner of you Sage 50 screen.
The entered date on the transaction is beyond the end date of your current financial year. This warning will be quite common
for Sage users when entering transactions for the new financial year but have not closed off the old financial year in Sage 50.
You can pause this message in Sage 50
Pausing the outside Financial Year message:
This is a setting that you can switch on for the Sage company that you are in. To switch this setting please follow the instructions below:
Click on the ‘Settings’ menu at the top of your Sage screen and click on ‘Company Preferences’ from the drop down box. On the Company
Preferences screen select the tab ‘Parameters’
On the ‘Parameters’ tab tick ‘Pause outside Financial Year Message’ check box and click ‘OK’.
Important note:, Please note that if you do need to enter a transaction for a prior year you will need to follow the prior your adjustment procedure.
As part of the Year End process your Profit and Loss is cleared down to your Balance Sheet ‘Retained Earnings’ account. If you enter a
transaction with a prior year date for a Profit and Loss nominal code it will not be account for on your Management Reports.
Please see our Knowledge Base Article 9860 for instructions in posting prior year transactions
Sage 50 Software closes when opening a Company or the Company can only be opened via Demo Data
Problem: When you choose a company from the list of companies in the Sage50 login screen, and then enter the username & password the splash screen appears & then disappears.
1. First try refreshing the license:
Rename C:\ProgramData\Sage\SDK Licence to ‘SDK License Old’
Rename C:\ProgramData\Sage\Accounts\2017\Sage.usr to Sage.usr.old
Try to open Sage50.
It should prompt you for your Serial Number & Activation Key this time, then Account Code. Enter these.
It should proceed to offer you the companies to open.
Try to open a company.
If you can successfully log in this time, try to log on to the company(s) a few times over to see if the problem is gone.
2. If the problem returns immediately, then try the following in addition:
Browse to C:\ProgramData\Sage\Accounts
Edit the SAGE.INI file with notepad.
Search for the word ‘analytics’
If Analytics is set to 0, change it to 1. Close and save the file.
Try to log on to Sage a few times over to see if the problem is gone this time.
If the Analytics setting worked then it may have been that someone accidentally caused this by turning off the analytics setting in Tools\Options\Analytics Tab inside Sage50. (Common in versions 23.2 and 24.1)
*The ‘2017’ location shown above is for demonstration purposes, use the year number of your own affected software.
This website uses cookies so that we can provide you with the best user experience possible. Cookie information is stored in your browser and performs functions such as recognising you when you return to our website and helping our team to understand which sections of the website you find most interesting and useful.
Strictly Necessary Cookies
Strictly Necessary Cookie should be enabled at all times so that we can save your preferences for cookie settings.
If you disable this cookie, we will not be able to save your preferences. This means that every time you visit this website you will need to enable or disable cookies again.
3rd Party Cookies
This website uses Google Analytics to collect anonymous information such as the number of visitors to the site, and the most popular pages.
Keeping this cookie enabled helps us to improve our website.
Please enable Strictly Necessary Cookies first so that we can save your preferences!