KB Category: Sage 50 Accounts

Sage 50 Accounts

Sage 50 – How to post adjustments into a previous financial year

Sage 50 – How to post adjustments into a previous financial year


When you run your Year End in Sage 50, it will post journals to clear down your Profit and Loss totals to the ‘Retained Earnings’ balance sheet account.
In doing so it allows you to account for a new financial year on your Profit and Loss.  However situations can arise where you may need to make
prior year adjustments.  Any late adjustments  should not be entered directly to Profit and Loss nominal code as it will result in a separate
‘Previous Year Adjustment’ value showing on your Balance Sheet.  Also prior year adjustment will not be accounted for on your Profit and Loss
as you will have entered these after your Year End in Sage 50 was run. The steps below will expain how to make a prior year adjustment to your correct
balance sheet’Retained Earnings’ account.


Before making any adjustments in Sage 50 we first recommend that you take a data backup and print off your management reports, Trial Balance, Profit and Loss and Balance Sheet.


How to post Adjustments for a prior year


  1.  In the Nominal module click on ‘Journal Entry’ icon at the top of your screen.
  2. Enter in a Reference and Date.  We recommend that you use the last date of the previous Financial Year End.
  3. Enter in the adjustments using the non-vatable tax code, by default this is normally T9 unless amended.
  4. If posting a Profit and Loss adjustment, we advise that you post the values instead to your balance sheet ‘Retained Earnings’ account,
    By default in Sage this nominal code 3200 unless amended.  if you post only to your Profit and Loss it will not be accounted for on your management reports.
  5. Once you have entered in your correct nominal codes, click ‘Save’ to post your adjustments.


How to identify your Retained Earnings Control account

If you are unsure of what your ‘Retained Earnings account is in Sage you can find this out by going to ‘Settings’ at the top of your Sage menu bar and clicking on
‘Control Accounts’ on the drop down list. What every nominal code is in your ‘Control Accounts’ for Retained Earnings is  nominal code that Sage posted your
cleared Profit and Loss totals to.

One you have entered in your adjustments re print your management reports, you should now see that your prior year adjustment has been included in your
Retained Earnigns total on your Balance sheet report.


Important Note:  Bad debt adjustments must not be posted as a journal to the debtors or creditors control accounts.  Instead it should be written off in the correct
way either by
manually raising a Credit Note or using the ‘Write of Wizard.


(SD)

Sage 50 Date entered is outside current financial year

Sage 50 Date entered is outside current financial year


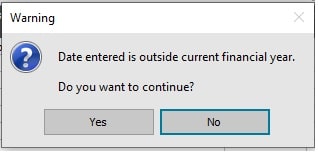
When entering transactions into Sage 50, users may from time to time see a warning stating that ‘the date entered is outside the current Financial Year’.

There are two reasons why this warning will appear

  1.  The entered date on the transaction is for a prior financial year.  At a quick glance you can see your Financial Year Start at the
    bottom right hand corner of you Sage 50 screen.
  2.   The entered date on the transaction is beyond the end date of your current financial year.  This warning will be quite common
    for Sage users when entering transactions for the new financial year but have not closed off the old financial year in Sage 50.

You can pause this message in Sage 50


Pausing the outside Financial Year message:

This is a setting that you can switch on for the Sage company that you are in.  To switch this setting please follow the instructions below:

  1.  Click on the ‘Settings’ menu at the top of your Sage screen and click on ‘Company Preferences’ from the drop down box.  On the Company
    Preferences screen select the tab ‘Parameters’
  2. On the ‘Parameters’  tab tick  ‘Pause outside Financial Year Message’ check box and click ‘OK’.


Important note:, Please note that if you do need to enter a transaction for a prior year you will need to follow the prior your adjustment procedure.
As part of the Year End process your Profit and Loss  is cleared down to your Balance Sheet ‘Retained Earnings’ account. If you enter a
transaction with a prior year date for a Profit and Loss nominal code it will not be account for on your Management Reports.
Please see our Knowledge Base Article 9860 for instructions in posting prior year transactions


(SD)

Sage 50 Software closes when opening a Company or the Company can only be opened via Demo Data

Sage 50 Software closes when opening a Company or the Company can only be opened via Demo Data


Problem: When you choose a company from the list of companies in the Sage50 login screen, and then enter the username & password the splash screen appears & then disappears.


1. First try refreshing the license:

  • Rename C:\ProgramData\Sage\SDK Licence to ‘SDK License Old’
  • Rename C:\ProgramData\Sage\Accounts\2017\Sage.usr to Sage.usr.old
  • Try to open Sage50.
  • It should prompt you for your Serial Number & Activation Key this time, then Account Code. Enter these.
  • It should proceed to offer you the companies to open.
  • Try to open a company.

If you can successfully log in this time, try to log on to the company(s) a few times over to see if the problem is gone.


2. If the problem returns immediately, then try the following in addition:

  • Browse to C:\ProgramData\Sage\Accounts
  • Edit the SAGE.INI file with notepad.
  • Search for the word ‘analytics’
  • If Analytics is set to 0, change it to 1. Close and save the file.

Try to log on to Sage a few times over to see if the problem is gone this time.

If the Analytics setting worked then it may have been that someone accidentally caused this by turning off the analytics setting in Tools\Options\Analytics Tab inside Sage50. (Common in versions 23.2 and 24.1)

*The ‘2017’ location shown above is for demonstration purposes, use the year number of your own affected software.


(JN)

Sage 50 – Audit Trail Import

Sage 50 – Audit Trail Import


To save time entering data into Sage Accounts, you can import data using either Comma Separated files (*.csv) or Microsoft Excel spreadsheets (*.xls and *.xlsx).

Transactions that can be imported include

  • BP – Bank payment.
  • BR – Bank receipt.
  • VP – Credit card payment.
  • VR – Credit card receipt.
  • CP – Cash payment.
  • CR – Cash receipt.
  • SI – Sales Invoice.(Batch)
  • SC – Sales Credit.
  • SA – Sales payment on account.
  • PA – Purchase payment on account.
  • SP – Sales payment.
  • PR – Purchase receipt.
  • PI – Purchase Invoice.(Batch)
  • PC – Purchase Credit.
  • JC – Journal credit.
  • JD – Journal debit.


Before importing into Sage Accounts, you need to prepare your data in a csv or excel formatted file. There are three ways to do this:

1. Use the file Import Templates (Recommended)

These are excel files that are formatted so they’re automatically recognised when importing. You can only import Microsoft Excel worksheets if you’ve a compatible version of Excel installed for the version of Sage Accounts you’re using

Excel files don’t need to be in any specific order as when you import the file you can choose which column you want to import into each field in Sage Accounts.

To help you, we’ve created some Excel templates you can use to enter the data you want to import. These templates are held in the Import Templates folder in the program directory: C:\Program Files\Sage\Accounts by default. To check your program directory:

Click Help and click About then find the Program Details section. Open the program directory and in there you find a folder called Import Templates and the Audit Trial Transaction Full Template is used to import transactions into Sage Account data

The templates include tips indicating the content that should be included in each column. Compulsory fields are highlighted in blue and optional fields are highlighted in yellow. As in the screen below



2. Export your data and re-Import the data

If you want to amend multiple fields in your records, in some modules you can export your current data, amend the required fields and then re-import the data


3. Comma-separated (*.csv) files

Comma-separated values (CSV) means that every item of data is separated by a comma, and each line of the file represents one record. For example, a typical customer record in CSV format would look like this: PIMBRK001.Pimbrook Software, Seapoint,Riverstown, Waterford,John Smith,051359900

The data for each field in your CSV file must be entered in an exact order for it to be accepted into Sage Accounts.

File format

Field Type Size Left Blank Format Excel Column Transaction CSV
Transaction Type Text 2 No This must be BP, BR, CP, CR, VP, VR, JC, JD, SI, SC, SA, SP, PI, PC, PA and PR. A CSV
Account

(Customer, Supplier or Bank Account Reference)

Text 8 Yes, but only for JC and JD transactions Account reference must already exist in your Sage Accounts data  B CSV
Nominal Code Text 8 No The nominal code must already exist in accounts data C CSV
Department Integral 3 Yes Must be a number between 0-999 with no decimal places D CSV
Date Date 10 Yes- the current program date is used This must be in format

DD/MM/YYYY

E CSV
Reference Text 30 Yes F CSV
Details Test 60 Yes G CSV
Net Decimal 11 No 8 digits + 2 decimal places. H CSV
T/C Tax Codes  Integral 3 Yes- Tax code T0 is used This must be between 0-99 I CSV
Tax Decimal 11 Yes, however, if left blank the transaction imports with a VAT value of 0.00. 8 digits + 2 decimal places J CSV
Exchange Rate Decimal 11 No. If importing Base currency transactions the exchange rate is 1. 8 digits + 2 decimal places K CSV
Ex.Ref Text 30 Yes L CSV
Username Text 32 Yes M CSV
Project Ref Text 12 Yes Up to 12 characters with no spaces. The project must already exist within the accounts data. N CSV
Cost Code Text 8 Yes Up to 8 characters. The cost code must already exist within the accounts data. O CSV


Import your data file


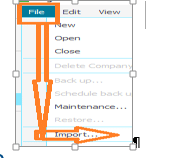
1. On the menu bar click File then click Import.
2.   If required, click Backup to back up your data, once complete, click Next.

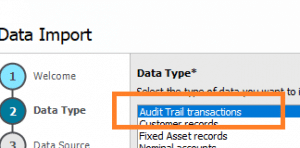
3.   In the Data type window, select the type of data you want to import then click Next
.

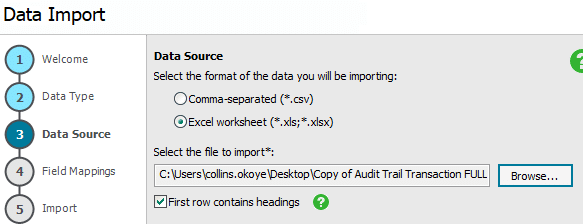
4. In the Data source window, select the format of the data you’re importing
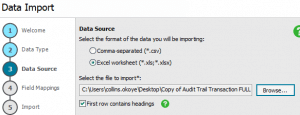
  

5. If the first row of your data contains headings, select the First row contains headings check box.

6. Click Browse and locate and select the file to import then click Open.

7. If your import file contains multiple worksheets, choose the required worksheet from the drop-down list.

8. Click Next. To link the imported data to the correct fields in Sage Accounts, complete the Imported Field column as required, choosing the relevant field from the drop-down list. Compulsory fields are marked with an asterisk, for these you must select an Imported Field.
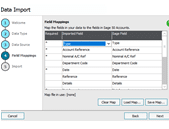
Note: If required, you can use the Load Map and Save Map options to import the default or previously saved mappings

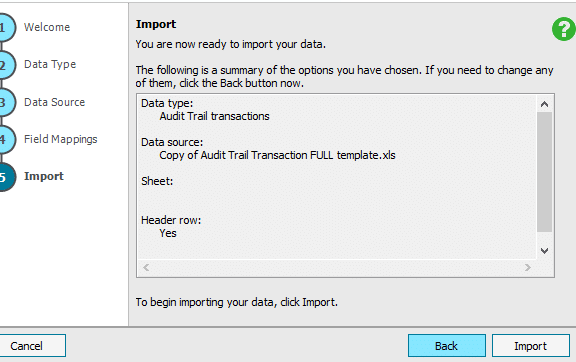
9. Once all of the required fields are mapped, click Next, check the summary information is correct, and then click Import or Finish.
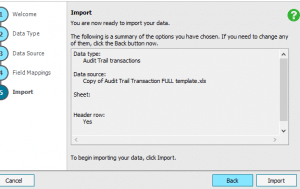
 

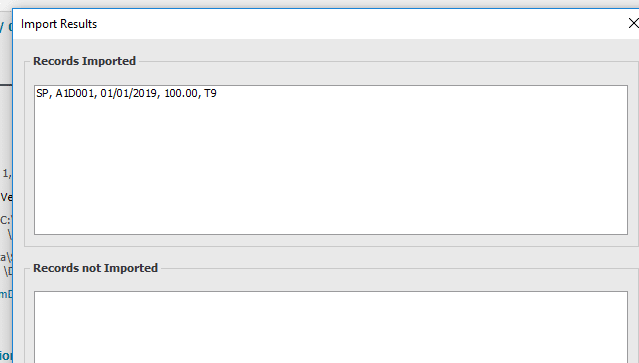
If the import is successful, a list of transactions imported appears in the Record Imported pane. Click Close.
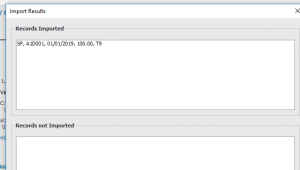


If the import is unsuccessful, a list of import errors appear in the Records not imported pane. Click Edit import to amend the original import file, click Close, and then attempt to import again


Exceptions

Not all transactions types can be imported into Sage Account

  • Charities – you can’t import a transaction with a fund reference. As a workaround, on all transactions except for journals, you can import the transaction and then add the fund reference in Corrections.
  • You can’t import the following foreign currency transaction types:

BP – Bank payment,BR – Bank receipt,VP – Credit card payment,VR – Credit card receipt,CP – Cash payment,

CR – Cash receipt,SR – Sales receipt,PP – Purchase payment,SA – Sales payment on account,PA – Purchase payment on account,SP – Sales payment,PR – Purchase receipt,SD – Sales discount,PD – Purchase discount,

JC – Journal credit,JD – Journal debit. They will have to be manually entered

However, you can import the following foreign currency transaction types:

  • SI – Sales invoice.
  • SC – Sales credit.
  • PI – Purchase invoice.
  • PC – Purchase credit.


Note

When you import transactions, each transaction imports as an individual header transaction – you can’t import a grouped transaction. This means that if you run grouped statements, every line of each invoice appears separately on the statement


Allocations

Because Sage Accounts can’t import transaction allocations, you can’t import transaction type’s sales receipt (SR), purchase payment (PP), sales discount (SD) and purchase discount (PD). As a workaround, you can change them to the following transaction types and allocate them manually or automatically using the allocation wizard


  • Sales receipt, SR – import as sales payment on account, SA.
  • Purchase payment, PP – import as purchase payment on account, PA.
  • Sale discount, SD – import as sales credit, SC.
  • Purchase Discount PD…import as purchase credit PC


Automatic allocation using the Wizard

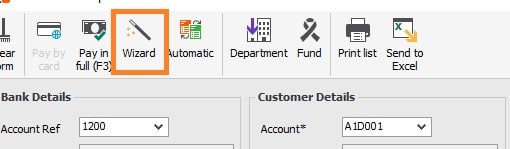
The wizard can be found within the Customer Receipt and Supplier payment window
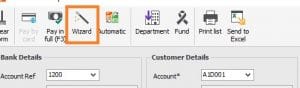
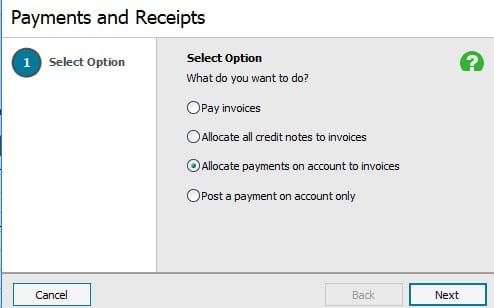
The wizard is typically used to pay invoices ,allocate Sales and purchase invoices, Credit notes and Payment on account
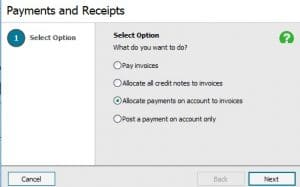
However it can also be used to allocated Sales Payment against Invoices, credit notes and payment on account


Sales Payment (SP)

Are created when you give a customer monetary refund and Purchase Receipt (PR) when a supplier gives you monetary refund

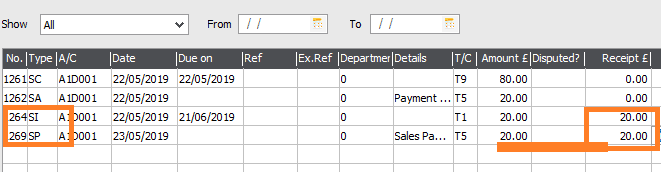
Once imported using the a CSV file or Excel import , you can use the wizard selecting either Pay invoices, Allocate credit notes or payment on account clicking next to see all transactions and then matching it against the imported sales payment .


Steps

1. Select Pay invoices
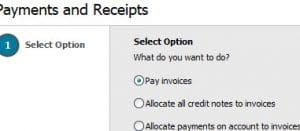
2.  Enter amount, account and date
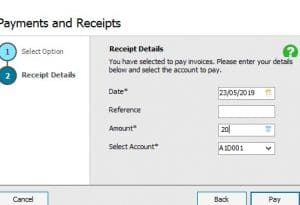
3. Make sure the amount is correct for both SP and SI
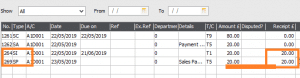


You can use  a 3rd party software to allocate payments as another option for allocating payments.  For details on how to use this click here.


How to setup e-Banking and e-Payments in Sage 50

How to setup e-Banking and e-Payments in Sage 50


If you use a compatible banking software or a compatible banking website, you can use Sage e-Banking to connect to your banking software for the purpose of
e-Payments and e-Reconciliations.

This document will explain the steps in order for you to setup e-banking in Sage50  v21(2015) and above.  If you are unsure if your banking software is compatible with Sage, please click here to view a list of compatible banks and their e-banking components.  You may need to check with your Bank what component to use.  You will also need to request an
OIN number from your bank.


Step 1 Enable e-banking

Before you can start using Sage e-banking you must first enable this feature in ‘Settings’ > ‘Bank Defaults’ and click on the ‘Enable e-banking’ tick box then select
‘OK’ to save your settings.


Step 2 Enter you bank details

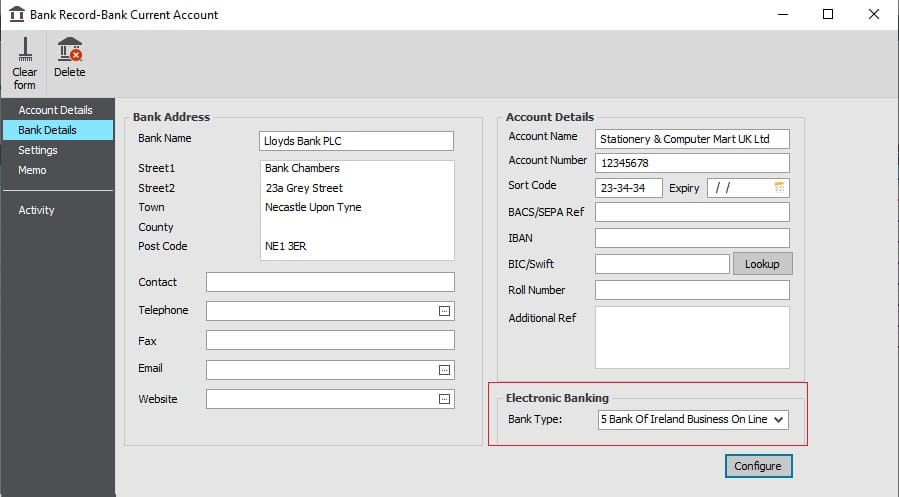
In your Bank Account module click ‘New/Edit’ on the bank account that you want to setup for e-banking, this will open up the Bank Record.  Click onto ‘Bank Details’ tab and complete the following:

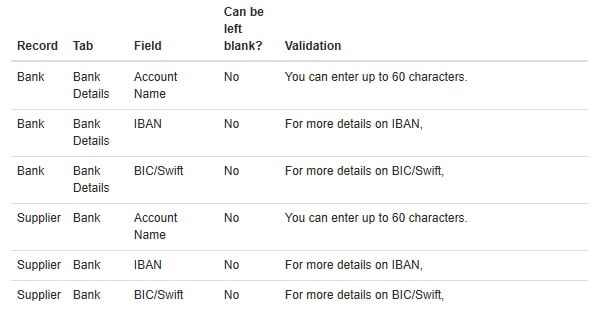
Bank Name:    This is the name of your bank and can be up to 60 characters long.  This must be entered for e-banking.
Address:    You can enter your address on each line up to 60 characters per line.
Account Name:   The name of your bank account.  This must be entered for e-banking.
Account Number:    This is your bank account number.  This is usually 8 digits long but you can enter up to 60 characters.  This must be entered for e-banking
Sort Code:    This is your 6 digit sort code number and must be entered for e-banking.
Expiry date:    If you account is a credit card you must enter your credit card expiry date.
BACS/SEPA ref:    Enter in your reference number.  This reference identifies the payer and must be entered for e-banking.
IBAN:   Enter in your bank account IBAN number.  This must be entered for e-banking.
BIC/Swift:    Enter in your bank accounts BIC/Swift number.  This must be entered for e-banking
Roll number:    If your building society notifies you of a ‘Roll Number’ for this account enter it here.  This is an additional reference that some building societies use.
Additional Ref:    You can use this box to enter any additional information you receive relating to your bank account.  You can enter any text up to 3 lines and 60
characters.


Step 3 Download and run the correct banking plugin for Sage 50

Before you can start using e-banking you will need let Sage know what Bank Type you are using.   This Bank Type is a plugin that is used to connect your Sage 50 to
your banking software.  Depending on your banking software you can download the relevant banking plugin here.  If you are unsure of what plugin to use please
contact your bank. To download and run the latest Sage e-Banking plugin, please follow the instructions below.

1  Select the correct banking plugin for your e-Banking software.
2  You may have a pop up screen asking you to Save or Run this file.  Click ‘Run’.  If you only have a ‘Save’ option, click ‘Save’ and locate the plugin in your ‘Downloads’ folder.
3  When the installation is completed click ‘Finish’, the Sage plugin for your Bank Type as been completed.


Step 4 To configure your Sage 50 Bank Account

Once you have run the Sage e-banking plugin, you are now ready  to configure your Sage bank account for e-banking.  Log back into Sage and go to your Bank
Account module select the bank that you are  going to use for e-banking and click ‘New/Edit’ to open your Bank Record.  Click on the Bank Details tab and
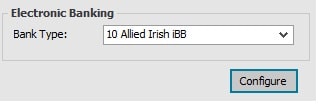
under the section called ‘Electronic Banking’, select the drop down for the ‘Bank Type’  and locate your Bank Type, this is the Banking plugin that you just installed.


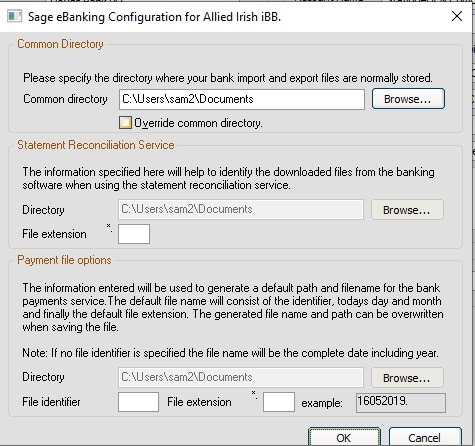
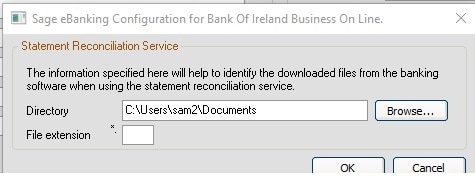
Once you have selected the Bank Type click on the ‘Configure’ button, The information required to configure the e-Banking option depends on the bank type you
choose from the drop down list.  Some of the following options may not be available depending on which banking component you selected.

Common Directory
Common Directory:   This is the directory where the e-payment files and e-Reconcile statements will save to.  You can amend this location by clicking on the ‘Browse’ button.
Override Common:    If you want to use the same directory for e-Payment files and e-Reconcile statements, click on this box.  If you click this box you must
complete the ‘Statement Reconciliation Service’ section and enter in the Directory.
Statement Reconciliation (used for e-Reconciliation only)
Directory:   This is the directory where the statement files from you banking software are saved to before you import into your e-Reconciliation.
File Extension:   You can enter the file extension your banking software saves the statement files in, for example .txt.  This ensure  only that extension appears in the import  Window.
Payment File Options (used for e-Payments only)
Directory:  This is the location that your e-payment file will be saved to.  You can amend this location by clicking on Browse.
File Identifier:   If you don’t enter a file identifier then the file name of your e-payment file will be DDMMYYYY, the date, month and year the file was saved.
File Extension: is the extension of the file.

Once you have configured you Sage e-banking.  click ‘Save’ on the e-banking configuration screen and then on your Sage Bank Record.  You have now successfully setup your Bank account for e-Banking.  If you are using e-Banking to pay your suppliers, you will need to follow the addition step below to ensure that your suppliers are setup correctly.


Step 5 Setting up your Suppliers for e-Payments

If you are just setting up e-banking in order to run e-Reconciliations, you can just run step 1-4, step 5 is the final setup for e-payments setup.

In order to ensure that your supplier payments are captured on your e-Payment file, there are a few additional amendments that you will need to make to your
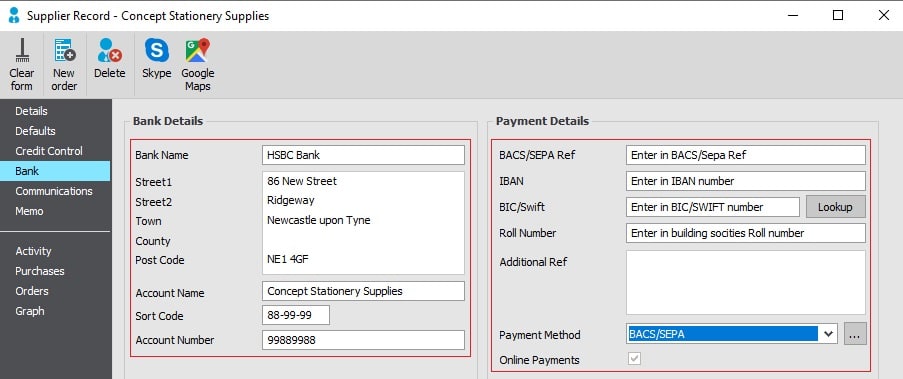
supplier records. Select a supplier that has opted for e-Payments and open their record.  Click onto the ‘Banking’ tab and complete the Supplier Banking Details as follows:

Bank Details section
Bank Name:  This is your suppliers Bank Name.
Address:  This is your suppliers Bank Address.
Account Name:  This is your suppliers bank account name.
Sort Code:  Enter in your suppliers Banks sort code, this is an 6 digit number
Account Number:  This is your suppliers Bank Account number.  This is usually 8 digits long
Payment Details section
BACS/SEPA Ref: Enter in your suppliers BACS reference number
IBAN:  Enter in your suppliers IBAN number
BICS/Swift:  This is your suppliers BICS/Swift number and is used to identify bank.
Roll number:  This is an additional number that your Building Society may provide.
Additional Ref:  Use this box to enter in any additional information that your bank gives you.  You can enter in 3 lines of text up to 60 characters.
Payment Method:  Sage comes with several payment methods for e-Payment you must select ‘BACS’s from the drop down list.
Online Payments:  Ensure that this section is ticked for e-Payments.

Please note that you will need to complete the bank details as mentioned above for each supplier that opted for e-Payment.  Once done your e-Payment setup has been completed.
Your OIN number will be entered on the ‘SEPA Processing Details’ screen when you go to generate your first e-payment file.


How to process e-Payments in Sage 50

How to process e-Payments in Sage 50


When you have correctly configured your bank and suppliers for e-Payments you are ready to generate your first bank file.  Your e-payment is generate in sage
through the ‘Supplier Payment’ option in either the Bank Account and Supplier module.

This document will explain how to generate your e-Payment file and what to do if you get any errors along with the e-Payment file formats.  Please note you can’t
generate and e-Payment file with foreign currency suppliers, nor can you generate an e-Payment file from payments  entered in the ‘Batch Supplier Payment’
and ‘Batch Invoice’ windows screens.

Create your supplier payment

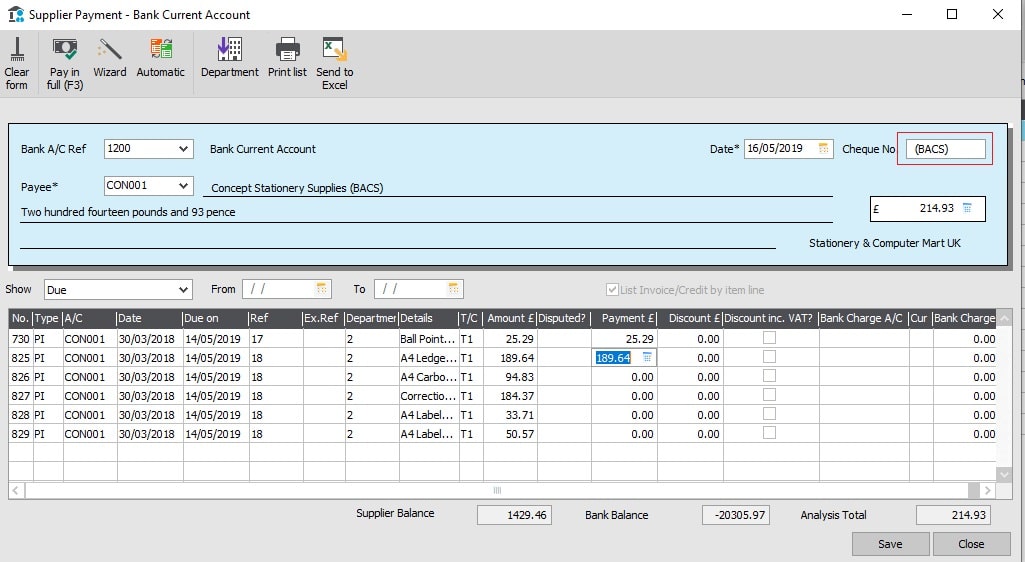
Generate your supplier payment from the ‘Supplier Payment’ screen,  this can be access from either your Supplier module or Bank Account Module.  When
you have selected a supplier that has been configured for e-payment, the word ‘(BAS)’ will appear in the ‘Cheque No.’ box.  This is a quick way to identify e-payment suppliers.

When you have made your payments click ‘Save’.

Note: Before making generating your e-payments file, it is advised to take a Sage backup.  This is because once the payment file has been created Sage flags these e-Payments
as been processed.  If a mistake has been you can either restore the data back or delete all the payments in Sage that were on the e-payment file and re enter them.

Create your e-Payment bank file

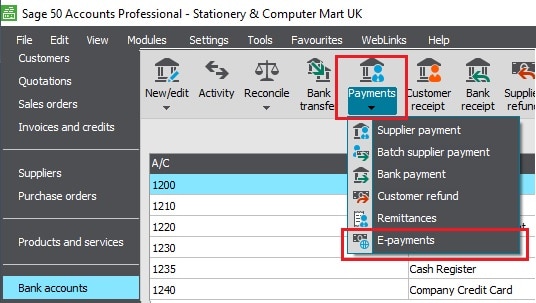
The e-Payment bank file is generated in the Bank Account module in Sage 50.  Select the bank that has been configured for e-Banking and click on ‘Payments’ and
E-payments’.


This will open up the Send Payment screen listing all your e-payments made in Sage.

To generate and e-payment file, select the payments from the list that you want to include on your payment file to the bank.  You can print or send this list to excel if
you need to get authorisation on what payments to included.  When you know what payments you are including select them from the list and click ‘Send’.

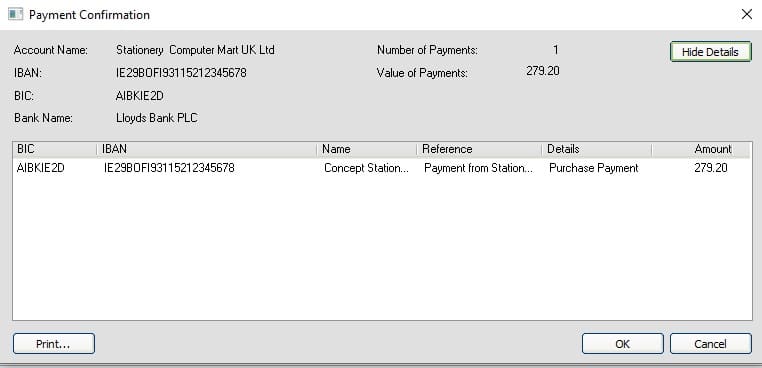
A ‘Payment Confirmation’ screen will open summarising your bank details and the number of payments on file along with the total payment value.  If you click the
‘Show Details’ button, you can view all your payments that will be included to which you can print by selecting the ‘Print’ button.

Click ‘OK’ and the Process details screen will open.  This holds your OIN number and the location to where you are saving the e-payment file to along with the
Requested Date.  Once you click ‘OK’ the e-payment file has been created and is stored in the locations that you setup in the e-payment configuration.

Payment Error

If you receive and error when creating the payment file, click ‘Yes’ to view the payment error log.  This log will provide you with more information in order
to determine what’s wrong with the file.  The error log is saved within your ACCDATA folder and the file name consists of the sort ode and account number for the
bank that you were sending the e-payment file from.

Errors occur if there is incorrect information in Sage 50.  The following information is included in the e-payment file so you will need to check that
your suppliers and bank account are setup correctly.

How to allocate a payment on account to an invoice


How to allocate a payment on account to an invoice


If you have entered both a payment on account and an invoice into Sage, you can use the allocation process to
marks the payment on account as being paid to that invoice at a later stage..

To allocate a supplier payment on account to a invoice.

In the supplier activity screen we can see both the Purchase Invoice ‘PI’ and the Payment on Account ‘PA’ marked as outstanding, this is because the transactions have only been entered and have not yet allocated to each other.


You can allocate payments to invoices by selecting the ‘Supplier Payment’ icon in the Supplier module or the Bank Account module.  On the Supplier Payment screen select your suppler and your correct bank account, a list of un allocated transactions will be listed for that supplier.   To allocate a payment to an invoice, on the ‘PA’ a line which is the payment on account, click into the ‘Payment’ box and  select the icon ‘Pay in Full’ to mark the payment as full allocated.  On the ‘PI’ purchase invoice line click into the ‘Payment’ box and click the ‘Pay in Full’ icon to make that Invoice as fully allocated.


Once you click ‘Save’, you have allocate your payment to that particular invoice.  This marks your invoice as paid on your suppliers ‘Activity’ screen, the ‘O/S'(outstanding) column is now blank and the spilt screen below shows the Purchase Invoice being allocated to that Payment on Account.


To allocate a customer payment on account to a invoice.

In the customer activity screen we can see both the Sales Invoice ‘SI’ and the Payment on Account ‘SA’ marked as outstanding, this is because we have not yet allocated the payment to that invoice.


You can allocate payments to invoices by selecting the ‘Customer Receipt’ icon in the Customer module or the Bank Account module.  On the Customer Receipt screen select your customer and bank account, a list of un allocated transactions will be listed for that customer.   To allocate a payment on account to an invoice, on the ‘SA’ sales payment on account line click into the ‘Receipt’ box and  select the icon ‘Pay in Full’ to mark the payment as full allocated.  On the ‘SI’ sales invoice line click into the ‘Receipt’ box and click the ‘Pay in Full’ icon to make that Invoice as fully allocated.


Click ‘Save’ to save your allocations marking your payment paid to that invoice.  This can be seen on the customers ‘Activity’ where your ‘SA’ sales payment on account and ‘SI’ sales invoice are no longer outstanding and are allocated to each other.


E-Banking ‘Unknown bank specified’ or ‘No banking component defined for this account’ in Sage 50 Accounts

E-Banking ‘Unknown bank specified’ or ‘No banking component defined for this account’ in Sage 50 Accounts


When you select E-payments or E-reconciliation one of the following errors may appear if  your E-Banking hasn’t been setup correctly:

  • Unknown bank specified
  • No banking component defined for this account.

To use this feature you must select the correct Electronic Banking ‘Bank Type’ on the required bank account.


To do this::

Open up your Bank Account module, this will list all your bank accounts on the main screen.  Double click on the correct bank account
to open the Bank Record.  On the Bank Record window select the Bank Details tab.

Under the heading ‘Electronic Banking’ click on the drop down and select your correct Bank type.
If your bank type is not listed you will need to close Sage and download the correct banking plug-in
from the Sage Website here.


If you are generating an E-payments file, Sage by default will save your payment file to ‘Documents’ folder on your
PC.

This can be amended by selecting the ‘Configure’ button on the Bank Record and Bank Details tab and browse to the location where you want
your payment files saved to.  Click ‘OK’ on the ‘Sage eBanking Configuraiton’ window and then click Save on your Bank Record for the changes to
to be applied.