• Transition from TASBooks to Sage 50
    Easy with the Right Partner and Remarkably Beneficial
  • Transition from TASBooks to Sage 50

KB Category: Sage 50 Accounts

Sage 50 Accounts

Sage 50 – Audit Trail Import

Sage 50 – Audit Trail Import


To save time entering data into Sage Accounts, you can import data using either Comma Separated files (*.csv) or Microsoft Excel spreadsheets (*.xls and *.xlsx).

Transactions that can be imported include

  • BP – Bank payment.
  • BR – Bank receipt.
  • VP – Credit card payment.
  • VR – Credit card receipt.
  • CP – Cash payment.
  • CR – Cash receipt.
  • SI – Sales Invoice.(Batch)
  • SC – Sales Credit.
  • SA – Sales payment on account.
  • PA – Purchase payment on account.
  • SP – Sales payment.
  • PR – Purchase receipt.
  • PI – Purchase Invoice.(Batch)
  • PC – Purchase Credit.
  • JC – Journal credit.
  • JD – Journal debit.


Before importing into Sage Accounts, you need to prepare your data in a csv or excel formatted file. There are three ways to do this:

1. Use the file Import Templates (Recommended)

These are excel files that are formatted so they’re automatically recognised when importing. You can only import Microsoft Excel worksheets if you’ve a compatible version of Excel installed for the version of Sage Accounts you’re using

Excel files don’t need to be in any specific order as when you import the file you can choose which column you want to import into each field in Sage Accounts.

To help you, we’ve created some Excel templates you can use to enter the data you want to import. These templates are held in the Import Templates folder in the program directory: C:\Program Files\Sage\Accounts by default. To check your program directory:

Click Help and click About then find the Program Details section. Open the program directory and in there you find a folder called Import Templates and the Audit Trial Transaction Full Template is used to import transactions into Sage Account data

The templates include tips indicating the content that should be included in each column. Compulsory fields are highlighted in blue and optional fields are highlighted in yellow. As in the screen below


2. Export your data and re-Import the data

If you want to amend multiple fields in your records, in some modules you can export your current data, amend the required fields and then re-import the data


3. Comma-separated (*.csv) files

Comma-separated values (CSV) means that every item of data is separated by a comma, and each line of the file represents one record. For example, a typical customer record in CSV format would look like this: PIMBRK001.Pimbrook Software, Seapoint,Riverstown, Waterford,John Smith,051359900

The data for each field in your CSV file must be entered in an exact order for it to be accepted into Sage Accounts.

File format

Field Type Size Left Blank Format Excel Column Transaction CSV
Transaction Type Text 2 No This must be BP, BR, CP, CR, VP, VR, JC, JD, SI, SC, SA, SP, PI, PC, PA and PR. A CSV
Account

(Customer, Supplier or Bank Account Reference)

Text 8 Yes, but only for JC and JD transactions Account reference must already exist in your Sage Accounts data  B CSV
Nominal Code Text 8 No The nominal code must already exist in accounts data C CSV
Department Integral 3 Yes Must be a number between 0-999 with no decimal places D CSV
Date Date 10 Yes- the current program date is used This must be in format

DD/MM/YYYY

E CSV
Reference Text 30 Yes F CSV
Details Test 60 Yes G CSV
Net Decimal 11 No 8 digits + 2 decimal places. H CSV
T/C Tax Codes  Integral 3 Yes- Tax code T0 is used This must be between 0-99 I CSV
Tax Decimal 11 Yes, however, if left blank the transaction imports with a VAT value of 0.00. 8 digits + 2 decimal places J CSV
Exchange Rate Decimal 11 No. If importing Base currency transactions the exchange rate is 1. 8 digits + 2 decimal places K CSV
Ex.Ref Text 30 Yes L CSV
Username Text 32 Yes M CSV
Project Ref Text 12 Yes Up to 12 characters with no spaces. The project must already exist within the accounts data. N CSV
Cost Code Text 8 Yes Up to 8 characters. The cost code must already exist within the accounts data. O CSV


Import your data file


1. On the menu bar click File then click Import.

2.   If required, click Backup to back up your data, once complete, click Next.

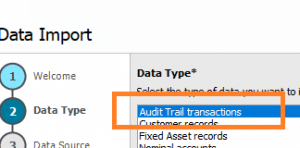
3.   In the Data type window, select the type of data you want to import then click Next

.

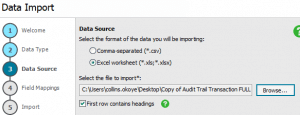
4. In the Data source window, select the format of the data you’re importing


5. If the first row of your data contains headings, select the First row contains headings check box.

6. Click Browse and locate and select the file to import then click Open.

7. If your import file contains multiple worksheets, choose the required worksheet from the drop-down list.

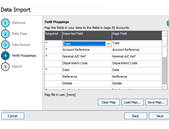
8. Click Next. To link the imported data to the correct fields in Sage Accounts, complete the Imported Field column as required, choosing the relevant field from the drop-down list. Compulsory fields are marked with an asterisk, for these you must select an Imported Field.

Note: If required, you can use the Load Map and Save Map options to import the default or previously saved mappings

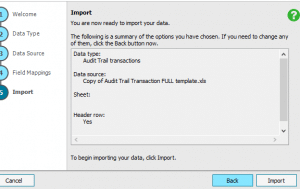
9. Once all of the required fields are mapped, click Next, check the summary information is correct, and then click Import or Finish.


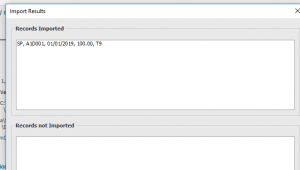
If the import is successful, a list of transactions imported appears in the Record Imported pane. Click Close.


If the import is unsuccessful, a list of import errors appear in the Records not imported pane. Click Edit import to amend the original import file, click Close, and then attempt to import again


Exceptions

Not all transactions types can be imported into Sage Account

  • Charities – you can’t import a transaction with a fund reference. As a workaround, on all transactions except for journals, you can import the transaction and then add the fund reference in Corrections.
  • You can’t import the following foreign currency transaction types:

BP – Bank payment,BR – Bank receipt,VP – Credit card payment,VR – Credit card receipt,CP – Cash payment,

CR – Cash receipt,SR – Sales receipt,PP – Purchase payment,SA – Sales payment on account,PA – Purchase payment on account,SP – Sales payment,PR – Purchase receipt,SD – Sales discount,PD – Purchase discount,

JC – Journal credit,JD – Journal debit. They will have to be manually entered

However, you can import the following foreign currency transaction types:

  • SI – Sales invoice.
  • SC – Sales credit.
  • PI – Purchase invoice.
  • PC – Purchase credit.


Note

When you import transactions, each transaction imports as an individual header transaction – you can’t import a grouped transaction. This means that if you run grouped statements, every line of each invoice appears separately on the statement


Allocations

Because Sage Accounts can’t import transaction allocations, you can’t import transaction type’s sales receipt (SR), purchase payment (PP), sales discount (SD) and purchase discount (PD). As a workaround, you can change them to the following transaction types and allocate them manually or automatically using the allocation wizard


  • Sales receipt, SR – import as sales payment on account, SA.
  • Purchase payment, PP – import as purchase payment on account, PA.
  • Sale discount, SD – import as sales credit, SC.
  • Purchase Discount PD…import as purchase credit PC


Automatic allocation using the Wizard

The wizard can be found within the Customer Receipt and Supplier payment window

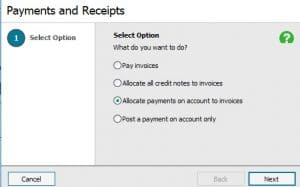
The wizard is typically used to pay invoices ,allocate Sales and purchase invoices, Credit notes and Payment on account

However it can also be used to allocated Sales Payment against Invoices, credit notes and payment on account


Sales Payment (SP)

Are created when you give a customer monetary refund and Purchase Receipt (PR) when a supplier gives you monetary refund

Once imported using the a CSV file or Excel import , you can use the wizard selecting either Pay invoices, Allocate credit notes or payment on account clicking next to see all transactions and then matching it against the imported sales payment .


Steps

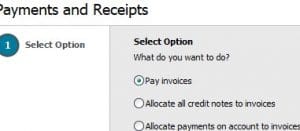
1. Select Pay invoices

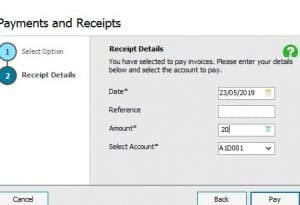
2.  Enter amount, account and date

3. Make sure the amount is correct for both SP and SI


You can use  a 3rd party software to allocate payments as another option for allocating payments.  For details on how to use this click here.


How to setup e-Banking and e-Payments in Sage 50

How to setup e-Banking and e-Payments in Sage 50


If you use a compatible banking software or a compatible banking website, you can use Sage e-Banking to connect to your banking software for the purpose of
e-Payments and e-Reconciliations.

This document will explain the steps in order for you to setup e-banking in Sage50  v21(2015) and above.  If you are unsure if your banking software is compatible with Sage, please click here to view a list of compatible banks and their e-banking components.  You may need to check with your Bank what component to use.  You will also need to request an
OIN number from your bank.


Step 1 Enable e-banking

Before you can start using Sage e-banking you must first enable this feature in ‘Settings’ > ‘Bank Defaults’ and click on the ‘Enable e-banking’ tick box then select
‘OK’ to save your settings.


Step 2 Enter you bank details

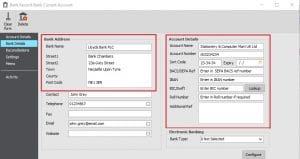
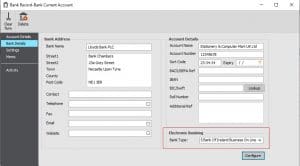
In your Bank Account module click ‘New/Edit’ on the bank account that you want to setup for e-banking, this will open up the Bank Record.  Click onto ‘Bank Details’ tab and complete the following:

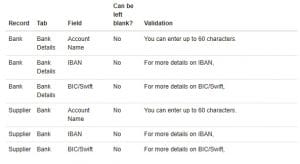
Bank Name:    This is the name of your bank and can be up to 60 characters long.  This must be entered for e-banking.
Address:    You can enter your address on each line up to 60 characters per line.
Account Name:   The name of your bank account.  This must be entered for e-banking.
Account Number:    This is your bank account number.  This is usually 8 digits long but you can enter up to 60 characters.  This must be entered for e-banking
Sort Code:    This is your 6 digit sort code number and must be entered for e-banking.
Expiry date:    If you account is a credit card you must enter your credit card expiry date.
BACS/SEPA ref:    Enter in your reference number.  This reference identifies the payer and must be entered for e-banking.
IBAN:   Enter in your bank account IBAN number.  This must be entered for e-banking.
BIC/Swift:    Enter in your bank accounts BIC/Swift number.  This must be entered for e-banking
Roll number:    If your building society notifies you of a ‘Roll Number’ for this account enter it here.  This is an additional reference that some building societies use.
Additional Ref:    You can use this box to enter any additional information you receive relating to your bank account.  You can enter any text up to 3 lines and 60
characters.


Step 3 Download and run the correct banking plugin for Sage 50

Before you can start using e-banking you will need let Sage know what Bank Type you are using.   This Bank Type is a plugin that is used to connect your Sage 50 to
your banking software.  Depending on your banking software you can download the relevant banking plugin here.  If you are unsure of what plugin to use please
contact your bank. To download and run the latest Sage e-Banking plugin, please follow the instructions below.

1  Select the correct banking plugin for your e-Banking software.
2  You may have a pop up screen asking you to Save or Run this file.  Click ‘Run’.  If you only have a ‘Save’ option, click ‘Save’ and locate the plugin in your ‘Downloads’ folder.
3  When the installation is completed click ‘Finish’, the Sage plugin for your Bank Type as been completed.


Step 4 To configure your Sage 50 Bank Account

Once you have run the Sage e-banking plugin, you are now ready  to configure your Sage bank account for e-banking.  Log back into Sage and go to your Bank
Account module select the bank that you are  going to use for e-banking and click ‘New/Edit’ to open your Bank Record.  Click on the Bank Details tab and
under the section called ‘Electronic Banking’, select the drop down for the ‘Bank Type’  and locate your Bank Type, this is the Banking plugin that you just installed.


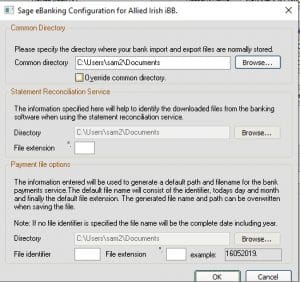
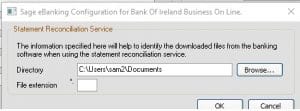
Once you have selected the Bank Type click on the ‘Configure’ button, The information required to configure the e-Banking option depends on the bank type you
choose from the drop down list.  Some of the following options may not be available depending on which banking component you selected.

Common Directory
Common Directory:   This is the directory where the e-payment files and e-Reconcile statements will save to.  You can amend this location by clicking on the ‘Browse’ button.
Override Common:    If you want to use the same directory for e-Payment files and e-Reconcile statements, click on this box.  If you click this box you must
complete the ‘Statement Reconciliation Service’ section and enter in the Directory.
Statement Reconciliation (used for e-Reconciliation only)
Directory:   This is the directory where the statement files from you banking software are saved to before you import into your e-Reconciliation.
File Extension:   You can enter the file extension your banking software saves the statement files in, for example .txt.  This ensure  only that extension appears in the import  Window.
Payment File Options (used for e-Payments only)
Directory:  This is the location that your e-payment file will be saved to.  You can amend this location by clicking on Browse.
File Identifier:   If you don’t enter a file identifier then the file name of your e-payment file will be DDMMYYYY, the date, month and year the file was saved.
File Extension: is the extension of the file.

Once you have configured you Sage e-banking.  click ‘Save’ on the e-banking configuration screen and then on your Sage Bank Record.  You have now successfully setup your Bank account for e-Banking.  If you are using e-Banking to pay your suppliers, you will need to follow the addition step below to ensure that your suppliers are setup correctly.


Step 5 Setting up your Suppliers for e-Payments

If you are just setting up e-banking in order to run e-Reconciliations, you can just run step 1-4, step 5 is the final setup for e-payments setup.

In order to ensure that your supplier payments are captured on your e-Payment file, there are a few additional amendments that you will need to make to your
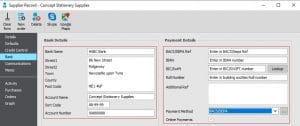
supplier records. Select a supplier that has opted for e-Payments and open their record.  Click onto the ‘Banking’ tab and complete the Supplier Banking Details as follows:

Bank Details section
Bank Name:  This is your suppliers Bank Name.
Address:  This is your suppliers Bank Address.
Account Name:  This is your suppliers bank account name.
Sort Code:  Enter in your suppliers Banks sort code, this is an 6 digit number
Account Number:  This is your suppliers Bank Account number.  This is usually 8 digits long
Payment Details section
BACS/SEPA Ref: Enter in your suppliers BACS reference number
IBAN:  Enter in your suppliers IBAN number
BICS/Swift:  This is your suppliers BICS/Swift number and is used to identify bank.
Roll number:  This is an additional number that your Building Society may provide.
Additional Ref:  Use this box to enter in any additional information that your bank gives you.  You can enter in 3 lines of text up to 60 characters.
Payment Method:  Sage comes with several payment methods for e-Payment you must select ‘BACS’s from the drop down list.
Online Payments:  Ensure that this section is ticked for e-Payments.

Please note that you will need to complete the bank details as mentioned above for each supplier that opted for e-Payment.  Once done your e-Payment setup has been completed.
Your OIN number will be entered on the ‘SEPA Processing Details’ screen when you go to generate your first e-payment file.


How to process e-Payments in Sage 50

How to process e-Payments in Sage 50


When you have correctly configured your bank and suppliers for e-Payments you are ready to generate your first bank file.  Your e-payment is generate in sage
through the ‘Supplier Payment’ option in either the Bank Account and Supplier module.

This document will explain how to generate your e-Payment file and what to do if you get any errors along with the e-Payment file formats.  Please note you can’t
generate and e-Payment file with foreign currency suppliers, nor can you generate an e-Payment file from payments  entered in the ‘Batch Supplier Payment’
and ‘Batch Invoice’ windows screens.

Create your supplier payment

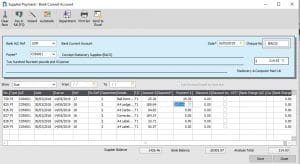
Generate your supplier payment from the ‘Supplier Payment’ screen,  this can be access from either your Supplier module or Bank Account Module.  When
you have selected a supplier that has been configured for e-payment, the word ‘(BAS)’ will appear in the ‘Cheque No.’ box.  This is a quick way to identify e-payment suppliers.

When you have made your payments click ‘Save’.

Note: Before making generating your e-payments file, it is advised to take a Sage backup.  This is because once the payment file has been created Sage flags these e-Payments
as been processed.  If a mistake has been you can either restore the data back or delete all the payments in Sage that were on the e-payment file and re enter them.

Create your e-Payment bank file

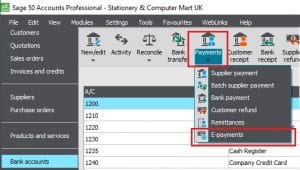
The e-Payment bank file is generated in the Bank Account module in Sage 50.  Select the bank that has been configured for e-Banking and click on ‘Payments’ and
E-payments’.


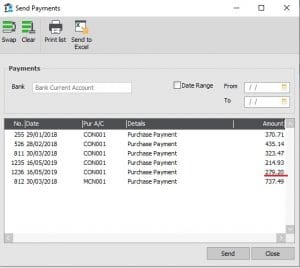
This will open up the Send Payment screen listing all your e-payments made in Sage.

To generate and e-payment file, select the payments from the list that you want to include on your payment file to the bank.  You can print or send this list to excel if
you need to get authorisation on what payments to included.  When you know what payments you are including select them from the list and click ‘Send’.

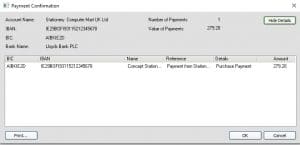
A ‘Payment Confirmation’ screen will open summarising your bank details and the number of payments on file along with the total payment value.  If you click the
‘Show Details’ button, you can view all your payments that will be included to which you can print by selecting the ‘Print’ button.

Click ‘OK’ and the Process details screen will open.  This holds your OIN number and the location to where you are saving the e-payment file to along with the
Requested Date.  Once you click ‘OK’ the e-payment file has been created and is stored in the locations that you setup in the e-payment configuration.

Payment Error

If you receive and error when creating the payment file, click ‘Yes’ to view the payment error log.  This log will provide you with more information in order
to determine what’s wrong with the file.  The error log is saved within your ACCDATA folder and the file name consists of the sort ode and account number for the
bank that you were sending the e-payment file from.

Errors occur if there is incorrect information in Sage 50.  The following information is included in the e-payment file so you will need to check that
your suppliers and bank account are setup correctly.

How to allocate a payment on account to an invoice


How to allocate a payment on account to an invoice


If you have entered both a payment on account and an invoice into Sage, you can use the allocation process to
marks the payment on account as being paid to that invoice at a later stage..

To allocate a supplier payment on account to a invoice.

In the supplier activity screen we can see both the Purchase Invoice ‘PI’ and the Payment on Account ‘PA’ marked as outstanding, this is because the transactions have only been entered and have not yet allocated to each other.


You can allocate payments to invoices by selecting the ‘Supplier Payment’ icon in the Supplier module or the Bank Account module.  On the Supplier Payment screen select your suppler and your correct bank account, a list of un allocated transactions will be listed for that supplier.   To allocate a payment to an invoice, on the ‘PA’ a line which is the payment on account, click into the ‘Payment’ box and  select the icon ‘Pay in Full’ to mark the payment as full allocated.  On the ‘PI’ purchase invoice line click into the ‘Payment’ box and click the ‘Pay in Full’ icon to make that Invoice as fully allocated.


Once you click ‘Save’, you have allocate your payment to that particular invoice.  This marks your invoice as paid on your suppliers ‘Activity’ screen, the ‘O/S'(outstanding) column is now blank and the spilt screen below shows the Purchase Invoice being allocated to that Payment on Account.


To allocate a customer payment on account to a invoice.

In the customer activity screen we can see both the Sales Invoice ‘SI’ and the Payment on Account ‘SA’ marked as outstanding, this is because we have not yet allocated the payment to that invoice.


You can allocate payments to invoices by selecting the ‘Customer Receipt’ icon in the Customer module or the Bank Account module.  On the Customer Receipt screen select your customer and bank account, a list of un allocated transactions will be listed for that customer.   To allocate a payment on account to an invoice, on the ‘SA’ sales payment on account line click into the ‘Receipt’ box and  select the icon ‘Pay in Full’ to mark the payment as full allocated.  On the ‘SI’ sales invoice line click into the ‘Receipt’ box and click the ‘Pay in Full’ icon to make that Invoice as fully allocated.


Click ‘Save’ to save your allocations marking your payment paid to that invoice.  This can be seen on the customers ‘Activity’ where your ‘SA’ sales payment on account and ‘SI’ sales invoice are no longer outstanding and are allocated to each other.


E-Banking ‘Unknown bank specified’ or ‘No banking component defined for this account’ in Sage 50 Accounts

E-Banking ‘Unknown bank specified’ or ‘No banking component defined for this account’ in Sage 50 Accounts


When you select E-payments or E-reconciliation one of the following errors may appear if  your E-Banking hasn’t been setup correctly:

  • Unknown bank specified
  • No banking component defined for this account.

To use this feature you must select the correct Electronic Banking ‘Bank Type’ on the required bank account.


To do this::

Open up your Bank Account module, this will list all your bank accounts on the main screen.  Double click on the correct bank account
to open the Bank Record.  On the Bank Record window select the Bank Details tab.

Under the heading ‘Electronic Banking’ click on the drop down and select your correct Bank type.
If your bank type is not listed you will need to close Sage and download the correct banking plug-in
from the Sage Website here.


If you are generating an E-payments file, Sage by default will save your payment file to ‘Documents’ folder on your
PC.

This can be amended by selecting the ‘Configure’ button on the Bank Record and Bank Details tab and browse to the location where you want
your payment files saved to.  Click ‘OK’ on the ‘Sage eBanking Configuraiton’ window and then click Save on your Bank Record for the changes to
to be applied.


How to post a payment on account in Sage 50

How to post a payment on account in Sage 50


If you received  payment from a customer or you wish to make a payment to a supplier before the invoice has been entered, you can post a payment on account and allocate it at a later date to an invoice.


How to enter a Payment on Account for a Supplier:

1. There are two ways to make supplier payment in Sage, one is to open up the Bank account module, select the required bank acount and click on ‘Supplier Payment’ or the other way is to open up the Suppliers module and and click on the  ‘Supplier Payment’  icon on the top menu bar.

2. On the Supplier Payment screen, ensure that the correct bank is selected and from the ‘Payee’ drop down select the supplier that your making the payment to. Ensure that the correct date has been entered and in the amount box enter in the suppliers payment amount.


3.  When you’ve entered the correct details click ‘Save’.  Because you have not selected an invoice to allocate the payment to, Sage will warn you that the amount entered is an unallocated amount and it will ask if you wish to post a Payment on Account


4. Click ‘Yes’ to post the payment on account.  The payment on account will be seen on the supplier ‘Activity’ as outstanding and will remain that way until you allocate it to an invoice.


How to enter a payment on account for a customer:

1. Like the supplier payment there are two ways to enter a customer payment on account.  This can be done via the Bank module or in the Customer module by selecting the icon ‘Customer Receipt’.  On the Customer Receipt screen select the correct Bank and customers account, ensure that you have entered in the correct date and amount, you can add a reference if required.


2. Click ‘Save’ on the ‘Customers Receipt’ screen.  Just like the Supplier payment on account you will get a similar message asking if you wish to post a Payment on Account.  Select ‘Yes’ to save.  This unallocated payment can be seen on your customers ‘Activity’ screen as Outstanding and will remain so until you allocate it to an invoice.


Sage 50 Accounts Version 25 System Requirements

Sage 50 Accounts Version 25 System Requirements


Supported Operating Systems

All 32-bit or 64-bit variants of the following operating systems:
Note: Please ensure all the latest Microsoft Service Packs and Updates are installed.

  • Windows 10 (except Windows 10S)
  • Windows 8.1
  • Windows 8
  • Windows 7
  • Windows Server 2019 (except Windows Server 2019 Essentials)
  • Windows Server 2016 (except Windows Server 2016 Essentials)
  • Windows Server 2012 (except Windows Server 2012 Essentials)
  • Windows Server 2012 R2 (except Windows Server 2012 R2 Essentials)
  • Windows Server 2008 (not supported on Small Business Server/SBS 2008)
  • Windows Server 2008 R2 (not supported on Small Business Server/SBS 2008)

Microsoft Small Business Server (SBS) 2008 and 2011 – due to a small number of customers seeing performance issues we don’t recommend the use of Microsoft Small Business Server (SBS) 2011 or 2008 with Sage Accounts v25. The installation of Sage Accounts v25 on SBS is blocked by default but, if required, you can still install the software by following the steps in article 32387. For further information on SBS 2011, please refer to article 30792 .

Sage Accounts is not tested on virtual environments, for example, Hyper-V servers. We therefore can’t guarantee Sage Accounts will install and work correctly on these environments.

Storing Sage Accounts data on non Windows operating systems, for example NAS drives, is not tested and therefore not supported.
Although most Sage software must be installed on a Windows operating system, you may still be able to use our software by installing Bootcamp on your Apple Mac computer, please refer to article 15524.

We do not support any issues you might have using these operating systems.

Minimum Hardware Requirements
  • 2 GB RAM (4 GB RAM if running a 64-bit operating system).
  • 2GHz processor or higher.
  • 5GB of free disk space.
  • 1Gbps network (100mbps minimum).
  • Screen resolution between 1024 x 768 and 1920 x 1080 – this applies to 4k and hi-res monitors.
  • Maximum DPI setting of 125%

Sage Accounts v25 requires you to install the Sage Data Service on the machine where your data is held. If this isn’t possible, you won’t be able to share your data on that machine. Although not supported, previous versions may have worked as they didn’t use the Sage Data Service. For more information on storing your data on non-Windows operating systems

Office Integration

Some features of Sage 50 Accounts interact with and require an installation of Microsoft Office.
These features include:

  • Emailing invoices and reports
  • Exporting report and screen lists to excel

Sage 50 Accounts v25 is compatible with the following:

  • Office 64-bit versions – In Sage Accounts v25 you can use the File > Microsoft Integration > Contents to Microsoft Excel feature and also run Excel ODBC queries with Office 64-bit. Other features aren’t compatible.
  • Office 365 32-bit – desktop version only
    To check if it’s the desktop version, Control Panel > Program > Default Programs > Set your default programs > check if Microsoft Outlook is the desktop version.
  • Office 2016 32-bit edition
  • Office 2013 32-bit edition
  • Office 2010 32-bit edition (except Office 2010 32-bit starter edition)

Sage 50cloud Accounts only
Sage 50cloud Accounts offers additional functionality using Office 365. These features require a UK based Microsoft Office 365 Business Premium or Enterprise E1, E3, or E5 subscription. Initial setup must be done by a user with global admin rights and a supported licence. If you’re unsure if you meet these requirements, please contact your Microsoft Office 365 supplier.

The section below confirms the requirements for each element of Sage 50cloud Accounts:

Sage 50cloud Intelligence

  • Excel desktop edition 2013 or 2016
  • Excel online

Sage Contact

  • Outlook desktop edition 2013 or 2016
  • Outlook online (accessed via browser)
    Sage Contact does not currently support the native mobile applications for mobile devices.

Further information:
Microsoft Office 365 system requirements
Microsoft Office compatibility

Microsoft Office 2007 and 2010 are no longer supported by Microsoft, therefore we’re limited in the support we can offer. We can help with basic steps, however if these don’t work, you should upgrade your software to a more recent version.

* Not compatible with Office 2010 32-bit starter edition

Sage 50c Accounts only

Sage 50c Accounts offers additional functionality using Office 365. These features require an Office 365 Business Premium subscription.

The section below confirms the requirements for each element of Sage 50c Accounts:
For further information about Microsoft Office compatibility, please refer to article 32017

Internet Connection

A broadband Internet connection is essential to keep your Sage software up to date, and to take full advantage of features such as Sage Drive and synchronising data with Office 365.

  • Recommended minimum download speed: 4Mbps
  • Recommended minimum upload speed: 2Mbps
Antivirus Software

To optimise performance your antivirus software should be configured to exclude Sage files from its checking routines

Internet Browser

Internet Explorer version 11 or above.
To check, open Internet Explorer, select Tools then choose About Internet Explorer.

Microsoft .Net

Microsoft .NET Framework 4.6 is required.

Sage Capture app

Sage Capture is tested on the following operating systems, but may work with earlier versions:

  • iPhone 5 or above running iOS 9.3 or later.
  • Android 5.0 (Lollipop) and above.


Migration from (Software) to Sage 50 – Checklist

Migration from (Software) to Sage 50-Checklist


Install Software – Checks

  1. Check Regional Settings are correct
  2. Anti Virus Software
  3. UAC Turned Off
  4. Install and Configure Software
  5. Ensure Tax codes are Correct (Irish Settings)
  6. Is Foreign trader required to be activated
  7. Have they any UK companies – activate MTD
  8. E-banking set up
  9. Set up email for basic layouts
  10. Set financial year

Software Migrating from (Software)

  1. Export Stock records and opening stocktake if needed. (Import to Sage 50 section as well)
  2. Get copy of P&L and B/S as well as the TB (could get extra paid job creating new COA at very least)..I know this COA is in your Checks section
  3. Agree mapping of Trial Balance with client from existing Nominal codes to Sage 50 codes and Enter to Sage 50.


Software migrating from (Software)

  1. Export Customers from (Software)
  2. Export Suppliers from (Software)
  3. Export Nominal from Sage one
  4. Report on outstanding transactions in the Bank
  5. Export Opening balances for Customers
  6. Export Opening balances for Suppliers
  7. Export Trial Balance


Sage 50

  1. Import Customers to Sage 50
  2. Import Suppliers to Sage 50
  3. Import Nominal to Sage 50
  4. Enter outstanding Bank transactions
  5. Import/Enter Opening balances for Customers
  6. Import/Enter Opening balances for Suppliers
    1. Do Journal to cancel out he suspense account entries after entering the opening balance
  7. Enter Trial Balance


Checks
  • Cross check that everything Balances
  • Configure COA
  • Report Design