• Transition from TASBooks to Sage 50
    Easy with the Right Partner and Remarkably Beneficial
  • Transition from TASBooks to Sage 50

KB Category: Sage Payroll (Micropay)

Consolidation company

Consolidation company


If you have more than one payroll with the same tax registration number, you should merge these payrolls into a consolidation company. You can then generate a single payroll report or Revenue Online Service (ROS) submission file that covers all the consolidated payrolls.

Although you can run reports in the consolidated company, you can’t process your payroll or edit employee details.

Set up a consolidation company

1. Log into Sage Micropay as the system administrator.
2. On the menu bar, click Company then click Consolidation Setup.
3. Complete the following information:

Consolidation Company Enter a name for the consolidation company, for example, CONSOL.
Password Enter an optional password.
Cons. Select the check boxes for the payrolls you want to merge.
Default Payroll Select a payroll that holds your company’s contact details. When you generate returns for Revenue, your company’s address and contact details must be included.

4. Click Create.
5. When asked if you want to create a new consolidation company, click Yes.
6. On the menu bar, click Login then click Exit.

Log into and use a consolidated company

1. Open Sage Micropay.
2. When prompted to log in, enter your normal user name and password.
3. Under Payroll, click the Name arrow, then click the consolidation company.
4. Enter the consolidation company password, if applicable, then click OK.
5. On the menu bar, click Miscellaneous then click Consolidate All.
6. When asked if you want to consolidate all company files, click Yes then click OK.
7. To access the:
• Standard reporting area – On the menu bar, click Reports then click Payroll Reports.
• Year end reporting area – On the menu bar, click Year End then click Tax Year End Reports.
8. Print or generate the reports and submission files you need.
9. To close the consolidation company, click Login then click Exit.


Set up a new company and payroll

Set up a new company and payroll

Before you can process any pay for your employees, you must set up at least one company payroll. If you want, you can set up a payroll for each pay frequency in your company, for example, weekly, fortnightly and monthly. So that you can keep your data secure, you can create a unique password for each of the payrolls.

If you need to set up more companies than your current licence covers, please contact Pimbrook software on 051-395900 or sales@pimbrook.ie 


Add a new company

  1. Log into Sage Micropay as the system administrator.
  2. On the menu bar, click Company then click Company Setup.
  3. Click Add New Company.
  4. In the Company Name box, type the name of your company.
  5. Click Create Company then click Close.


Set up a new payroll and assign it to a company

  1. Log into Sage Micropay as the system administrator.
  2. On the menu bar, click Company then click Company Setup.
  3. Click Add New Payroll.
  4. Complete the following information:


Payroll ID Enter a name for the payroll. You can use a maximum of eight characters.

You may find it helpful to use a name that indicates the pay frequency, for example, weekly or monthly.

Licence Name Choose the company to which the payroll belongs.
Password If required, enter a password. You can use a maximum of 16 characters.
Frequency Choose the pay frequency of the payroll. For example, weekly, monthly, fortnightly, etc.Click Create, then click Close.

5. Click Create, then click Close.


Set up the payroll calendar

Set up the payroll calendar

Before you begin to process pay in a new company or tax year, you must set up the payroll calendar. You can enter default dates on which to pay your employees for each pay period. For example, if you pay your employees by cash and by bank transfer on different dates.

When you set a pay period, the dates automatically default to those set up in the calendar. This means you don’t need to manually enter them each time.

Create a new payroll calendar


1. On the menu bar, click Company/Payroll then click Calendar.


2. Click the New Calendar tab, then complete the following information:


Period The period number relating to each of the pay periods in the tax year.
Ins Wks The number of insurance weeks for the specified period.
Cost Month This check box indicates whether the period relates to the start of a new cost month. In a cost month, the new pay period starts a new month for cost analysis.
Pay Date The date on which payment is made to employees. The date on which cheques, giros and bank transfers are processed generally should precede this date to ensure that employees are paid on time.
Cheque Date The date on which payment cheques are processed. This generally should precede the Pay Date to ensure that employees are paid on time.
Giro Date The date on which payment giros are processed. This generally should precede the Pay Date to ensure that employees are paid on time.
EMT Date The date on which bank transfer payments are processed. This generally should precede the Pay Date to ensure that employees are paid on time.
Noml. Period The relative period for nominal analysis purposes.
Cost Analysis Year End A period number for the cost analysis year end, which does not necessarily coincide with the tax year end.

3. Click Update

4. Review the information held within the Calendar Details tab.  Edit if required.

5. Click Save


If you made a mistake and need to re-create the calendar, simply repeat the steps above and enter the correct details.


How to change the default paper size on your printer


How to change the default paper size on your printer

You may sometimes need to permanently set the default paper size for a printer. New documents attached to that printer can then automatically pick up the selected paper size.

Note: If you have previously saved reports or layouts with a different paper size, these do not automatically update. You should edit the report or layout and save it with the new paper size.

All instructions in this article are written for the Windows 7 operating system. For help navigating in the Windows 8 or Windows 10 operating systems, please refer to article 29847.


To change the default paper size in Windows 7

  1. Start > Devices and Printers.
  2. Right-click the required printer > Printer Properties.
  3. Preferences > Advanced > select the required paper size > OK > OK > OK.

To change the default paper size in Windows Vista

  1. Start > Control Panel > Printers.
  2. Right-click the required printer > Properties.
  3. Printing Preferences > Advanced > select the required paper size > OK > OK > OK.

To change the default paper size in Windows XP

  1. Start > Printers and Faxes > select the required printer.
  2. Right-click the required printer > Properties.
  3. Printing Preferences > Advanced > select the required paper size > OK > OK > OK.

GDPR – Remove old Micropay – Sage Payroll (Micropay) (V21.0)

Sage Payroll (Micropay) (V21.0)


Remove all data for a specific tax year

As per Revenue’s guidelines, you (the employer) must keep all company payroll records for six years after the end of the tax year to which they refer and make these records available for inspection when required.

After the six year period expires, you should remove the company payroll records that relate to these years from your software – so you’re compliant with the General Data Protection Regulation (GDPR).

Validate Your Payroll Data


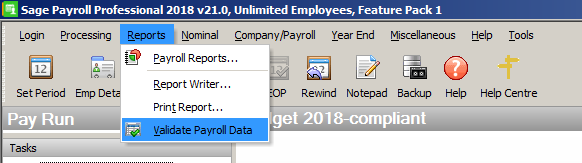
1. On the menu bar, click Reports then click Validate Payroll Data.

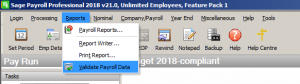
2. To print a copy of the Validate Payroll Data report, click File then click Print.

The system will give you a report with a warning if you have any data over 6 years.

Warning: You have employee records older than six years – These should be removed.

  • As an employer, you must keep your payroll records for six years and make them available for Revenue inspection when required.
  • To comply with General Data Protection Regulation (GDPR) guidelines, you must remove all payroll records older than six years.

Recommended: Delete all company payrolls older than six years from your software.

3. Click File, then click Exit.


Delete payroll records for a specific tax year

1. Open Sage Payroll (Micropay) and log into a payroll as normal.

2. On the menu bar, click Help then click System Information.

3. Make a note of the Data Directorylink, but exclude the tax year mentioned.

For example, if the Data Directory link is C:\ProgramData\Micropay Professional\2017, you should make a note of C:\ProgramData\Micropay Professional.

If the Data Directory shows a local C drive path, for example, C:\Program Data\Micropay Professional, then your payroll data is held on this computer. If the Data Directory shows a mapped network drive or path, this means your payroll data is held on a network.

4. To close Sage Payroll (Micropay), click Loginthen click Exit.

5. Using Windows Explorer, browse to the location you noted in step 3.

6. Right-click a tax year folder you want to remove, then click Delete.

7. When prompted, click Yes.

8. Repeat steps 6 and 7 for each tax year you want to delete company payroll records for.

How to remove a company and all its data


To comply with the General Data Protection Regulation (GDPR) requirements, you may need to remove a company and all its data from your Sage payroll software and computer. This article explains how to do this.

Revenue’s guidelines state that an employer must keep all company payroll records for six years after the end of the tax year to which they refer and make these records available for inspection whenever required.


Delete company payroll data folder(s)


1. Open Sage Payroll (Micropay) and log into a payroll as normal.

2. On the menu bar, click Help then click System Information.

3. Make a note of the Data Directorylink, but exclude the tax year mentioned.

For example, if the Data Directory link is C:\ProgramData\Micropay Professional\2017, you should make a note of C:\ProgramData\Micropay Professional.

4. To close your Sage software, click Loginthen click Exit.

5. Using Windows Explorer, browse to the location you noted in step 3 and open a tax year folder.

6. Right-click the company payroll folder you want to remove, then click Delete then click Yes.

7. If you have more than one payroll associated to the company you’re removing, repeat steps 6 for each.

8. Repeat steps 5 to 7 for each tax year you want to delete this company’s payroll records for.


Delete company name within Sage Payroll


1. Log into Sage Payroll (Micropay) as the system administrator.

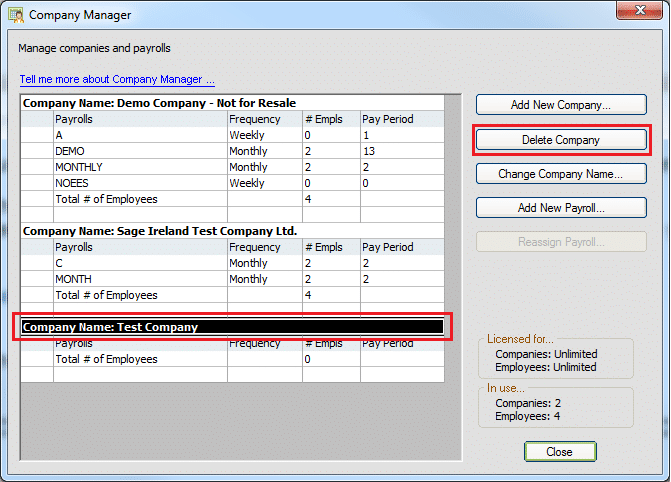
2. On the menu bar, click Company, then click Company Setup.

If you have any payrolls currently assigned to the company, you can’t delete the company. To remove these payrolls, you must complete the steps detailed in the previous section.

3. Select the company you want to delete, then click Delete Company

.

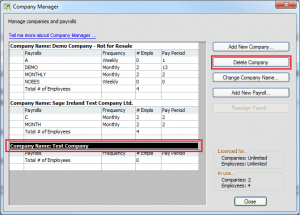
4. When prompted, click

5. To close the Company Manager window, click Close.


Remove all backup files that relate to the deleted company


Make sure that you delete all Sage backup files (PAYBACK.CRC,PAYBACK.CTL and PAYBACK.001) that relate to this company, from the following:

  • Any computer that you currently operate Sage Payroll (Micropay) on.
  • Any computer that you operated Sage Payroll (Micropay) on in the past.
  • Network drives.
  • USB memory sticks.
  • Email and cloud storage. For example, Dropbox, Google drive.