• See our Sage 50 Advanced Query Tool – AccountsMate
    Live Webinar Demonstration
  • Transition from TASBooks to Sage 50
    Easy with the Right Partner and Remarkably Beneficial
  • See our Sage 50 Advanced Query Tool – AccountsMate
  • Transition from TASBooks to Sage 50

KB Category: Sage Payroll (Micropay)

Sage Paryoll – Software licence details aren’t updating

Software licence details aren’t updating

If you’re experiencing an issue when licensing your Sage Payroll software, you should complete the following troubleshooting tasks in the order given below. After each completed task, please try to license your software again and see if the issue is resolved.

Task 1: Check your Internet connectivity

Check if you can open web pages. For example, open your Internet browser and go to www.sage.ie/payroll

If this webpage doesn’t open for you, please contact your local IT support for further assistance.


Task 2: Clear out the Sage Payroll licence configuration folder

1. Open Sage Payroll and log in to a payroll as normal.

2. On the menu bar, click Help then click System Information.

3. Make a note of the Data Directory link, but exclude the tax year referenced.

4. Using Windows Explorer, browse to the location you noted in step 3.

5. Open the Configuration folder, then delete the following files:

  • ACCOUNTCODE TXT
  • SERIALNUMBER.TXT

6. Close and re-open Sage Payroll. When prompted, click License Now then click Edit.

7. Type your Sage account number and Sage Payroll serial number in the boxes provided, then click OK.

Don’t copy and paste your licence details into Sage Payroll as this may cause the licensing process to fail.


Task 3: Restart your computer and log in as a Windows administrator

If you’re unsure about how to do this, please contact your local IT support.


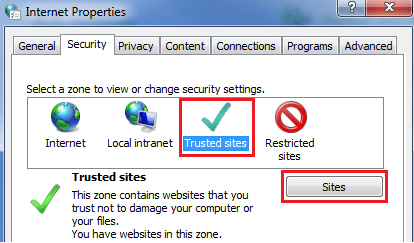
Task 4: Add the Sage server as a trusted Internet site

To do this, complete the following steps:

1. Press the Windows key + R.

2. In the Open box, type cpl then click OK.

3. Click the Security

4. Click Trusted sites, then click Sites.

5. In the Add this website to the zone box, type https://licensing.services.sage.com

6. Click Add, then click Close.

7. To close the Internet Properties window, click OK.


Task 5: Check your computer’s date and time setting are correct

To do this, complete the following steps:

1. Press the Windows key + R.

2. In the Open box, type cpl then click OK.

3. Click Change date and time.

4. Set the correct time and date, then click OK and OK


Task 6: Check your computer’s regional settings are correct

To do this, complete the following steps:

1. Press the Windows key + R.

2. In the Open box, type cpl then click OK.

The Formats tab opens automatically.

3. Set the Format to English (Ireland).

4. Click the Location

Set Current location to Ireland, then click OK.


Task 7: If the issue still occurs

Sage cannot accept liability for any issues that result from disabling your antivirus software. If you’re unsure, please contact your local IT support.


When opening Advanced Report Writer (ARW) an error appears: Error: ‘Data Source Error Filling Lattice’ or ‘Cannot Read User File’

When opening Advanced Report Writer (ARW) an error appears: Error: ‘Data Source Error Filling Lattice’ or ‘Cannot Read User File’


These errors can appear when you try to open the ARW (Advanced Report Writer) if the computer you are running the ARW on does not have the required ODBC driver installed on it.

“Data Source Error Filling Lattice: The Company data could not be accessed Data Source Name not found and no default driver specified”

“Cannot Read User File – Please ensure that ODBC is installed”

To Fix this issue:

1. Close out of Sage Payroll (Micropay) and any other Sage applications on the computer you’re trying to run ARW on.

2. Download the ODBC driver from our website or click here.  Depending on your Internet browser, the file automatically download to your Downloads folder or you will be asked to save the file, take note of where the file is saved to, for example, the Windows desktop & Save.

3. Open the folder where you saved the download file and double-click ODBC driver.msi and click Run.

4. When the ODBC Driver Setup window appears, click Next and follow the on-screen prompts to complete the installation.

5. Log back into ARW from your desktop & the issue should be corrected.


Sage Payroll Data Import (Micropay)

Data Import


You can use the data import option in Sage Payroll (Micropay) to:

  • Add information from other software.
  • Add or amend information on batches of records, without having to edit each individual record.

Note: Please be aware that data import is a complex process. If you have any queries, please contact support@pimbrook.ie we can perform the data import for you, as a chargeable service. For more information about this, please call us on 051-395900.

The following steps contain everything you need to help you perform a data import in Sage Payroll (Micropay).

1. Create an IMP file

The *.IMP file contains the database files and payroll fields you want to import in to your payroll. You can create the *.IMP file using either Notepad or Wordpad.

Note: To view the full listing of all your Sage Payroll (Micropay) database fields > log in to a payroll in Sage Payroll (Micropay) > Help > System Information > click the Program Directory link > locate and right-click the file, MICW.DDL > Open with > select Excel or Notepad.

The following is an example of a *.IMP file using just one table, although more than one table can be used.

[tables]
table1=Employee
[Employee]
record=EMPLMAST
key=EMPLOYEE
field1=employee
field2=name
field3=first
field4=addr1
field5=addr2
field6=addr3
field7=addr4
data=C:\EXAMPLE.CSV
create=yes
blank=yes
decimals=yes
audit=Yes
verbose=Yes

Data import example – Fields explained

[tables] Must appear on the first line.
table1=Employee Specifies the file you want to update.
[Employee] The Database file to be updated.
record=EMPLMAST The record to be updated.
key=EMPLOYEE The tag key of the file.
A tag key determines the ordering that the records in a data file should be presented in. The information that this ordering is based upon is called an index key (*.cdx file), and this file defines the index key for each record. This key is assigned to the tag key, “employee” in the above example. In the case of the Employee Master file, the search key is simply the “employee”.

The import module reads the search key from the index key, records are searched linearly using the defined key in the import file, and if a record is not found in such a search, it is either created or ignored.

field1=employee The employee number.
field2=name The employee surname.
field3=first The employee first name.
field4=addr1
field5=addr2
field6=addr3
field7=addr4 The employee address lines 1, 2, 3 and 4.
data=C:\EXAMPLE.CSV The location of the .CSV file.
create=yes An entry of No/Yes/Only.

A create condition:

• No – Only existing records are updated, new records will not be created.
• Yes – All records are updated, whether they exist or not.
• Only – Only records that did not previously exist are updated.
blank=yes An entry of No/Yes.
A blank condition:

• No – If a blank condition has been inserted into the .CSV file for a particular field, the value for this field in the database (.DBF) file remains the same, the field is not updated.
• Yes – If a blank condition has been inserted into the .CSV file for a particular field, the value for this field in the database (.DBF) file will be updated with a blank/null value.
decimals=yes An entry of No/Yes.
A decimal condition:

• No – The values that you are importing into numeric fields are displayed in cent in the *.CSV file (i.e. 110 instead of 1.10).
• Yes – The values that you are importing into numeric fields are displayed as decimals figures.

audit=Yes Will record import info on an audit file.
verbose=Yes Should be set to Yes to ensure any errors are recorded.

2. Create a CSV file

The *.CSV file contains the data you want to import in to your payroll. It’s fields correspond to those detailed in the .imp file you created earlier.
Note: The name of the *.CSV file must match the *.IMP file exactly. For example, NewStarters.csv and NewStarters.imp. If the names are different, the import won’t work.

The following is an example of the contents of a typical CSV file:

001,Smith,Sam,Waterstone House,Moycullen,Galway,
002,Jones,Bill,Citywest,Tallaght,Co Dublin,

The above CSV file content must match the fields on the corresponding *.IMP file:

field1=employee
field2=name
field3=first
field4=addr1
field5=addr2
field6=addr3

3. How do I import data?

1. Open Sage Payroll (Micropay) and log in to the payroll as normal.
Note: Before you proceed, you must take a backup of your payroll data.

2. On the menu bar, click Miscellaneous, then Data Import then Data Import.
3. Browse to and select the *IMP file you want to import, then click Open.
4. When prompted to view the import log, click Yes.
5. Check the details of the data import are correct..

Note: You should view the import log after every data import process.

How to transfer employees mid-year from one company payroll to another

How to transfer employees mid-year from one company payroll to another

If you have a multi-company licence, you can transfer employees from one company to another. The way you would transfer your employee depends on if the tax registration number is the same as the company you’re transferring the employee from.

Note: Before you begin the transfer process, you should take a full system backup of the affected companies.
The following sections contain everything you need to help you transfer an employee from one company to another in Micropay.


If the tax registration number is different

You must mark the employee as a leaver in their current company and add the employee as a starter in the second company. To do this:

1. Open Micropay > log in to the company you want to move the employee from.
2. Mark the employee as a leaver with a finish date and finish period
3. If you have paid employees this period and on the submission that will mark the employees as left

If you need any assistance with this process, please contact the ROS technical help desk on 01-7383638

4. Employees need to go onto ‘My Account’ and move the employment to the new company number or continue to step 5, 6 & 7 which will allow you pull a new rpn.5. Open Micropay > log in to the company you want to move the employee to.
6. Set up the employee as a new starter with a start date.
7. You can then download the New RPN file from the revenue – New employees with a start date, this will link the employees to the new prem number

If the tax registration number is the same


Tip: The best time to transfer employees is at the beginning of a new tax year, before you start processing their pay. However, you can carry out this process during the course of a tax year if required.

You must manually transfer the employee’s year to date values from their current company into the second company. We recommend that you print the employee’s Earnings Tax & PRSI report. This report details their personnel details and year to date values for the current company.

1. Open Micropay > log in to the company you want to move the employee from.
2. Reports > Payroll Reports > Employee tab > select Earnings Tax & PRSI.
3. Selection > Sequence > Employee Code > enter the employee’s number in the From and To boxes.

Tip: If you’re unsure of what the employee’s number is, you should check the employee’s record.

4. Print > Cancel.
5. Login > Login to a Payroll > log in to the company you want to move the employee to.
6. Processing > Employee Details.
7. Set up the employee and enter their year to date values, using the printed Earnings Tax & PRSI report as a point of reference.

8. Make sure the employees PPS number, Employment ID, and RPN number on the Tax/Prsi/ USC tab of the Employee Details are correct

9.Finally, log back into the payroll you moved the employee from, and delete the employee’s record.

Click here for detailed instructions for entering in Year to Date Values

Set up new employees

Set up new employees


To help you manage your employees’ information, you create records for them. You can enter their personal details, employment details, payment method and much more.
If you’re moving to Sage Micropay part-way through the year from another software provider, you must also enter your employees’ year to date values. Find out how >>
Add a new employee to your payroll

1. On the menu bar, click Processing then click Employee Details.
2. Click New.
3. Enter the employee’s personal details, then click Next.

If the details you entered:

  • Match an existing employee record, a Matching Employee Records window appears. To reactivate an existing employee record, click Use Record then click Next and OK.
    If an employee left your company then rejoins in the same tax year, you must reactivate their existing employee record. Don’t create a new record for them.
  • Do not match an existing employee record, the standard Employee Details window appears. If you want to, you can change the automatically allocated employee code by clicking into the Code field then enter the relevant value.
    Once you save the record, you can’t manually change their employee code anymore

4. If you want to pay the employee by bank transfer, under Bank Details, enter the employee’s Account name, IBAN and BIC.
5. Click the Tax / PRSI / USC tab.


Has the employee provided you with P45 information that’s relevant to the current tax year?


YES


  1. Click the Tax/USC Status arrow, then click Week 1.
  2. Click the Tax Credits Yearly box, enter the yearly amount from the employee’s P45.
  3. In the Tax Rate 1 Cut-Off Point Yearly box, enter the yearly amount from the employee’s P45. – Until Revenue issues a P2C tax credit certificate stating otherwise, you should use the default universal social charge (USC) details in Sage Micropay – All pay at 8%.
  4. Click the PRSI Code arrow, then click the relevant code.
  5. Click the Pay / YTD tab.
  6. Click the Pay Type arrow, then click either Hourly or Salary.
  7. Click the Pay Method arrow, then click the relevant payment option.
  8. Click Save, then click Cancel.
  9. Click the Tax/USC Status arrow, then click Emergency.
  10. Click the PRSI Code arrow, then click the relevant code.
  11. Click the PRSI Code arrow, then click the relevant code
  12. Click the Pay / YTD tab.
  13. Click the Pay Type arrow, then click either Hourly or Salary.
  14. Click the Pay Method arrow, then click the relevant payment option.
  15. Click Save, then click Close.
No
  1. Click the Tax/USC Status arrow, then click Emergency.
  2. Click the PRSI Code arrow, then click the relevant code.
  3. Click the PRSI Code arrow, then click the relevant code.
  4. Click the Pay / YTD tab.
  5. Click the Pay Type arrow, then click either Hourly or Salary.
  6. Click the Pay Method arrow, then click the relevant payment option.
  7. Click Save, then click Close.

You’ve now set up the new employee on your payroll. Next, you must notify Revenue to let them know this employee has joined your company. Read more >>

Allow Tax Agents to record their Agent TAIN (Required for PAYE Modernisation returns) (v21.1)

Allow Tax Agents to record their Agent TAIN (Required for PAYE Modernisation returns)

If you’re a tax agent running a payroll on behalf of an employer, you must enter your Tax Advisor Identification Number (TAIN) in Sage Payroll. This is a requirement for PAYE Modernisation returns to Revenue in 2019.

Before you begin, check your version is 21.1 or higher. You can find this in the top left-hand corner of your software. If it’s not, please install the latest Sage Payroll (Micropay) update now.

To apply the same TAIN to all companies set up in Sage Payroll

1. Open Sage Payroll and log into a payroll as normal.
2. On the menu bar, click Company/Payroll then click Tax Agent Details.

3. In the TAIN box, enter the tax advisor identification number assigned to you by Revenue.

4. From the Apply to drop-down list, click All companies. Then click Ok.


5. When asked if you wish to continue, click Yes to save the changes. Alternatively, if you want to return to the previous window and make further changes, click No then repeat steps 3 and 4.
6. Enter the Sage Payroll administrator password, then click Continue.
7. When prompted that the process has completed successfully, click OK.

To apply the same TAIN to all payrolls associated with this company

1. Open Sage Payroll and log into a payroll as normal.
2. On the menu bar, click Company/Payroll then click Tax Agent Details.

3. In the TAIN box, enter the tax advisor identification number assigned to you by Revenue.

4. From the Apply to drop-down list, click All payrolls in the company. Then click Ok.

5. When asked if you wish to continue, click Yes to save the changes. Alternatively, if you want to return to the previous window and make further changes, click No then repeat steps 3 and 4.
6. When prompted that the process has completed successfully, click OK.

To only apply the TAIN to the payroll you’re currently logged into

1. On the menu bar, click Company/Payroll then click Tax Agent Details.

2. In the TAIN box, enter the tax advisor identification number assigned to you by Revenue.

3. From the Apply to drop-down list, click This payroll only. Then click Ok.

4. When asked if you wish to continue, click Yes to save the changes. Alternatively, if you want to return to the previous window and make further changes, click No then repeat steps 2 and 3.
5. When prompted that the process has completed successfully, click OK.


Click here to view the new features in V21.1


PRSI Exemption feature [V21.1 and Higher]

Sage Payroll – PRSI Exemption

PRSI Exemption feature Director (Required for PAYE Modernisation returns)

Most employees (aged between 16 and 65) make social insurance contributions. The amount they pay is based on their earnings each period and the type of work they do. For this reason, it is called Pay Related Social Insurance (PRSI).

As an employer, you must deduct PRSI contributions directly from your employees’ wages. However, if the Department of Employment Affairs and Social Protection authorises you to not deduct PRSI from an employee’s pay, you must mark the employee as PRSI exempt within your Sage Payroll software.

Before you begin, check your version is 21.1 or higher. You can find this in the top left-hand corner of your software. If it’s not, please install the latest update now.


To mark an employee as PRSI exempt within their record

  1. On the menu bar, click Processing then click Employee Details.
  2. Next to the Surname box, click browse  and click the relevant employee.
  3. Click the Tax / PRSI / USC
  4. Under Exceptions & Exclusions, select the PRSI Exempt check box.
  5. From the PRSI Exempt Reason drop-down list, click one of the following:
A1 Portable Doc If the employee holds an A1 portable document from an EU member state, click this option.
Soc Sec Bilat Agree If the employee holds a certificate of coverage under the Social Security Bilateral Agreement, click this option.
Exempt posted Ees If the employee holds a notification of exemption for posted workers (other than the two mentioned above), click this option.
Family member If the employee is employed by a family member, click this option.
Under 16 If the employee is under 16 years of age, click this option.
Social Welfare If the employee works for a social welfare scheme, click this option.
Other If none of the exempt reasons above apply, click this option.


1. If you chose the PRSI Exempt Reason ‘Other’, you must now select either M or NA in the PRSI Code If unsure, please contact the Department of Employment Affairs and Social Protection.
If you chose another PRSI Exempt Reason, your Sage Payroll software automatically updates the employee’s PRSI Code to match the chosen exempt reason. You don’t need to do anything else.

2. Click Save.
3. Repeat steps 2 to 7 for any other employees you want to mark as PRSI exempt, then click Cancel.

If the PRSI exemption started on a date that fell in a previous period, you may need to manually refund overpayments of PRSI back to the employee. Read more >


Option to indicate if an employee is being paid via a Shadow Payroll [V21.1 and Higher]

Option to indicate if an employee is being paid via a Shadow Payroll (Required for PAYE Modernisation returns)

Shadow payroll is a term used to report compensation data that is actually paid from another country. If you have an employee on assignment in a foreign country, their wages may need to be reported in both the home and host countries via a shadow payroll. If relevant, select this check box to indicate that the employee is being paid via a shadow payroll.

  1. Select Employee Details and Tax/PRSI/USC
  2. Tick the Box for Shadow Payroll


Click here to view the new features in V21.1


More Information on the Shadow Payroll