• Payroll Year End 2026
    See our Webinars

KB Category: Sage Payroll (Micropay)

Register for Sage Services to ROS error – ‘The CAPTCHA security check wizard cannot be completed’

Register for Sage Services to ROS error – ‘The CAPTCHA security check wizard cannot be completed’


While registering to use the Sage Services to ROS, the following message may appear in your software:

‘The CAPTCHA security check wizard cannot be completed’


To close this message, click Cancel.


This issue can occur if your computer is not connected to the Internet, or the Sage service is temporarily off-line or your computer (or internet) security isn’t allowing a connection to be made.


To resolve this issue, please complete the following steps in the order given below:

1. To close the registration window in Sage Payroll, click Cancel then click Yes when prompted.

2. Check if you can open web pages. For example, open your Internet browser and go to www.sage.ie

If this webpage doesn’t open for you, please contact your local IT support for help with resolving your Internet connectivity issue.

3. If your Internet connection is working correctly and you can open webpages, wait a few minutes then go back into Sage Payroll and try to register for Sage Services to ROS again.

4. If the issue persists, get your local IT support to temporarily disable your anti-virus and/or firewall software, then try to register for Sage Services to ROS again in Sage Payroll.

5. Do one of the following:

  • If the issue is resolved, switch back on your anti-virus/firewall software and get your IT support to ensure that your protection programs don’t block the connection to the Sage service going forward.
  • If the issue still occurs, switch back on your anti-virus/firewall software. Then get your IT support to whitelist the following URL addresses as access to these sites is permanently required by Sage Payroll:
    • https://api-rtx-ie-prod-ros.sagertx.com
    • https://rtx-ie-prod-ros-s3-eu-west-1-files.s3.eu-west-1.amazonaws.com
    • https://www.sagetokenservice.com

If the issue persists, please contact  support on 051-395900 for further assistance.

Warning when saving a timesheet: Duplicate Payments

Warning when saving a timesheet: Duplicate Payments


If you receive this error when saving an employee’s timesheet, you will have duplicate payments in the company settings.

  1. Click Company/Payroll, and Payments.
  2. Check to see if there are any payments with the same name.
  3. Edit the duplicate payment and rename to something unique.

Payments can have a maximum of 10 characters.

Making corrections to the current period (in Sage Payroll 2019)

Making corrections to the current period (in Sage Payroll 2019)

We all know, mistakes can happen, and processing payroll is no exception. This article explains how to handle corrections in the current pay period.

If you need to make corrections to values in a previous pay period, please ignore the steps detailed in this article. Instead you should refer to article 6909 for guidance.


If you haven’t sent a payroll submission to Revenue for this period yet

The first thing you need to do is check the payroll status at the bottom of your window. If it reads:

  • End Of Period (EOP) – You’ll need to rewind the EOP process, then make the necessary changes to the relevant employee records and/or timesheets. Next you must post the EOP values again and then produce the Gross to Nett report. Check that all employees that should be paid this period are appearing on the report and that their values are correct. Once you’ve done this, you can send your payroll submission to Revenue.
  • Time and Pay Calculated or Start Of Period – Make the necessary changes to the relevant employee records and/or timesheets. Complete the rest of your payroll processing for this period as normal then post the EOP values. Once you’ve done this, you can send your payroll submission to Revenue.


If you’ve already sent a payroll submission to Revenue for this period

If you make any change to the current pay period after you’ve sent your initial payroll submission to Revenue, you must use the Re-Send Payroll Submission option to let Revenue know about these changes. The corrected payroll submission will replace the incorrect version that Revenue had previously received.


Using the Re-Send Payroll Submission option


1. Do one of the following:

  • From the menu bar at the top of the window, click Direct Payroll Reporting, point to Payroll Submission, then click then click Re-Send Payroll Submission.
  • From the process map in the centre of Sage Payroll, click Send Payroll Submission then click Yes when prompted.

2. If your Revenue Online Service (ROS) login details already appear on-screen, skip to step 7.

3. Under ROS Digital Certificate, click Browse.

4. Browse to and select your ROS Certificate (.P12) file, then click Open.

5. Enter your ROS digital certificate password in the box provided.

6. If relevant, click the Save password to Sage Payroll check box.

7. Check the ROS login credentials are correct. Edit if required.

8. To proceed, click Next.

9. Check the information is correct within the Review Details window. To view a detailed breakdown of the values per employee, click Export Details.

10. Once you’re happy with the details, to proceed, click Submit.

Please note that once you click Submit, this process can’t be reversed or stopped.

11. Once the amendment submission is successfully received by Revenue, a confirmation window appears. To produce a copy of the submission log for your records, click Export Details then to:

  • Print the report, click the Printer printer printer button.
  • Save a PDF copy of the report, click the Save save save button.

To close the report, click X at the top right-hand side of the window.

12. To close the Send Payroll Submission window, click Finish.

If you want to check or review the previous submissions you’ve made to Revenue, you can do this using the View Payroll Submission Log option. Read more >


Making corrections to a previous pay period (in Sage Payroll 2019)


Making corrections to a previous pay period (in Sage Payroll 2019)


We all know, mistakes can happen, and processing payroll is no exception. For example, you may have recorded an overpayment to an employee in your software or entered the wrong finish date for a leaver.

This article explains how to handle corrections in Sage Payroll 2019 if you’ve already sent a payroll submission to Revenue for the relevant period the issue occurred in.

If you need to make corrections to values in the current pay period, please ignore the steps detailed in this article. Instead you should refer to article 6910 for guidance.


If an employee has been overpaid

You shouldn’t do any manual adjustments in Sage Payroll. Instead the correction to recoup this overpayment should be made in the next pay run. Here is a example of this:

John normally gets €500 gross pay per week. In week 1, John was out sick for one day. His employer doesn’t pay him for sick leave so John should only have been paid €400. However, the payroll operator wasn’t informed of this on time and so John was paid the full €500.

John’s employer must recoup the overpayment of €100 in the next pay run. John gets paid €500 weekly, so in week 2 John’s gross pay will be reduced to €400. This is the amount John was actually paid each week.

If an employee has been underpaid

You shouldn’t do any manual adjustments in Sage Payroll. Instead the correction of the underpayment should be made in the next pay run. Here is a example of this:

Mary normally gets €500 per week. In week 1, Mary worked overtime which meant that she should have been paid an additional €100. The payroll operator wasn’t informed of this on time and so Mary was only paid €500 instead of €600.

Mary’s employer has agreed to pay the €100 in the next pay run. Mary’s gross pay is €500 per week, so her gross pay is increased to €600 in week 2 to correct the underpayment. This is the amount that Mary was actually paid in each week.

Incorrect details on a submission

If you report incorrect values on a submission that can’t be rectified in the next pay run by either increasing or decreasing the employee’s gross pay, then you must make the necessary amendments to the relevant submission on the Revenue website to rectify the error. You should make any corrections required to the submission before the return due date to avoid penalties being applied.

Here are two examples of errors that require corrections be made to the original submission:

  • Patrick was paid €500 in week 1. However, the employer incorrectly reported his pay as €5000 in the payroll submission.
  • Jane left the company on 04/01/2019. However, the employer incorrectly reported her finish date as 04/10/2019 in the payroll submission.

Once you’ve made the necessary corrections to the submission in the Revenue website, you can then make the corresponding changes to your data in Sage Payroll. Please contact us on 051-395900 for further assistance with doing this.


Error opening PAY DATA

Error opening PAY DATA


On attempting to open the program you receive the following message:

‘Error opening PAY DATA’

To resolve this, follow the steps below

Run the SBD repair
  1. Right-click the Payroll Icon.
  2. Click go to File Location.
  3. Double click SetupSBD.exe.
  4. Select Repair Install.
  5. Click Next and Finish.
  6. Double click the Payroll icon.


Reinstall the program to a new location
  1. Download the latest version of the program.
  2. Create a new folder in C:\ProgramData called MPD.
  3. Create a new folder in C:\ProgramFiles (or C:\ProgramFilesx86 if you have it) called MPF.
  4. Double click your downloaded install file.
  5. To accept the terms of the licence agreement, select the check box, then click Next.
  6. Select This PC, then click Next.
  7. Select Custom – Change the program and data folder locations, click Browse, browse to the location of the new files created click OK.MPD = Program Data and MPF for program Files
  8. Click Next, then Install.
  9. When prompted that the installation has completed successfully,
  10. click Finish.Double click the Payroll icon.


Check the path in Dataloc.ini
  1. Right-click the payroll icon then click Properties.
  2. Click Open File Location.
  3. Find the dataloc.ini file and open this in Notepad.
  4. Ensure that the path specified in dataloc.ini exists and that the Windows permissions are set correctly. Avoid using the ‘Everyone’ reserved group on Windows.If you require help with setting the Windows permissions, please refer to your own IT support.


Check if you’re logged in to your computer as an administrator

Check if you’re logged in to your computer as an administrator


Before you install software or updates on your computer, you must check that you’re logged in to Windows as an administrator. This ensures you have enough access to add, change or remove files on your computer.

Check your Windows version


  1. Press the Windows key + R, type winver then click OK.
  2. In About Windows check your Windows version, then refer to the relevant section below.


Windows 10 and Windows 8


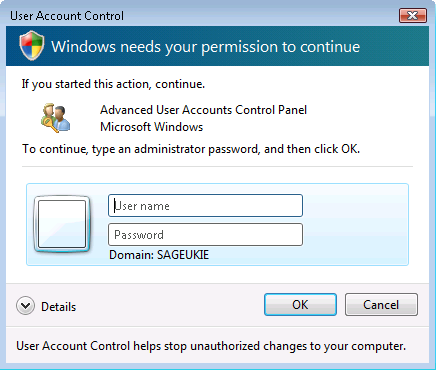
  • Press the Windows key + R, type netplwiz then click OK.If the User Accounts window appears, you are logged in as an administrator.If you’re prompted to enter your credentials, you’re not logged in as an administrator. To find out your administrator login details, please speak to your IT support.


Windows 7


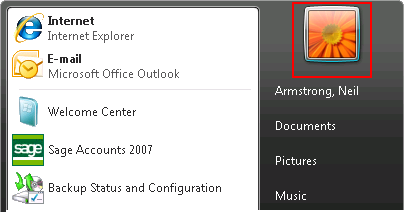
1. Click the Windows Start menu then click the user account picture.

If your computer is not a member of a domain, the user status appears below the user name.


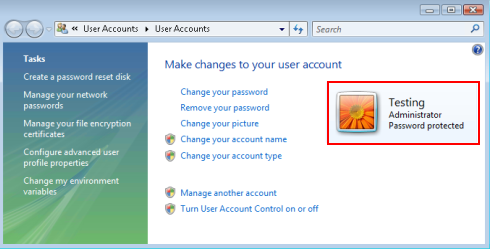
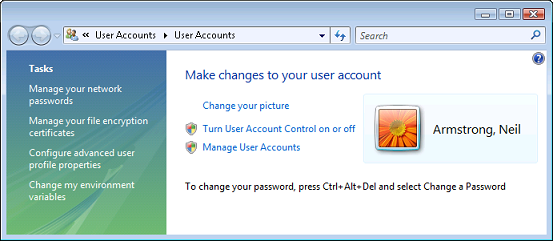
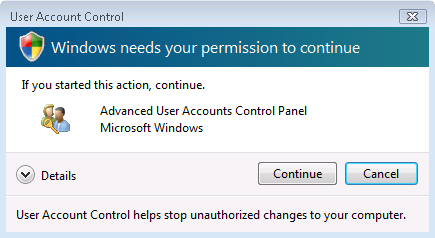
2. If your computer is a member of a domain, to check the user status, click Manage User Accounts.


3. If you are logged in as an administrator, the following window appears.


4. If you’re not logged in as an administrator, the following window appears. To find out your administrator login details, please speak to your IT support.


If the administrator access is hidden


If the default administrator account for your computer doesn’t appear when you start your computer, you can enable this account.

1. Right-click the Windows Start button then click Command Prompt (Admin).

Windows 8 or below – Click the Windows Start button, in the search box type CMD then right-click cmd.exe and click Run as administrator.

2. Type net user administrator /active:yes then press Enter.

3. Type Exit then press Enter.

The administrator account is now visible when you restart the computer, by default it has no password.

To turn the administrator account off, repeat the above steps, replacing active:yes with active:no


Error: ‘Unable to open ISO 3166 Country list’ after 21.2 update

Error: ‘Unable to open ISO 3166 Country list’


When opening the Employee Details window in Sage Payroll (v21.2 or higher), the following message may appear:

‘Unable to open ISO 3166 Country list.’

To close this message, click OK.

This error is a result of inadequate user permissions when the latest version of Sage Payroll was installed. The person that did the install had restricted access/permissions to the program and data directories of Sage Payroll – so some of the update’s components weren’t installed correctly, such as, the country list settings.

To resolve this issue, you must complete the following steps:

1. Log on to the computer as a user with administrative rights. If you need assistance with this, please contact your local IT support.

2. Download the latest update of Sage Payroll from our website.

  • After downloading the update; to install it, ensure you’ve closed all Sage software and run the file.
  • Please ensure you run the server update if you have a server client installation.

For help with installing a Sage Payroll update, please refer to our Installation Help Centre >

3. Once you’ve installed the latest version, open Sage Payroll and try to access the Employee Details window.


If the issue still occurs, please contact us on 051-395900.


Setting up a New Monthly Calendar

Setting up a New Monthly Calendar


1. When you log into your 2019 payroll, ensure that your Sage Payroll Version number is the latest Version. ( 2019 Software should be V22.0)

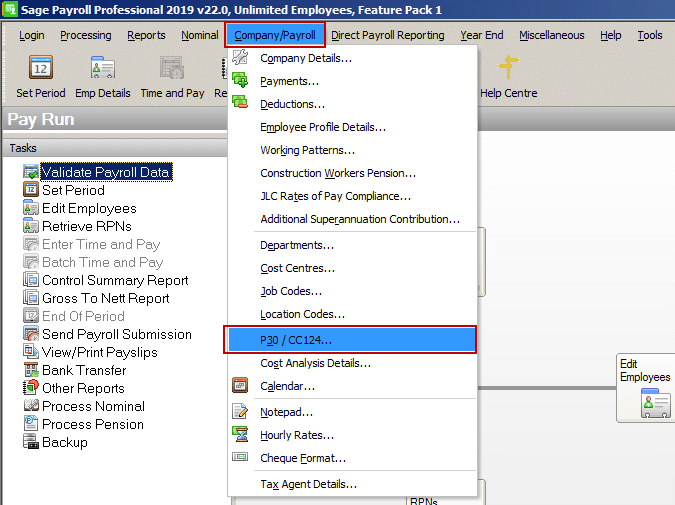
2. Select the Company/Payroll and the Calendar menu option.

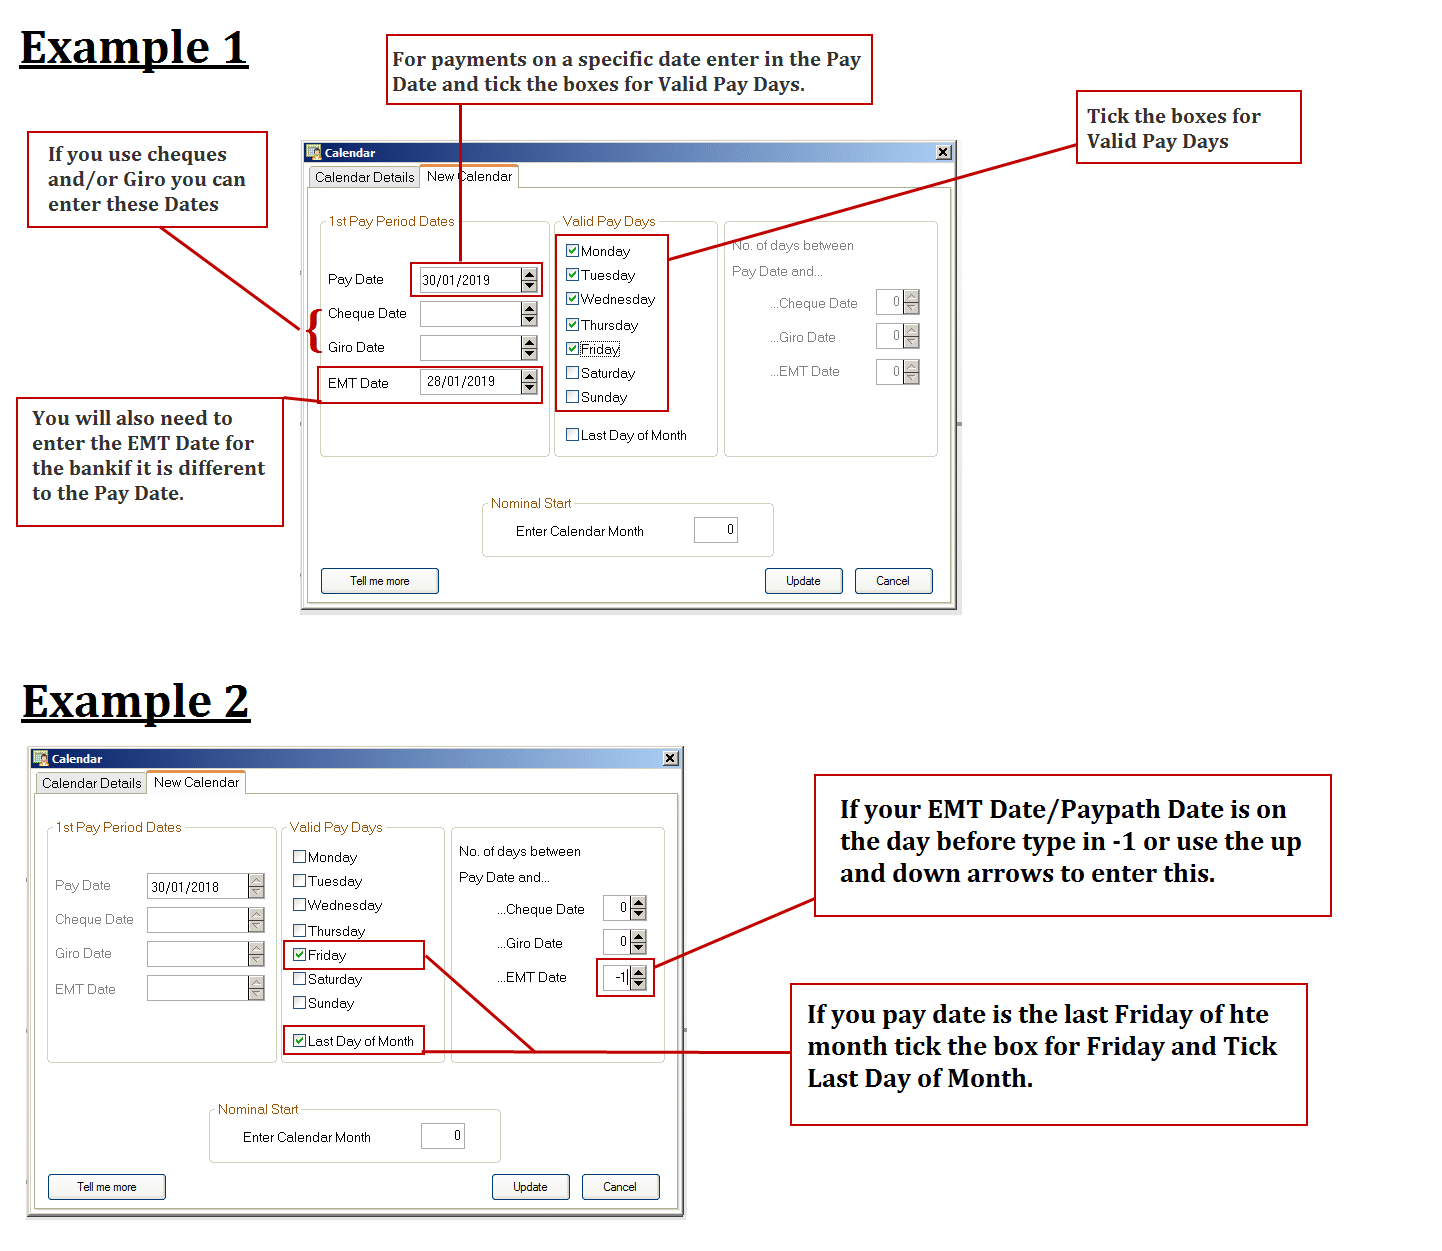
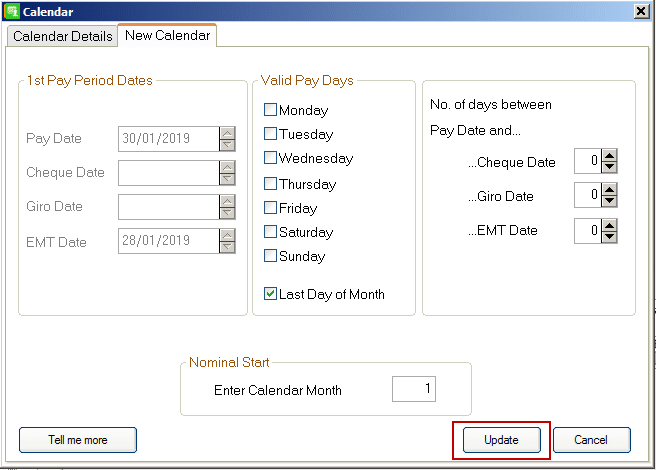
3. In the Calendar window, Click New Calendar tab.

4. Enter the calendar details for Period 1 of the new tax year.


N.B. It’s very important to enter the correct PAY Date for Period 1 of the new tax year. This date determines the subsequent dates of all of the 2019 pay periods.


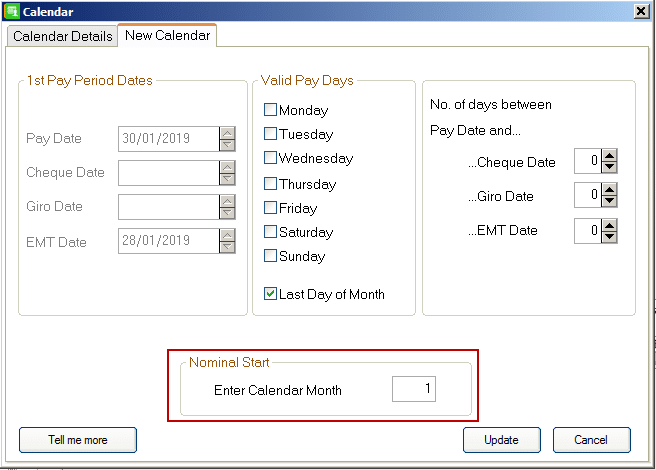
5. Enter Calendar Month number of the start of your Financial Year.


6. When you are happy with the dates entered click on Update.

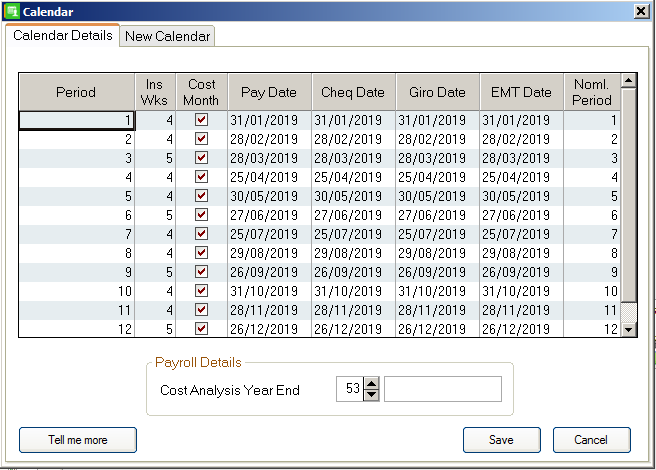
7. This will populate the dates for the full year. You can amend the calendar information if required, and set your cost analysis year end period and then click save.

8. Repeat this procedure for each payroll you set up in 2019 (if you have payrolls with the same frequency and pay date, you can copy the calendar in the Admin Section.


Pimbrook Software
Privacy Overview

This website uses cookies so that we can provide you with the best user experience possible. Cookie information is stored in your browser and performs functions such as recognising you when you return to our website and helping our team to understand which sections of the website you find most interesting and useful.