• See our Sage 50 Advanced Query Tool – AccountsMate
    Live Webinar Demonstration
  • Transition from TASBooks to Sage 50
    Easy with the Right Partner and Remarkably Beneficial
  • See our Sage 50 Advanced Query Tool – AccountsMate
  • Transition from TASBooks to Sage 50

KB Category: Sage Payroll (Micropay)

Direct Payroll Reporting

Direct Payroll Reporting


You will have 3 types of Processing with Revenue:        

1. Upload/Download

2. Manual

3. Direct


If you do not use a payroll package to operate your payroll, you will be able to meet new reporting requirements by using Revenue Online Service (ROS).

Payment due dates for employers remain the same.  If you have a sage payroll you will use the direct feed as follows:

3. Direct


This allows payroll software communicate seamlessly with ROS to exchange the required information.

Integration of payroll process


For more information on how to set up direct feed see Sage Services Registration


Sage Services Registration

Before you can retrieve Revenue Payroll Notifications (RPNs) for your employees and send online payroll submissions to Revenue from within your Sage Payroll 2019 software, you must first register to use the Sage Services to ROS. The registration process only takes a few minutes to complete in each of your payrolls, and you can do this now within your 2018 software.  Please ensure you are on the latest version 21.2.  Click here for instructions on how to upgrade.

To complete the registration process, your computer must be connected to the Internet.


Sage Services Registration


1. Open the payroll

2. Click on Direct Payroll Reporting – Register sage Services

3. Tick the box ‘I’m not a robot’ and follow the wizard

4. Click Finish

5. Congratulations you have successfully registered for sage on line services


6. If it fails you will get a message like this letting you know why. In this case the company email is missing.


7. Go back into your payroll

8. In the General Tab – Enter in the email address

9. Click OK when it is complete

When you have fixed all your errors Re run steps 1-5.


Next step is Retrieve Payroll Notification – (RPN)

Bike to Work Scheme

Bike to Work Scheme


  • As an employer, you can purchase bikes and accessories up to €1000 tax free for your employees and deduct the net cost from their wages over an agreed timeframe.
  • This is beneficial to your employees as they receive the full benefit of tax, universal social charge (USC) and social insurance (PRSI) relief on these amounts.
  • Your company also pays less employer PRSI on these amounts.


 1. To Set up a Bike to Work Deduction

a) At Start of Period – Click Company/Payroll then Deductions.


b) Click New & complete the following information:


  • Title: Enter a name for the deduction, for example, Bike2Work.
  • Type: Click Gross.
  • Sub-Type: Click Standard
  • Multiply by the number of holiday periods:

(If you want the value of this deduction to adjust according to the number of holiday periods you enter on an employee’s timesheet, select this check box. This option is only available in weekly and fortnightly payrolls.)

  • Balance Type: Click Reducing balance.

(This determines how the information will appear on the employee’s timesheet entry)

  • Click Save, then click Close.
 2. Assign the deduction to an Employee

a) Click Edit Employees – Open the relevant employee record and open the deductions tab


 b) Locate the Bike2 Work deduction, then enter the following information on the same entry line:

Std. E’e Amt:         Enter the amount you want to deduct from the employee each pay period.

Balance E’e:           Enter the total amount of the deduction (i.e.: the total cost of the bike)

c) Click Save, then click Cancel.

3. Enter Time and Pay,


a) Open the employee’s timesheet, enter the employees payments and you will see on the deductions side, that the standard deduction amount is there for the Bike2 Work.

b) Click Save.


  • To check that the set-up is correct you can then click on Payslip to see the details on the timesheet.
  • The Bike 2 Work deduction is showing the standard amount deducted this period
  • (E20.00 & the reduced balance of E380)
  • From now on in each pay period, when you process the employee’s pay details, the deduction balance reduces by the standard amount.
  • When it reaches zero, the deduction stops automatically.


Send payslips and P60s by email

Send payslips and P60s by email

You can use Sage Micropay to send payslips and P60s to your employees by email. You can specify which employees have agreed to receive documents electronically, and also set up a password to protect the emailed documents.

Activate the Use Email Feature

1. On the menu bar, click Company/Payroll then click Company Details.
2. Click the Email tab.

3. Select the Use Email Feature check box.
4. If required, complete the following information:

Show Message Before Sending Payslip/P60 All payslip and P60 emails use the same default message. If you want to preview or personalise each of your employee’s payslip or P60 emails before sending them, select this check box.
Request Read Receipt If you want to receive notification when the e-mail is received and opened, select this check box.
PDF Password If you want, you can type a master password. This allows you to open email and PDF payslips generated from Sage Micropay without having to enter the employee’s PIN password.

This password is for security and protection only, so the wrong person can’t view the payslips. It will not prevent someone from editing a PDF payslip if they have a PDF writing software.
5. Click OK.

Set up your employees to receive email payslips and P60s

1. On the menu bar, click Processing then click Employee Details.
2. Next to the Surname box, click browse and click the relevant employee.
3. Under Contact Details, enter the employee’s email address.
4. Click the Pay / YTD tab.

5. Under Pay/Misc, select the Email Payslips and P60s check box.
6. In the PIN box, edit the code if required.

.


Before an employee can open their email payslips or P60s, they must enter their pin code. For security purposes, this code should be different for each employee and can be up to a maximum of nine characters in length.

7. To email the pin code to this employee, click Email PIN.


8. Click Save and Send
9. Repeat steps 2 to 8 for each employee who wants to receive email payslips and P60s, then click Cancel.


Send payslips by email

1. On the menu bar, click Reports then click Payroll Reports.
2. Click the Employee tab.
3. Under List, click Email Payslip.
4. Click eMail.

5. To change the language the payslips generate in, click either In English or As Gaeilge.
If you want to, you can edit the default message that appears in the Accompanying e-mail window.
6. Click Generate Payslips.
7. If a Microsoft Outlook message appears, click Allow. To stop this message from appearing in future, please contact Microsoft Outlook support.
When the emailing process is complete, a confirmation window appears.
8. Click OK, then click Cancel.


Send P60s by email

Before generating your employees’ P60s, you must process the final pay periods of the current tax year. You should also print the Earnings Tax & PRSI (ETP) report for each of your employees, and check their year to date values are correct.

1. Check the payroll status at the bottom of your Micropay window is End Of Period (EOP).
If it’s not, on the menu bar, click Processing then click End Of Period and OK.
2. On the menu bar, click Year End, point to Tax, then click Tax Year End Reports.

3. Under P60 Plain Paper, select either In English or As Gaeilge.
4. Click eMail.

5. If prompted and applicable, select the following check boxes then click OK:

  • Include applicable PRD60s – If any of your employees pay pension related deduction (PRD), select this check box.
  • Include employees who were not paid this year – To email blank P60s to your directors or any active employees who weren’t paid this year (due to long term absence), select this check box.

6. If a Microsoft Outlook message appears, click Allow. To stop this message from appearing in future, you must contact Microsoft Outlook support.
When the emailing process is complete, a confirmation window appears. To close it, click OK.
7. To close Tax Year End Reports window in Micropay, click Cancel.
8. Open Microsoft Outlook and check:

  • The Sent Items folder – If the P60s have already sent, they appear here.
  • The Outbox folder – If the P60s are awaiting release from your email provider, they appear here.

The subject title on the emails is ‘Your P60 for 2017’.

How to map a network drive

How to map a network drive

Here we explain how to map a network drive. Before you can do this, the folder to which you want to map a drive must first be shared.

Check the folder share name

If the folder is already shared, make a note of of the share name.

Tip: If you’re unsure about this and the drive is already mapped on another PC, you can identify the computer name and share name from the other PC in My Computer. In the following screenshot, the S: drive is mapped to the accounts folder on a computer called sage002337. The UNC path is therefore \\sage002337\accounts 

Alternatively, you can use the net use command to see the full UNC paths allocated to each network drive on the PC.

1. Start > Run > in the Open box, type cmd > OK.

Tip: To open the Run window in Windows Vista or Windows 7, hold down the Windows key + R on your keyboard.

2. At the prompt, type net use > press Enter.

The list of mapped drives and their corresponding UNC paths appear.


3. To return to the Windows desktop, type exit > press Enter.


Windows 10


To map a network drive:

1. Right-click Start > File Explorer > select This PC.

2. Computer tab > Map network drive button > Map network drive.

3. From the Drive drop-down list, select the required drive letter.

4. In the Folder box, enter the UNC path, for example \\sage002337\accounts or click Browse and browse to the shared folder.

Tip: If the drive has been previously mapped on this PC, you can select the required UNC path from the drop-down list.


5. Select the Reconnect at logon check box > Finish.


Windows 8

To map a network drive:

1. Start > Windows Explorer > Computer > Map network drive.

2. From the Drive drop-down list, select the required drive letter.

3. In the Folder box, enter the UNC path, for example \\sage002337\accounts or click Browse and browse to the shared folder.

Tip: If the drive has been previously mapped on this PC, you can select the required UNC path from the drop-down list.

4. Select the Reconnect at logon check box > Finish.


Windows 7

To map a network drive:

1. Start > Computer > press the left Alt key > Tools > Map Network Drive.

2. From the Drive drop-down list, select the required drive letter.

3. In the Folder box, enter the UNC path, for example \\sage002337\accounts or click Browse and browse to the shared folder.

Tip: If the drive has been previously mapped on this PC, you can select the required UNC path from the drop-down list.

4. Select the Reconnect at logon check box > Finish.


Windows Vista

To map a network drive:

1. Start > Computer > press the left Alt key > Tools > Map Network Drive.

2. From the Drive drop-down list, select the required drive letter.

3. In the Folder box, enter the UNC path, for example \\sage002337\accounts or click Browse and browse to the shared folder.

Tip: If the drive has been previously mapped on this PC, you can select the required UNC path from the drop-down list.


4. Select the Reconnect at logon check box > Finish.


Windows XP

To map a network drive:

1. Open My Computer > Tools > Map Network Drive.

2. From the drop-down list, select the required drive letter.

3. In the Folder box, enter the UNC path, for example \\sage002337\accounts or click Browse and browse to the shared folder.

Tip: If the drive has been previously mapped on this PC, you can select the required UNC path from the drop-down list.

4. Select the Reconnect at logon check box > Finish.

Windows 2000

To map a network drive:

1. Open My Computer > Tools > Map Network Drive.

2. From the drop-down list, select the required drive letter.

3. In the Folder box, enter the UNC path, for example \\sage002337\accounts or click Browse and browse to the shared folder.

Tip: If the drive has been previously mapped on this PC, you can select the required UNC path from the drop-down list.


4. Select the Reconnect at logon check box > Finish.


Error: Server Busy – This action cannot be completed… Switch to… Retry

Error: Server Busy – This action cannot be completed… Switch to… Retry

When processing in Sage Micropay, you may receive the following message:

‘Server Busy – This action cannot be completed because the other program is busy. Choose ‘Switch to’ to activate the busy program and correct the problem.’

The following options are offered: Switch to, Retry or Cancel.

This message can appear for a variety of reasons, such as anti virus software and permissions.

If this message appears when you’re viewing the year end guide within Sage Micropay, please refer to article 34240 .


To resolve this, please try the following:


Step 1 – Install any Windows updates, restart your computer and log on as administrator

Ensure that you’ve checked for, and installed, any required Windows updates.

1. Close all software, including Sage Micropay.

2. Windows key + R.

3. Type wuapp then click OK.

4. Click Check online for updates from Microsoft Update.

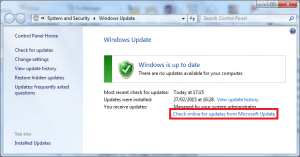
Follow the instructions to download and install any available updates. For further assistance with this, please contact your local IT support

5. Restart your computer and log on as a Windows administrator.

If you’re unsure about how to log on to your computer as an administrator, please contact your local IT support.

6. Repeat steps 2 to 5, until there are no further updates to install.


Step 2 – Configure your anti virus software to exclude Sage Micropay files

To protect against the message occurring in the future, you should configure your anti virus software to exclude Sage files.

For more information about which files to exclude from the anti virus checks, please refer to article 35265.


Step 3 – Run Sage Micropay as an administrator

Windows 10

1. From the Windows desktop, right-click the relevant tax year option of Sage Micropay then left-click Properties.

2. Click the Compatibility

2. Select the Run this program as administrator check box.

4. Click Apply then OK.

If you’re not logged on to the computer as an administrator, the User Account Control window prompts you to enter the user name and password of an administrator. Enter the user name and password then click OK.

Windows 8

1. From the Windows desktop, right-click the relevant tax year option of Sage Micropay then left-click Properties.

2. Click the Compatibility

3. Select the Run this program as administrator check box.

4. Click Apply then OK.

If you’re not logged on to the computer as an administrator, the User Account Control window prompts you to enter the user name and password of an administrator. Enter the user name and password then click OK.

Windows 7

1. From the Windows desktop, right-click the relevant tax year option of Sage Micropay then left-click Properties.

2. Click the Shortcut tab, then click Advanced.

3. Select the Run as administrator check box.

4. Click OK then OK and Yes.

If you’re not logged on to the computer as an administrator, the User Account Control window prompts you to enter the user name and password of an administrator. Enter the user name and password then click OK.

Windows Vista

1. From the Windows desktop, right-click the relevant tax year option of Sage Micropay then left-click Properties.

2. Click the Shortcut tab, then click Advanced.

3. Select the Run as administrator check box.

4. Click OK then OK and Continue.

If you’re not logged on to the computer as an administrator, the User Account Control window prompts you to enter the user name and password of an administrator. Enter the user name and password then click OK.


Step 4 – Download and install the latest update of Sage Micropay

You can download the latest version of Sage Micropay from the downloads area of our website.

After downloading, to install it ensure you’ve closed Micropay and run the file.

Before you install this new version of Micropay, you must check that your computer meets the recommended system requirements and that you’re logged on to your computer as an administrator. If you don’t have administrator access, your software may not install correctly.


Modifying your antivirus software to avoid conflicts with Sage Micropay

Modifying your antivirus software to avoid conflicts with Sage Payroll (Micropay)

Under certain conditions, the antivirus software you’re using to protect your computer may have a negative effect on the performance of Sage Micropay. When Sage Micropay creates or accesses a file, the antivirus software can lock the file as it performs a scan. This means that Sage Micropay may slow down or hang as the file is locked by the antivirus software. In extreme circumstances, your antivirus software can also affect the stability and general functionality of Sage Micropay.

Note: If you’re using Avast! antivirus software and you’re experiencing problems when opening or using Sage, please refer to article 33605.

We’ve created this guide to identify the files and folders that Sage Micropay uses, so you can exclude them from your antivirus software’s scanning routine. This can help to improve the performance of Sage Micropay.

Note: We can’t support you with modifying your antivirus software. If you need help with this, please refer to your local IT support.

Files and folders used by Sage Payroll  (Micropay)

To check where your Sage Micropay program directory and data directories are located:

  1. Open Sage Micropay and log in to a payroll as normal.
  2. On the menu bar, click Help, then click System Information.
  3. Under Program Details, make a note of the Program Directoryand Data Directory

Tip: If the Data Directory link shows a local drive, for example, C:\Program Data\Micropay Professional, then your payroll data is held on this computer. If the Data Directory link shows a mapped network drive, then your payroll data is held on a network.

The following folders and their sub directories are used only by Sage software:

  • The Sage Micropay program directory.
  • The Sage Micropay data directory.
  • C:\Program Data\Sage.
  • C:\Program Files (x86)\Common Files\Sage SBD or C:\Program Files\Common Files\Sage SBD.
  • C:\Program Files (x86)\Common Files\Sage Ireland Payroll or C:\Program Files\Common Files\Sage Ireland Payroll.

Sage Micropay and proxy servers

Sage Micropay and proxy servers

This article details everything you need to help you understand what a proxy server is, and how it affects your Sage Micropay software.

Definition, purpose and function of a proxy server

Proxy servers are used to control the flow of information between networks, typically a local network and the internet. A proxy server may comprise either hardware, software or both.

The main purpose of a proxy server is to regulate access to other networks whilst maintaining security. When a networked computer is used to access information from outside the network, for example an internet based web page, the information is accessed through a proxy server which retrieves the data from the web server and passes that information back to the computer.

How does a proxy server affect Sage software?

With the introduction of Automatic Updates, Sage software accesses web based resources more than ever before. It is highly likely that such requests pass through proxy servers.

You can enter proxy server settings in your Sage software, on the menu bar, click Tools then Internet Options then click the Network Settings tab. The use of browser settings is recommended, although proxy settings may be entered in this window if preferred. If required, this task should be undertaken by your IT support.

URLs to exclude on a Proxy server

Firewall and antivirus software may interfere with the download and installation of software updates and other Sage services, for example Sage Licensing. To minimise this issue, firewall and anti virus software may be configured to permit access to:

For further information and help with this, please contact your IT support.

Telnet – To check if you have access to the required Sage websites

Get your IT support to check you have access to the Sage Licensing, Update and Download websites. They can do this using Telnet and the following settings:

Web address Port number
licensing.services.sage.com 443
update.sage.com 443
download.sage.com 443

If there’s no access to the required site, this must be resolved by your IT support. If you can access the sites successfully, no further action is required.