• Transition from TASBooks to Sage 50
    Easy with the Right Partner and Remarkably Beneficial
  • Transition from TASBooks to Sage 50

KB Category: Sage Payroll (Micropay)

Support Employment IDs for existing, new and reinstated employees (Required for PAYE Modernisation returns) (V21.1)

Support Employment IDs for existing, new and reinstated employees (Required for PAYE Modernisation returns)


Within the Employee Details window of Sage Payroll (v21.1 or higher), there is a field titled Employment ID. This holds a unique value for each separate employment for an employee and is a requirement for Revenue’s PAYE Modernisation Project which comes into effect from 1 January 2019.


To save you time, Sage Payroll has automatically allocated each of your employees with a default Employment ID value of 1. You should only change the Employment ID value for an employee, if one or both of the following scenarios apply:


  • The employee has multiple employments with your company.
  • The employee left and re-joined your company in the same tax year.

To change an employee’s Employment ID

  1. Open Sage Payroll 2018 and log into the payroll as normal.
  2. Check your version number is 21.1 or higher. You can find this in the top left-hand corner of your software. If it’s 21.0 or lower, you must install the latest Sage Payroll (Micropay) update
  3. On the menu bar, click Processing then click Employee Details.
  4. Next to the Surname box, click browse  and click the relevant employee.
  5. Next to the Employment ID box, click Edit.
  6. In the New Employment ID isbox, enter a value using any combination of the following:
  • Upper and lower case letters.
  • Digits 0 to 9, and the following special characters – \ _

The New Employment ID must be different to the value that is held in the Current Employment ID box. Also, the following special characters cannot be used:

^ & ‘ @ * £ € { } [ ] . ? , $ = “! # ( ) % . + ~

  1. Once you’ve entered the new employment ID, click Change.
  2. Click Save.
  3. Repeat steps 3 to 8 for each employee you need to edit the Employment ID for, then click Cancel.


Click here to view the new features in V21.1

Sage Payroll Update (Micropay) – Payroll is held on a Network

My Payroll is held on a Network

Please ensure you follow the preparation steps which include Backups and Administration rights before you continue

To install the latest version of Sage Payroll on a single computer, you must complete the following steps:

If you have followed the preparation steps which include Backups and Administration rights you should have the download available to run.  If not you can download it from our website here .

Server Install

1. Double click on the icon to start the installation

2. To accept the terms of the licence agreement, select the check box then click Next.

3. Select Server, then click Next.


4. Check the data folder location is correct.

If it’s not, click Browse, enter the correct folder then click OK.

5. Click Next, then click  Install and Finish.


Once the server is complete run the Client Install

1.Double click on the icon to start the installation

2. To accept the terms of the licence agreement, select the check box then click Next.

3. Select Client, then click Next.

4. Click Custom, then click Next.

5. Check the data folder location is correct.

If it’s not, click Browse, enter the correct folder then click OK.

6. Click Next, then click  Install and Finish.

7. Repeat steps 7 to 10 on all computers that operate Sage Payroll.

You’ve now completed the installation process and you must reboot your Computer/Server once you have completed the installation before you log in to Sage Payroll.


Sage Payroll Update (Micropay) – Payroll is held on this Computer

My Payroll is held on this Computer


Please ensure you follow the preparation steps which include Backups and Administration rights before you continue

To install the latest version of Sage Payroll on a single computer, you must complete the following steps:

If you have followed the preparation steps which include Backups and Administration rights you should have the download available to run. Alternatively, if you downloaded the update from our website

1. Double click on the icon to start the installation.

2. To accept the terms of the licence agreement, select the check box then click Next.

3. Select This Computer, then click Next.

4. Select Custom, then click Next.

5. Check the program and data folder locations are correct. Click Next


If not, click Browse, enter the correct folders then click OK.


6. Select the Add shortcuts to my desktop check box, then click Install.

7.  Click Finish to complete.

You’ve now completed the installation process and you must reboot your Computer/Server once you have completed the installation before you log in to Sage Payroll.

Sage Payroll (Micropay) Update Instructions and Preparation

How to Prepare and Update your Sage Payroll (Micropay) System?


Before you install Sage Payroll, you or your IT support, should check the following:

Download Sage payroll (Micropay)

If your automatic news feeds is enabled you will receive an automatic notification to download the update  or alternatively you can download from our website

1. Log into our website

2. Browse for the file you want to download (e.g. type sage payroll ) click on the latest version no.

3.  You should get the option to run or save the file. Save the file


4. Double click to run the latest version of Sage Payroll on your PC.


Install the latest update for your Sage payroll software.

To install the payroll on your machine follow the following steps:

My Payroll is held on this Computer

My Payroll is held on a Network


You must reboot your Computer/Server once you have completed the installation of  Sage Payroll 22.2 Update

Generate an employee list for Revenue

Sage Payroll – Knowledgebase

Generate an employee list for Revenue


PAYE Modernisation comes into effect from 1 January 2019. To help prepare for this new legislation, the Revenue will ask you for a listing of all employees in your company for their Data Alignment exercise.

Within Sage Payroll (previously known as Micropay), you can generate the Employee List to ROS file. You can then submit this XML data file to Revenue via their website.

Generate the Employee List to ROS file

1. Open Sage Payroll 2018 and log in to a payroll as normal.

2. Check your version number is 21.1 or higher. You can find this in the top left-hand corner of your software. If it’s 21.0 or lower, you must install the latest Sage Payroll (Micropay) update

3. On the menu bar, click Reports then click Payroll Reports.

4. Click the Company

5. Under File Exports, click Employee List to ROS

Generate an Employee List

6. For each payroll you want to include in the report, select the Include check box and enter the password if required.

Generate an Employee List

7. To proceed, click Continue.

If any issues are found in your data, an Errors and Warnings window appears. You must resolve all errors before you can proceed with creating the return. 

8. Browse to where you want to save the XML data file, then click Save

.Generate an Employee List

The Employee List to ROS – Complete window now appears.

9. Click View File Summary, then check the values are correct for each employee on this report.

10. To print a copy of this summary report for your own records, click File then click Print.

Ensure your printer details are correct, then click Print again.

11. To close the summary report, click File then click

12. Select the Open folder containing Employee List File check box, then click Done.

The location where the XML file is saved now opens automatically in Windows Explorer.

13. To close the Payroll Reports window of Sage Payroll, click Cancel.


Click here To watch a video – Generate an employee list for Revenue


How to process holiday pay using the Holiday Tracking and Accrual feature

How to process holiday pay using the Holiday Tracking and Accrual feature

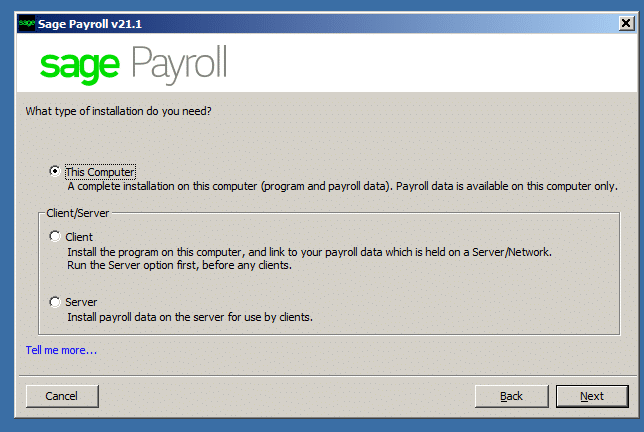
Within Sage Micropay, you can use the Holiday Tracking and Accrual feature to quickly and easily record your employees’ holidays and process their holiday pay.


Entering payroll holiday settings

If you have hourly-paid employees in your payroll, you must complete steps 1 to 4. If you don’t have any hourly-paid employees, please skip to step 5.

1. On the menu bar, click Company/Payroll then click Payments.

2. Locate and select a hourly payment, then click

3. Select the Holiday Accrual calculation check box, then click Save.

4. Repeat step 2 and 3 for each hourly payment on your payroll, then click Close.

5. On the menu bar, click Company/Payroll then click Company Details.

6. Click the Holidays

7. Under Holiday Year, enter the holiday year’s start date and finish date.

8. Under Company Settings, complete the following information:

Holiday Payment (Days) Choose the payment you want to use for holiday pay when it is calculated on the basis of days. Only fixed payments or variable payments can be specified.
Holiday Payment (Hours) Choose the payment you want to use for holiday pay when it is calculated on the basis of hours. Only hourly payments can be specified.


9. Under Employee Accrual Settings, complete the following information if required:

Default accrual method for all employees Select the default accrual method for all employees in the payroll.
Standard Entitlement Enter the standard number of holidays per year for all employees.
Total Hours in a working day Enter a default value for all employees in the payroll.
Total number of working days per week Enter a default value for all employees in the payroll.

If necessary, you can override the values of these accrual settings within a particular employee’s record.

10. Click Apply accrual settings to all employees, then click Yes and OK.

11. To close the Company Details window, click OK.


Entering employee holiday accrual settings


1. On the menu bar, click Processing then click Employee Details.

2. Next to the Surname box, click browse and click the relevant employee.

3. Click the Holidays tab, then complete the following information:

For a full time salary-paid employee

Accrual method Choose Based on a standard number of holidays per year.
Holidays B/F from last year (days) If applicable, enter the number of holiday days that this employee has left over from the previous holiday year, and is bringing forward into this holiday year.
Holiday entitlement per year (days) Enter the total number of holiday days due to this employee in the current holiday year.
Total number of working days per week Enter the total number of days this employee works each week. If this fluctuates from week to week, enter an average number of days.
Hours per working day Enter the total number of hours this employee works each day. If this fluctuates from day to day, enter an average number of hours.
Payment method Choose Pay based on a number of days taken in a period.
Annual pay Enter the employee’s yearly gross earnings.


For a full time hourly-paid employee

Accrual method Choose As a percentage of hours worked.
Holidays B/F from last year (days) If applicable, enter the number of holiday days that this employee has left over from the previous holiday year, and is bringing forward into this holiday year.
Total number of working days per week Enter the total number of days this employee works each week. If this fluctuates from week to week, enter an average number of days.
Hours per working day Enter the total number of hours this employee works each day. If this fluctuates from day to day, enter an average number of hours.
Payment method Choose Pay based on a number of hours taken in a period.


For a part time employee

Accrual method Choose One third of a working week per calendar month.
Holidays B/F from last year (days) If applicable, enter the number of holiday days that this employee has left over from the previous holiday year, and is bringing forward into this holiday year.
Total number of working days per week Enter the total number of days this employee works each week. If this fluctuates from week to week, enter an average number of days.
Hours per working day Enter the total number of hours this employee works each day. If this fluctuates from day to day, enter an average number of hours.
Payment method Choose Pay based on a number of days taken in a period.
Annual pay Enter the employee’s estimated yearly gross earnings.

If you’re setting up the holiday accrual settings for this employee mid-way through the holiday tax year, proceed to step 4. Alternatively, if you’re setting up the holiday accrual settings for this employee at the start of the holiday tax year, skip to step 5.

4. Click Edit Holiday Year Details, then click Add and complete the following information:

For a full time salary-paid employee

Period Date Enter the current pay period’s date.
Weeks Worked Enter the total number of weeks the employee has worked this holiday year to date.
Days Taken If applicable, enter the total number of holiday days the employee has taken this holiday year to date.
Holiday Pay If applicable, enter the total holiday earnings that you’ve paid to the employee this holiday year so far.

In this example, the employee has worked twelve weeks, taken two holiday days and has received holiday pay of 193.30 to date this year.

 For a full time hourly-paid employee

Period Date Enter the current pay period’s date.
Hours Worked Enter the total number of hours the employee has worked this holiday year to date.
Hours Taken If applicable, enter the total number of holiday hours the employee has taken this holiday year to date.
Holiday Pay If applicable, enter the total holiday earnings that you’ve paid to the employee this holiday year so far.

In this example, the employee has worked 100 hours, taken 15 holiday hours and has received holiday pay of 192.30 to date this year.

 For a part time employee

Period Date Enter the current pay period’s date.
Worked 117 hrs last month Select either Yes or No.
Days Taken If applicable, enter the total number of holiday days the employee has taken this holiday year to date.
Holiday Pay If applicable, enter the total holiday earnings that you’ve paid to the employee this holiday year so far.

In this example, the employee has worked 117 hours last month, taken 2 holiday days and has received holiday pay of 192.00 to date this year.

5. Click Save.

6. Repeat steps 2 to 5 for each employee on your payroll, then click Cancel.

Processing employee holiday pay

1. On the menu bar, click Processing then click Time and Pay.

2. Under Entry mode, select Random then click Continue.

3. Next to the Employee box, click browse and click the relevant employee.

4. Under Pay periods, in the Periods box, enter the number of periods the employee is on holidays for.

Based on the value you enter in this box, Sage Micropay automatically allocates the correct insurance weeks and tax credits to your employee.

5. Click the Holidays/Absence tab, then complete the following information:


 For a full time salary-paid employee

Holidays taken this period (Days) Enter the number of holiday days the employee is taking this period.
Holidays due this year (Days) To view a detailed breakdown of the employee’s holiday values to date, click Show Details.


For a full time hourly-paid employee

Holidays taken this period (Hours) Enter the number of holiday hours the employee is taking this period.
Holidays due this year (Hours) To view a detailed breakdown of the employee’s holiday values to date, click Show Details.


For a part time employee

Employee has worked at least 117 hours in the last calendar month Select either Yes or No.
Holidays taken this period (Days) Enter the number of holiday days the employee is taking this period.
Holidays due this year (Days) To view a detailed breakdown of the employee’s holiday values to date, click Show Details.


6. Click the Data Entry tab, then enter any additional pay details you want to record for this employee.

7. Check that all payment and deduction values are correct. If not, edit as required.

8. Click Save.

9. Repeat steps 3 to 8 for all employees you want to record holiday pay for this period, then click Cancel.


Reconciling values on the Control Summary report

Reconciling values on the Control Summary report

Before you begin processing a new pay period, you should check the values on your Control Summary report are correct. This involves reconciling the carried forward values from the previous period’s report with the brought forward values for the current period’s report.

Generally, the year to date totals for gross pay, tax, universal social charge (USC) and pay related social insurance (PRSI) are the same on both. However, if they’re different, you should always investigate the reasons why and reconcile the differences.

For the current period

1. On the menu bar, click Reports then Payroll Reports

2. Select Control Summary, then click Print.

3. To close the Payroll Reports window, click Cancel.


For the previous period

    1. 1. On the menu bar, click

Miscellaneous

    1. then

Period Archive

2. Under Period Archives, select the previous period.

3. Click Revert.

4. On the menu bar, click Reports then Payroll Reports.

5. Select Control Summary, then click Print.

6. To close the Payroll Reports window, click  Cancel

7. To go back to the current period, click Miscellaneous then Period Archive.

8. Under Period Archives, select Current Period.

9. Click Revert.

To reconcile the values on your Control Summary reports

On the Control Summary, the year to date totals appear under the Cumulative Control Totals section. You should review this information and reconcile any differences between the carried forward (C/Forward) values from the previous period and the brought forward (B/Forward) values for the current period.


Possible reasons why your Control Summary values may differ from one period to the next

There are a number of reasons why your Control Summary values may differ from one period to the next. These include:

  • If you enter P45 information for an employee who started in a previous period. Micropay no longer considers the employee to be a new starter and their P45 information appears as an adjustment to the brought forward (B/Forward) values on the Control Summary.

If the difference between the brought forward and carried forward values relates to P45 information, there isn’t a problem. However, we recommend that you write a note on the printed Control Summary report to identify the reasons for any differences.

  • If you enter P45 information for a new starter, and the new starter is not paid in that period. The P45 information goes into the carried forward (C/Forward) values for that period. In the following period, the new starter’s P45 information remains in the New Starters column and the brought forward (B/Forward) values reduce by the same amount.

If the difference between the brought forward and carried forward values relates to a new starter, there isn’t a problem. However, we recommend that you write a note on the printed Control Summary report to identify the reasons for any differences.

  • If you make an amendment to a timesheet, after printing the Control Summary.
  • If you manually adjust values on an employee’s record, for example, if you’re setting up an employee mid year and entered their year to date information.

If the difference between the brought forward and carried forward values relates to a legitimate manual adjustment, there isn’t a problem. However, we recommend that you write a note on the printed Control Summary report to identify the reasons for any differences.

In summary, when there is a difference between the brought and carried forward values on the Control Summary, any combination of the above explanations could cause the difference. However, it’s important that you reconcile these differences immediately. You should also write a note on the printed Control Summary report to identify the reasons for any differences.


End of Period (EOP) Rewind

End Of Period (EOP) and Rewind

Once you’ve entered and checked your employees’ pay details for the current period, you’re ready to finalise the payroll. To update your employees’ year to date values and your P30/CC124 totals with the current period’s values, you use the End Of Period option.

You must run the End Of Period option before you can process your next pay period.

After posting the end of period (EOP) values, you may detect errors in your data, for example, if you’ve saved a timesheet for someone by accident or you overpay someone. If so, you must rewind the end of period process and correct these errors before posting the end of period values again. You can only rewind the current pay period.

The rewind process involves rolling back your payroll data to it’s pre-end of period state. Timesheet details are unaffected by a period rewind, so you don’t need to re-enter pay details for employees already completed in the period unless you want to edit them.

To post the end of period values

  1. On the menu bar, click Processing then click End Of Period.

If you’ve already posted the EOP values for the current period, this option is greyed out.

  1. When you’re prompted to post calculation results, click OK.
  2. Check the payroll status at the bottom of your Micropay window is End of Period. If it’s not, repeat the previous steps.

To rewind (undo) the posting of end of period values

  1. On the menu bar, click Processing, then click Period Rewind.

If you haven’t posted the EOP values for the current period yet, this option is greyed out.

  1. When you’re prompted to rewind the last posting, click OK.
  2. Check the payroll status at the bottom of your Micropay window is Time and Pay Calculated, or Start Of Period if you didn’t process any pay details this period.