• Payroll Year End 2025 & Pension Auto Enrolment
    We have all the help you need to complete your Payroll Year End and manage Pension Auto Enrolment here.
  • Payroll Year End 2025 & Pension Auto Enrolment

KB Category: Sage Payroll (Micropay)

What’s new in V26.2 Sage Payroll (Micropay)

What’s new in V26.2 Sage Payroll (Micropay)

  • Enhanced Password Security
    • You will be prompted to change your Admin password when logging into the software.
    • Must be at least eight characters in length.
    • Must contain at least one letter.
    • Must contain at least one number.
    • Must contain at least one special character/symbol.
  • If your payroll or user password doesn’t meet the password requirements it will prompt you to change these also.
  • New Payment type added to Sage Payroll
    • An Expenses payment type has been introduced to support the Enhanced Reporting Requirements (ERR) Coming into effect from 1 January 2024.
    • You’ll need to process payments that will be reported under ERR using an Expenses payment.  This includes payments for small benefit exemption, remote working daily allowance and certain travel and subsistence items.
    • ERR functionality will be available in your Sage Payroll 2024 update.
  • CWPS rates
    • CWPS rates have increased effective from 18th September.
  • One4all vouchers
    • Minimum and Maximum limits have been applied to the vouchers.


Follow Sage’s guide to Download and install the latest version of Sage Payroll.


Previous Employment Figures include this Employment values

Problem: Previous Employment Figures coming in on RPN but are also in This Employment when you re-instate an employee and transfer to another payroll to be paid


This happens when the employee has been working elsewhere in between employments with your company.

When you reinstate the employee and retrieve rpns in the same payroll, revenue recognize that this matches the previous employment they have for this employee. But when you retrieve rpns in a different payroll with a different reference and frequency, it does not recognize it as a previous employment with the same company and sends all previous employment figures added together instead of just the ones for the employment outside your company.

Solution Options:

  1. Restore both payrolls involved in the transfer to the period prior to the re-instatement and transfer ie when the employee had a status as “Left” and re-run the payroll without transferring the employee.  In the destination payroll, set the employee up as a new starter.
  2. Contact Revenue and ask them to remove the previous employment figure for your company for this employee as you have these figures in your payroll as current employment figures
  3. If payroll has been processed for one or more periods and restoring is not an option, then go to the ETP of the employee and remove the transferred figures i.e. usually period 1. Check control summary figures before and after this and make note of why the Cl balances last period do not match op balances this period.


Gender Pay Gap Reporting

Gender Pay Gap reporting


On 13 July 2021, the Gender Pay Gap Information Act 2021 was signed into law.

The act is due to come in towards the end of 2022 and will require employers to report on the pay differences between female and male employees, including any bonuses. Whilst the act has been signed into law, it does not mean reporting is required immediately. The act allows the making regulations through which reporting requirements will be specified. The reporting process will begin in 2022.


Will my business be affected?

All employers with 250 or more employees will be required to report on this from 2022. By 2025, it is expected that employers with 150 or more employees will be expected to report, with this reducing to 50 employees or more after that.


What information will be reported?

The new law allows for the regulation of the following:

  • How to calculate the number of employees,
  • How to calculate the pay of employees,
  • The mean and median hourly pay of male and female employees,
  • The mean and median bonus pay of male and female employees,
  • The mean and median pay of part-time male and female employees,
  • The mean and median pay of employees on temporary contract,
  • The form, manner and frequency with which information is to be published.


How do I prepare for Gender Pay Gap reporting?


Gender identification for Payroll reporting and Import employee gender information


To help you prepare for Gender Pay Gap reporting, you can run reports to check that your employees are set up with the correct gender on your payroll.


We’ve included the Employee Gender report and Employee Gender import CSV file in the 2022 software.


The Employee Gender report


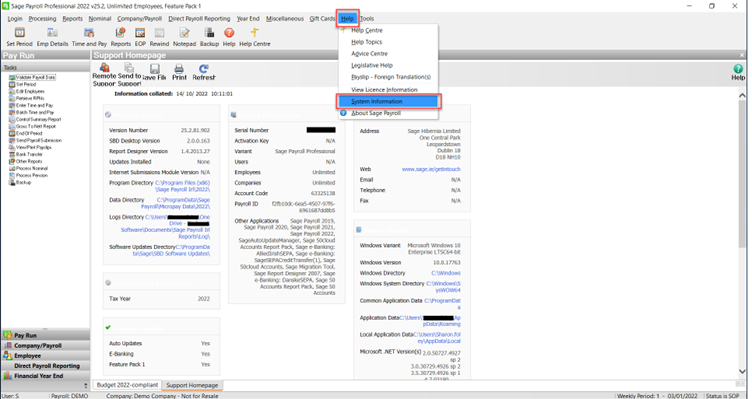
1. On the menu bar, click Help then click System Information.


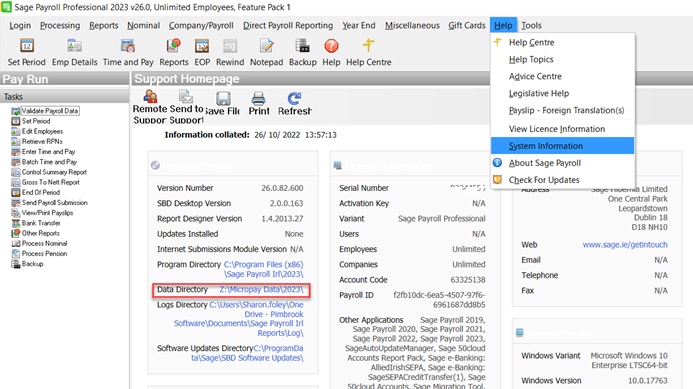
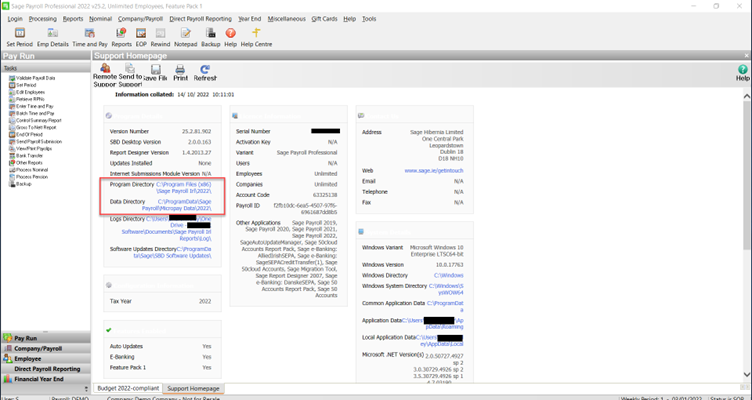
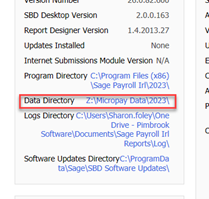
2. Make a note of the Data Directory

3. Click Reports and then choose Report Writer.


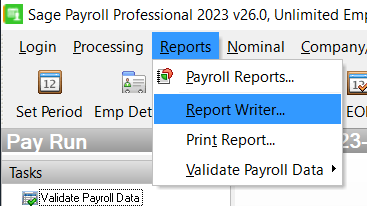
4. Within Report Writer click File then click Open.


5. Choose the rpt file then Open it.


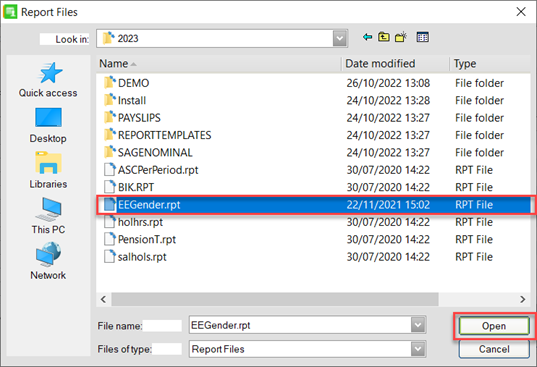
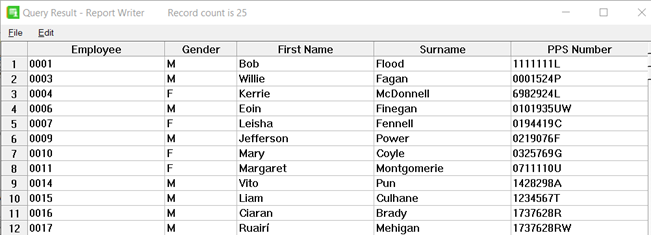
6. Click Process to generate the report.
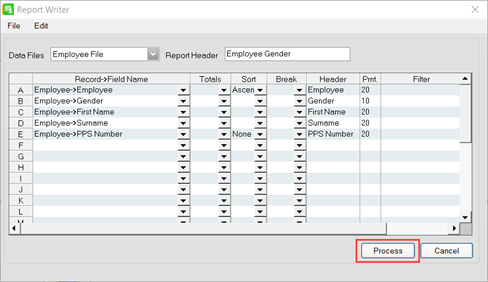
 

This report shows:

  • Employee’s Gender
  • Employee’s Surname
  • Employee’s First Name
  • Employee’s PPS Number


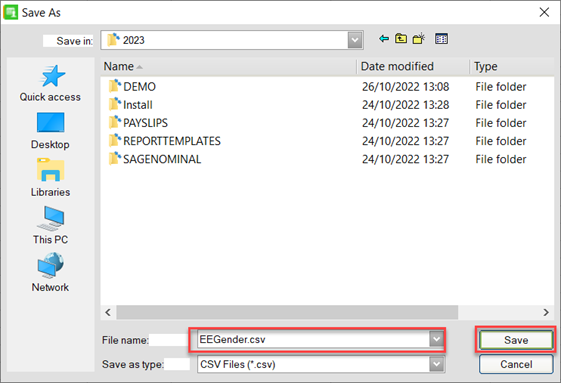
7. Click File, then click Save As.


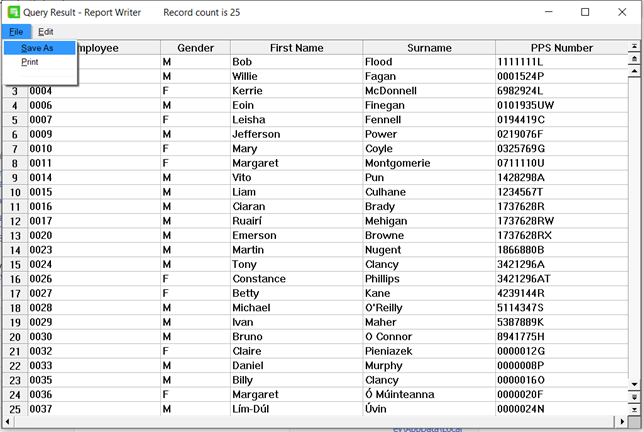
8. Click the Save in arrow, then browse to the location you noted in step 3.

9. In the File name box, type csv. and Click Save.


10. Close Sage Payroll and browse to the location you noted in step 3.

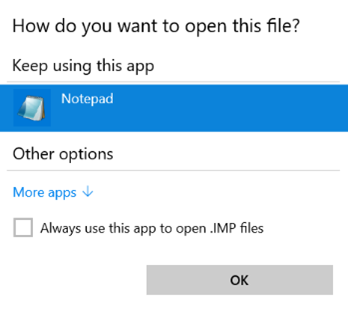
11. Right-click the file csv, then click Open with.

12. When prompted, select Excelthen click OK.

13. Under column B, ensure the gender is correct for each employee. If any gender is incorrect, amend to ‘M’ or ‘F’ as appropriate.

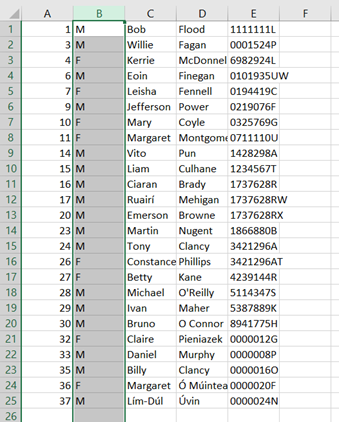
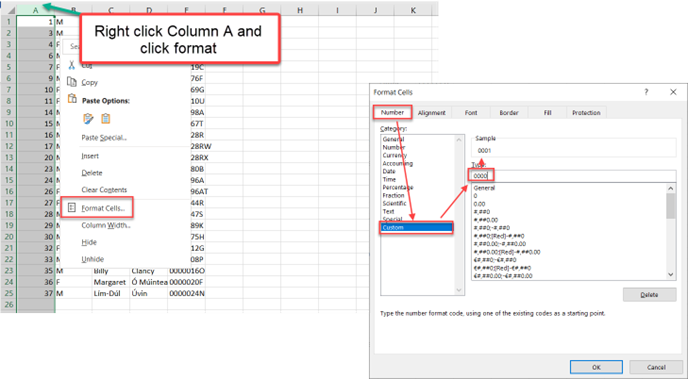
14. Under column A, ensure your employees’ numbers are correct as excel may have removed any leading zeros e.g. ‘0001’ may have changed to ‘1’. Change this if required.


15. Click File then click Save.

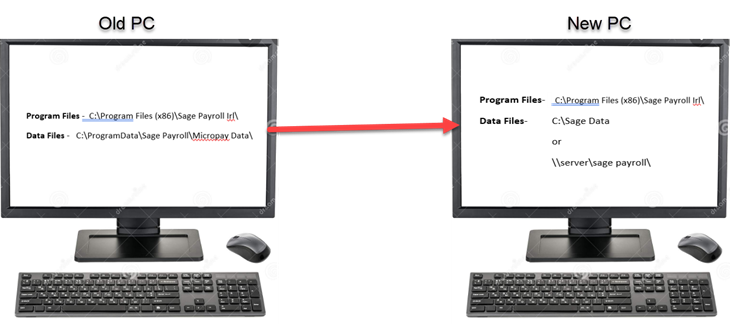
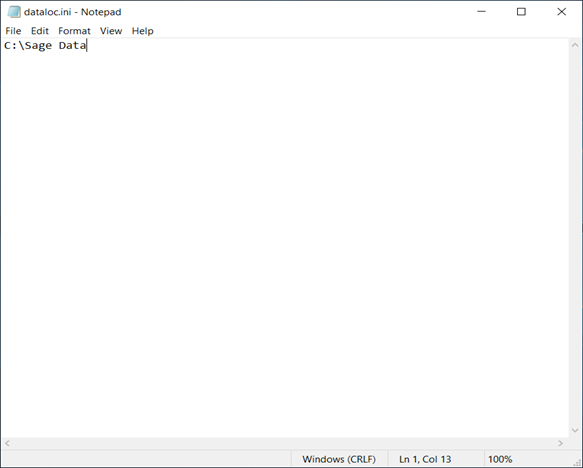
If the Data Directory link that you noted in step 3 is C:\ProgramData\Sage Payroll Irl/2022, skip to step 24. If it’s not, you must correct the Sage Payroll data path specified within the import file. To do this, please complete steps 18 to 23.

16. Click the Data Directory link.

17. Right-click the file IMP, then click Open with.

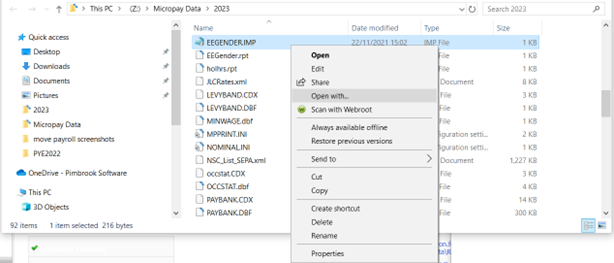
18. When prompted, select Notepad then click OK.

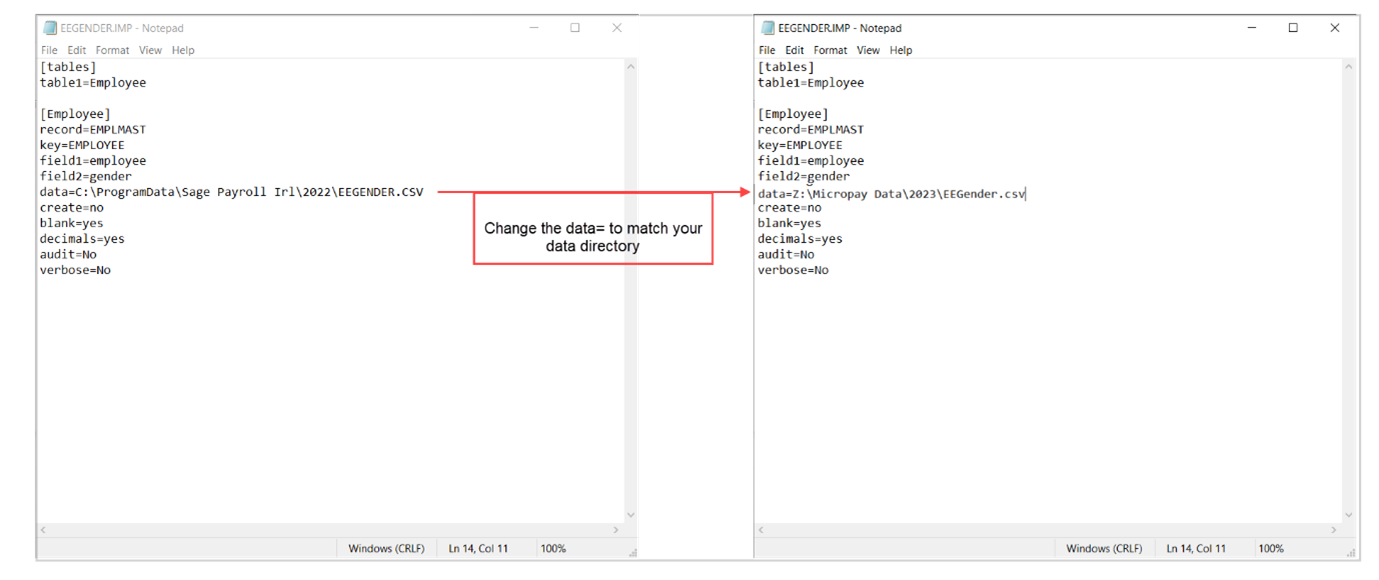
19. Locate the data=entry line, then edit the highlighted section below so it matches your data directory location:
data= C:\PROGRAMDATA\SAGE PAYROLL IRL\2021\EEGender.CSV


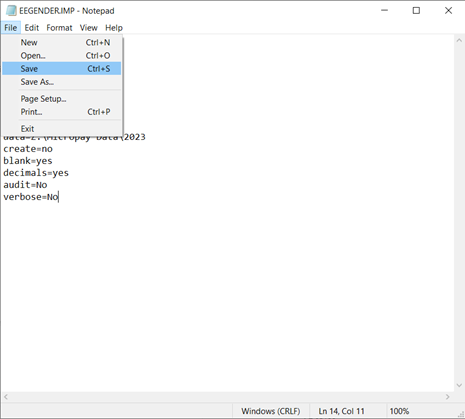
20. Click File, then click Save.


21. Click File, then click Exit.

22. Open Sage Payroll and log into a payroll as normal.

23. Take a backup of your payroll data.

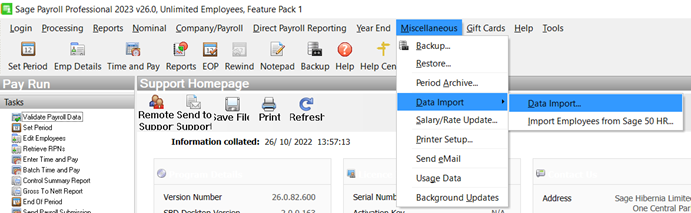
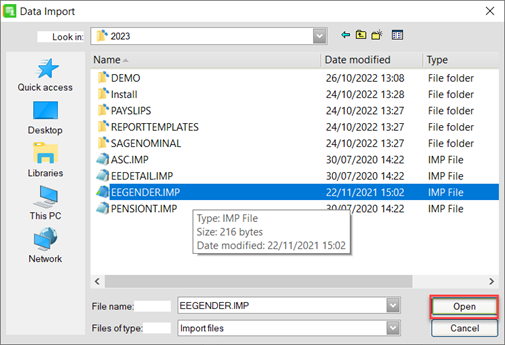
24. On the menu bar, click Miscellaneous, point to Data Import then click Data Import.

25. Browse to the location you noted in step 3 and Select IMP then click Open.


26. Repeat steps 4 to 7 again and check the correct gender is applied to each of the employees. If not, you must restore the backup you took before you ran the import process and complete the steps detailed in this section again.


Click here for details on Processing/Create Gender Pay Gap Data File

Moving Sage Payroll to a New PC

Moving Sage Payroll to a New PC

1. Log into your current Payroll

2. Go to Help and System Information

3. Print the support home page for the details of the Program Files and Data Files Location.  This also gives you the Serial No and Activation Keys if its needed.

4. Copy the Program Directory and the Data Directory to the New PC


5. If you change the location of the data files on the New PC to a different location, you will need to change the dataloc.ini file.


6. The dataloc.ini file is in the Program files within each year. In this case its C:\Program Files (X86)\Sage Paryoll Irl\2022

7. Open this file with Notepad or Wordpad and enter in the data location.

8. Copy this file into each year of your program directory.


9. Download and install the latest version of the software.

“Retrieve RPNs” Button Non-Responsive

“Retrieve RPNs” Button Non-Responsive


When attempting to retrieve RPNs and the button is non-responsive, this may be due to corruption of the calendar.

To resolve this – please follow the steps below:

Replace the PAYCAL files

  1. Backup your payroll
  2. Locate the data via: Help > System Information > Data Directory
  3. Click on Data Directory & locate the file folder for the payroll
  4. Double-click on the file folder & scroll down to the following files: PAYCAL.CDX & PAYCAL.DBF
  5. Select both files, then cut & paste them into a folder on your desktop named “Paycal OLD
  6. Create a blank new payroll in Sage Payroll by logging in as ADMIN & navigate to: Company > Company Setup > Add New Payroll > Create
  7. Once created, click on Data Directory & locate the file folder for the new blank payroll
  8. Double-click on the file folder & scroll down to the following files: PAYCAL.CDX & PAYCAL.DBF
  9. Select both files, right-click & copy
  10. Return to the Data Directory, locate the file folder for the original payroll & paste the new PAYCAL files there

Recreate the Calendar

  1. Log back into the original payroll
  2. Select: Company/Payroll > Calendar > New Calendar
  3. Enter the required dates & Save
  4. Retrieve RPNs as per normal

Download and install Sage Payroll v28.1

Download and install Sage Payroll v28.1

Sage Payroll v28.1 is available to download and install. This article details how to download and install this version.


Before you install

Check the version you’re currently using and make a note of where the software is installed.

  1. Login to your computer as system administrator.
  2. Open Sage Payroll 2025, click Help then click System Information.
  3. Confirm your version number is v28.0 or above.
  4. Make a note of the Program Directory and Data Directory.
  5. Back up your data.

If your data is held on this computer, continue to the next section. If your data is held on a network the steps are different.


Download and install

  1. Close Sage Payroll 2025 and all other software.
  2. Click the link: Download Sage Payroll v28.1
  3. Double-click the file that downloads – Sage_Payroll_v28.1.exe
  4. Select the I accept the terms of the licence check box, then click Next.
  5. Select This Computer, then click Next.
  6. Select Custom, then click Next.
  7. Check the program and data directories are the same as you noted earlier.  If not, click Browse, enter the correct directories, then click OK.
  8. Click Next, then select the Add shortcuts to my desktop check box.
  9. Click Install, then click Finish.

Nominal Integration Report from Sage Payroll

Nominal Integration Report from Sage Payroll


You can use the nominal option to produce a nominal journal for integration with your accounts software. However before you start using this option, you must enter your nominal settings in Sage Payroll so it knows where to post your journals to.

Don’t add commas to descriptions, translations or nominal codes, as these will be interpreted as columns in the CSV file and place data in the incorrect columns. This may result in a failed import into your accounting package.

1.  On the menu bar, Click Nominal and Set-up.


2. Specify the format of the nominal codes you want to use in Sage Payroll for analysis of payroll costs.

This field must have an entry, and can be up to 16 characters in length.  When you’re defining a format, there are three letters with special meaning:

  • d – department code
  • c – cost centre code
  • a – item code

All other characters are understood by Sage Payroll, in the context of nominal code formats, to be constants.

For example, if you specify the format definition ddddccccaaaa, Sage Payroll expects codes whose first four characters identify the department, the next four characters identify the cost centre and the final four characters identify the item code.

In this example for Sage 50/Instant Accounts, this field must read: aaaaddddd.


3. Complete the following information with the relevant nominal Codes.  In this case we have taken the default nominal codes from Sage 50 Accounts:
  • Nominal Code Format: aaaadddd
  • Employee PRSI: 2210 [PAYE/PRSI/USC]
  • Employer PRSI +:  7006 [ER PRSI]
  • Employer PRSI -: 2210 [PAYE/PRSI/USC]
  • ASC: 2240 [ASC]
  • PAYE: 2210 [PAYE/PRSI/USC]
  • USC: 2210 [PAYE/PRSI/USC]
  • Bank Account: 2220 [WAGES CONTROL ACCOUNT – NET WAGES]
  • Rounding Account: Round
  • Suspense Account:  9998


4. The Journal Format is used to specify the print column positions in the nominal report or file output for the following:
  • Code – 5
  • Description – 20
  • Debit value – 55
  • Credit value – 65
  • Total – 85


Example of the Journal when its printed


Click OK when this is complete.


5.  Select Nominal – Payments

Set your Payments to 7000 for Gross pay as follows:


6.  Select Nominal – Deductions

set you nominals for Deductions as follows:


7. Select Nominal – Departments

In my accounts package my department codes are 1 – 2 – 3 etc so in payroll I have entered in these codes as 001,002 and 003 as follows:


8. Select Nominal – Translations

Set up translations for the balance sheet items as follows:


This table is used to set up alternative nominal codes.  This is a useful tool if you want to make the nominal coding structure less rigid.  You can use it to translate the codes defined in Payroll to alternative codes that will be used when you export the report or file to import.

So in this case I want my balance sheet codes to be used and not look at the department.  If I don’t enter these in here it will split them out by department being:

  • 2210001
  • 2210002
  • 2210003 and so on

Instead we enter in

  • 2210 – PAYE/PRSI/USC
  • 2220 – Wages Control Account
  • 2230 –  Pension
  • 2240 – ASC

All the profit and loss nominal will now be split by department.


8. Select Nominal – Descriptions


By default, the nominal report show’s the nominal code, enclosed by square brackets in the Descriptions field. An entry in the nominal report with nominal code 2200 shows [2200] in the Description field.  You use the Descriptions feature to replace the nominal codes with text to define what the entry refers to. This can be repeated for all codes created by the nominal process.

You can translate the nominal codes into English as follows:


9. Final Payroll Journal Report

You will now get the following report when you preview it within the payroll.


If you require a more detailed report or you would like to import the file into your accounts package please contact us for a quote to set this up.


Sage Payroll V24.1

Sage Payroll V24.1

Sage Payroll V24.1 – has introduced plain paper layouts.  Please contact us 051-395900 if  you require to purchase the current MP011’s or equivalent.


Before you install

Check the version you’re currently using and make a note of where the software is installed.

  1. Open Sage Payroll, click Help then click System Information.
  2. Make a note of the Program Directory and Data Directory.
  3. Check that all of your payrolls have a status of End of Period (EOP) or Start of Period (SOP).
  4. Backup your data.
  5. Ensure you’re logged onto the computer as an administrator.

If your data is held on this computer, continue to the next section. If your data is held on a network the steps are different.

Download and install
  1. Close Sage Payroll and all other software.
  2. Click the link below: Sage Payroll v24.1 update
  3. Double-click the file that downloads – Sage_Payroll_v24.1.exe.
  4. Select the I accept the terms of the licence check box, then click Next.
  5. Select This Computer, then click Next.
  6. Select Custom, then click Next.
    1. Check the program and data directories are the same as you noted earlier.  If not, click Browse, enter the correct directories, then click OK.
    2. Click Next, then select the Add shortcuts to my desktop check box.
    3. Click Install, then click Finish.


Pimbrook Software
Privacy Overview

This website uses cookies so that we can provide you with the best user experience possible. Cookie information is stored in your browser and performs functions such as recognising you when you return to our website and helping our team to understand which sections of the website you find most interesting and useful.