• New Sage Payroll Update v27.1 Released
    Includes ERR and CWPS enhancements
  • New Sage Payroll Update v27.1 Released

KB Category: Sage Payroll (Micropay)

CWPS – New Calendar Year 2020/2021 and Rate Changes (From 1st Oct 2020 – Version 23.4)

The Calendar year for the Construction Workers Pension Scheme changed back in 2019. In previous years it has been a ‘Jan – Dec’ year. From 1st October 2019, it changed to an ‘Oct – Sept’ year. Due to the new CWPS calendar year, the CWPS Rates will be changing annually on the 1st of October.

V23.4 supports those increases to the Construction Workers Pensions Scheme (CWPS) which come in to effect from 1st of October 2020. When installed, the update will immediately apply changes to the necessary rates. If this applies to your payroll, then this update will help you to remain compliant. Please note though, that this update will need to be installed on a particular period so as not to apply the increases too soon.

You will need to carry out the following steps to complete the update:

  1. Choose the Appropriate Period to Run the Update
  2. Backup Your Payroll
  3. Download & Install The Update prior to setting your ‘Applicable Period’
  4. Set up the new CWPS Calendar prior to setting your ‘Applicable Period’
  5. Set your Applicable Period (‘Period Date’ must be on or after 28/09/2020)
  6. Browse The New Rates & Check Categories
  7. Clear the CWPS Balance History
  8. Run your CWPS Report (1-52) to confirm it is blank.
  9. Process Timesheets
  10. Check CWPS Report to confirm rates used are correct.


Steps 1-8 are detailed below:

1. Choose the Appropriate Period to Run the Update:

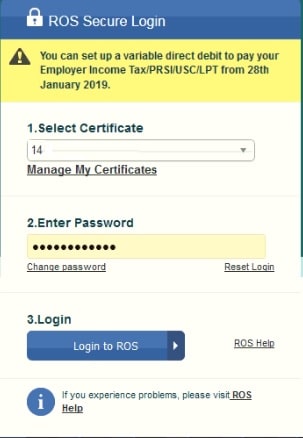
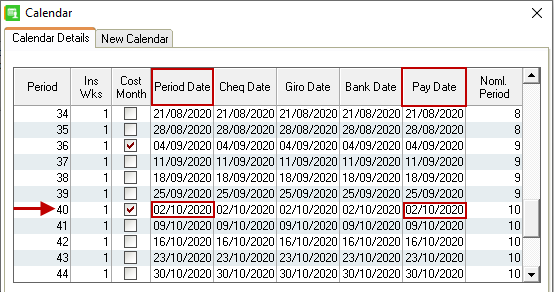
If the change in CWPS rates effect your payroll, then it is imperative that you install the update at the appropriate time. At the moment you install the update, the CWPS Rates will change in your payroll software. As the rate increase is only applicable from 1st of October 2020, ideally you should wait to install the update, until ‘End Of Period’ of your last September payroll. That is, the last September payroll where ‘Pay Date’ is a September 2020 Date (See ‘Pay Date’ in Image Below).

You can check this in advance, by clicking the ‘Company/Payroll’ menu at the top of the screen, and choosing ‘Calendar’. In the example below, as the applicable period is Period 40, it would be appropriate to run the update and set up the new CWPS Calendar at End of Period 39. This way the new rates and new CWPS Calendar will exist before setting the first CWPS Period (CWPS Week1).

Your payroll(s) may differ to this example, so check the calendar in each of your payrolls, before processing timesheets.


2. Backup Your Payroll
  • We recommend to take a backup of your payroll data, in your usual manner, before running an update.
  • It may also be advisable to print off your CWPS Report for CWPS Weeks 1-52, prior to making the necessary changes to CWPS, as this report will be cleared later in the process.


3. Download & Install The 23.4 Update prior to setting your ‘Applicable Period’:

As per step 1 above, make sure you have chosen the correct moment to install the 23.4 update, as the CWPS Rate changes must not be used until your appropriate period. Once you have identified the moment you need to run the update in, you can click the link below to download the update. Run the update in the usual manner.

Click Here to Download the Sage Payroll Software Update 23.4 (225mb)


4. Set up the new CWPS Calendar:

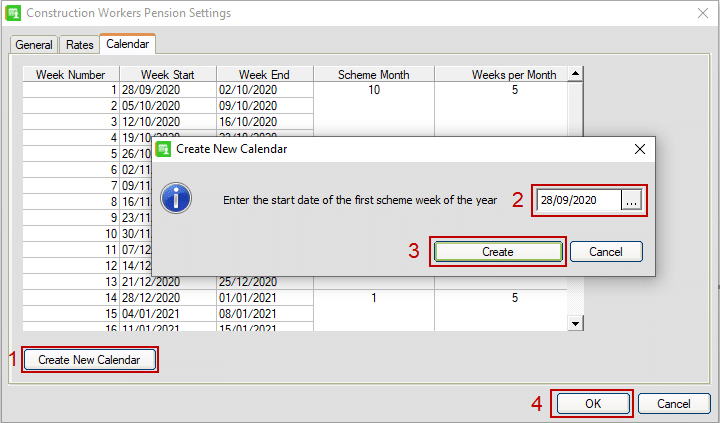
In order to comply with the new CWPS calendar year format, you will need to set up a new CWPS calendar. To do this:

  • Click on ‘Company/Payroll’ menu.
  • Choose the ‘Construction Workers Pension’ option.
  • In the window that is presented click on the ‘Calendar’ tab.
  • In here click on the ‘Create New Calendar’ button.
  • Enter the start date of 28/09/2020 (This is the Monday of the first week of the new CWPS calendar).
  • Click ‘Create’
  • Click ‘OK’


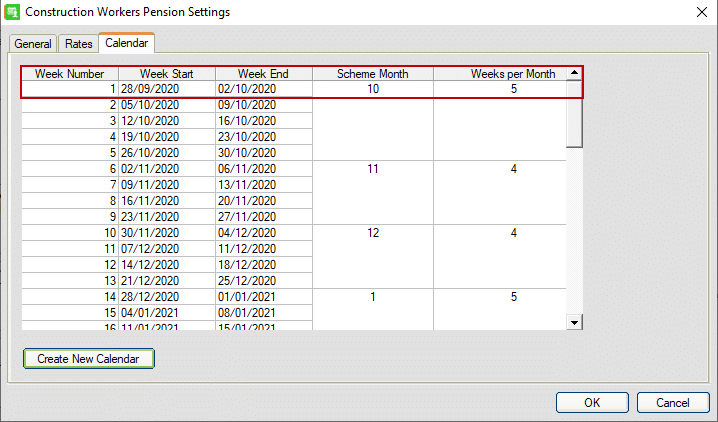
The new Calendar should look like this:

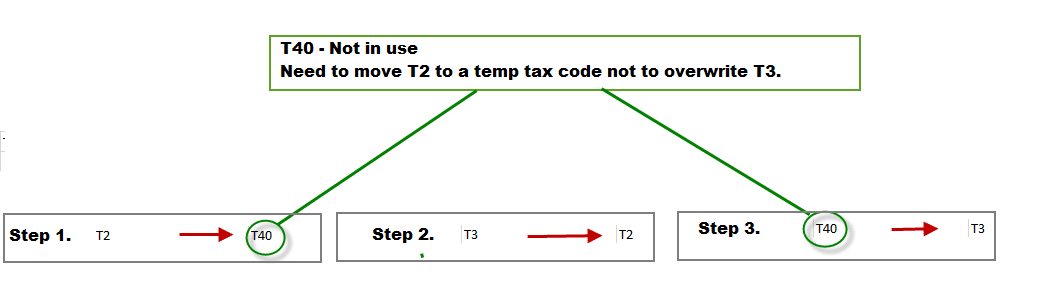
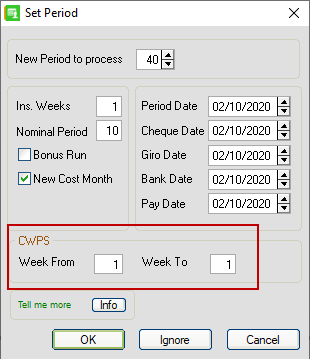
5. Set your Applicable Period:

Set you applicable period number. ensure that your ‘Period Date’ is on or after 28/09/2020. This date (28th Sept) is the start date for the new CWPS Calendar. If your period date is prior to this, your CWPS contributions may not report into the correct period. In the example above, this is period 40. Your applicable period may differ to this.

Note On ‘Set Period’: When you click ‘Set Period’ make sure that the ‘Week To’ and ‘Week From’ fields in the ‘CWPS’ area of the screen are: both equal to ‘1’ if running a weekly payroll, or show From ‘1’ To ‘5’ if running a monthly payroll. If this is not correct, then your CWPS data may report to the incorrect CWPS ‘Pay Week’.


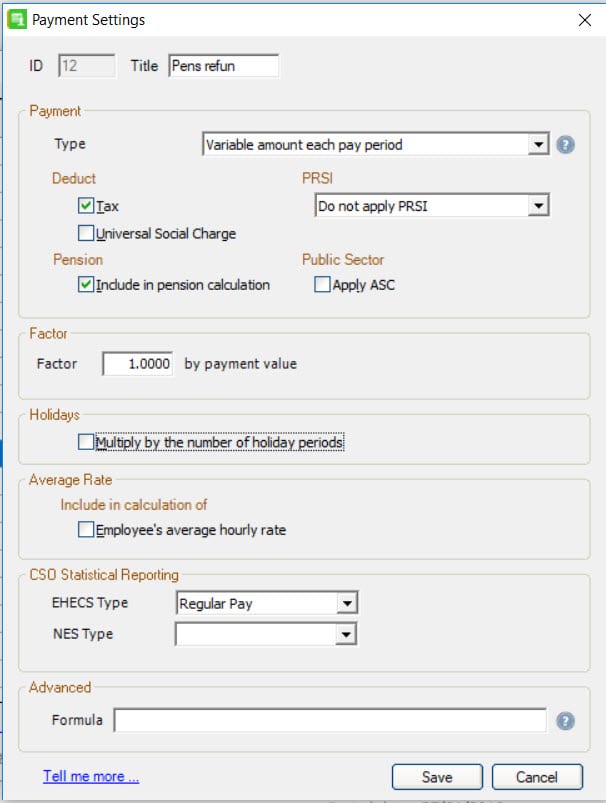
6. Browse The New Rates & Check Categories:

After you have set the period, browse the CWPS categories & new rates under the ‘Company/Payroll’ menu – ‘Construction Workers Pension’ option. The new rates are listed here.

There are only three Active Categories: POC (Pension Only no DIS), SPB (Pension/Sick Pay) and SPI (Standard Contrib + Industry Additions). Other earlier categories are no longer in use:

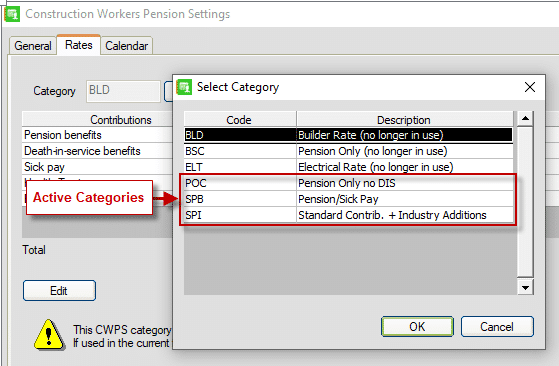
It is also advisable to browse your employees, and ensure that they are assigned to the correct category. To do this:

Choose the relevant employee in ‘Employee Details’, Click ‘Deductions’ Tab, Under ‘Construction Worker’s Pension Scheme’ select the correct category from the drop down list. Click Save.


7. Clear the CWPS Balance History:
  • From the menu bar at the top of your window, click Year End then click New Construction Pension Year.
  • When you receive the prompt to clear the balances and history, to continue, click Yes.


8. Run your CWPS Report (New Year 1-52) to confirm it is blank:
  • Click ‘Other Reports’
  • Choose ‘Construction Pension’ on the left hand side.
  • Click ‘Preview’
  • There should be no data for any ‘Pay Weeks’ in the report.


9. Process Timesheets:
  • Once you have carried out steps 1-8 above, you can continue to process your timesheets & do End Of Period as normal.


10. Check CWPS Report to confirm rates used are correct:
  • Check your CWPS Report after EOP to view contributions at new rates for CWPS Week1. Ensure the rates are correct before completing CWPS Week1 in your payroll, as if they are not correct, you will need to re-process at the correct rates.

System requirements – Sage Payroll (Micropay) 19/08/2019

System requirements – Sage Payroll (Micropay) 19/08/2019


This article details the system requirements for installing and operating Sage Payroll (previously known as Micropay). You can also find information about how to check your computer’s specifications.


Recommended system requirements


Processor speed 2Ghz processor or equivalent.
Operating System The following are supported:

    • Windows 10 November Update version 1511 – 32-bit (x86) or 64-bit (x64).
    • Windows 10 version 1507 – 32-bit (x86) or 64-bit (x64).
    • Windows 8.1 – 32-bit (x86) or 64-bit (x64).
While you can install and run Sage Payroll on Windows 8.0, we recommend you update to Windows 8.1 if you haven’t already done so. Windows 8.1 is a patch release to resolve multiple issues in Windows 8.0.
  • Windows 7 Service Pack 1 – 32-bit (x86) or 64-bit (x64).
  • Microsoft Windows Server 2016 – 32-bit (x86) or 64-bit (x64).
  • Windows Server 2012 – 64-bit (x64).
  • Windows Server 2012 R2 – 64-bit (x64).
  • Windows Server 2008 R2 Service Pack 1 – 64-bit (x64).

Please ensure all the latest Microsoft service packs and updates are installed.

On 14 January 2020, Microsoft will end all support for Windows 7 operating system, including security updates. However we strongly recommend that you upgrade to windows 10 before this date.
As an alternative to upgrading your operating system you can simply move your sage Software onto a computer that already has a newer Operating System on it.
RAM (memory) 2 gigabytes (GB).
Free disk space 2GB after installation. You also need additional space for data files.
Network speed 1Gbps (100 Mbps minimum).
Backup media USB memory stick.
Microsoft .NET Framework 4.6.2.

Other requirements
  • Internet Explorer v11 or higher.
  • An Internet connection.
  • Latest version of Adobe Reader, or an equivalent PDF reader.
  • Screen resolution between 1024 x 768 and 1920 x 1080 – this applies to 4k and hi-res monitors.
  • Antivirus software should be configured to exclude Sage files from its scanning routines.
  • Administrator Account


Office integration

Some features of your Sage payroll software interact with and require an installation of Microsoft Office.

These features include:

  • Emailing payslips and reports.
  • Exporting reports to Microsoft Excel.

Sage Payroll isn’t compatible with 64-bit editions of Microsoft Office.


Office versions that are compatible
  • Microsoft Office 365 (32-bit desktop edition).
  • Microsoft Office 2016 (32-bit desktop edition).
  • Microsoft Office 2013 (32-bit desktop edition).
  • Microsoft Office 2010 (32-bit desktop edition).
  • Microsoft Office 2007.
  • Microsoft Office 2003.

Microsoft Office 2003, 2007 and 2010 are no longer supported by Microsoft, therefore we’re limited in the support we can offer. We can help with basic steps, however if these don’t work, you should upgrade your software to a more recent version.


Supported types of installation

You can run Sage Payroll as a standalone type install or server/client arrangement.

The following network configurations are not supported:

  • Peer to peer network.
  • Citrix client-server network.
  • Wide area network (WAN).
  • Virtual-Machine platforms or configuration (VM-ware).


Check the operating system
  1. Press the Windows key + R.
  2. Type winver then click OK.

This opens the About Windows window which displays the operating system details.


If you’re using an Apple Mac computer, you can see the Apple symbol at the top right-hand corner of the screen. Sage Micropay isn’t currently tested on this type of operating system.


On 14 January 2020, Microsoft will end all support for Windows 7 operating system, including security updates. However we strongly recommend that you upgrade to windows 10 before this date.
As an alternative to upgrading your operating system you can simply move your sage Software onto a computer that already has a newer Operating System on it.


Check Microsoft .Net Framework
  1. Press the Windows key + R.
  2. Type appwiz.cpl then click OK.A list of installed programs appears.
  3. Scroll down and check if the entries for Microsoft .NET Framework 4.6.2 are listed.
  4. If Microsoft .NET Framework 4.6.2 is installed, you don’t need to take any further action. If it’s not installed, you must download and install it from the Microsoft website.


Check other computer specifications

Operating system, processor speed and RAM

  1. Press the Windows key + R .
  2. Type msinfo32 then click OK.


Check other computer specifications

Operating system, processor speed and RAM

  1. Press the Windows key + R .
  2. Type msinfo32 then click OK.


If the memory appears in KB (Kilobytes), to calculate the equivalent in MB (Megabytes) you can divide the figure by 1024. Alternatively, use the following values as a guide:

  • 1 GB = 1024 MB = 1,048,576 KB
  • 512MB = 524,288 KB
  • 256MB = 262,144 KB
  • 128MB = 131,072 KB
  • 64MB = 65,536 KB
  • 32MB = 32,768 KB
  • 16MB = 16,384 KB
Free disk space
    1. Press the Windows key + E.
    2. Depending on your version of Windows, complete one of the following options:
Windows 10 Click This PC, then right-click C: and left-click Properties.
Windows 8 Click Computer, then right-click C: and left-click Properties.
Windows 7 or below Right-click C:, then left-click Properties.


Internet Explorer version
  1. Open Internet Explorer.
  2. On the menu bar, click Help then click About Internet Explorer.

If the Help menu doesn’t appear, press the Alt key on your keyboard.


Display settings
  1. From your Windows desktop, click Start.
  2. Depending on your version of Windows, complete one of the following options:
Windows 10 and 8 Settings > System > Display > Advanced display settings > Resolution.
Windows 7 or below Control Panel > Appearance and Personalization > Display > Adjust screen resolution.


Tax Code Changer

Tax Code Changer


1. Backup up Data

2. Restore Locally

3. Print tax code details

4. Prepare mapping Structure to Sage Default Tax Codes – See Sage KBA 33290


What the outcome to be:

Pimbrook current Codes Sage Codes
T2 T3
T3 T2
T12 T13
T13 T28


How to change them:

Pimbrook Codes Sage Codes
T13 T28
T12 T13
T2 T40
T3 T2
T40 T3


Please ensure you change codes in the correct sequence.

example

5. Run Adept Tool

  • Browse to the correct Data Path
  • Enter in the Manager name and password
  • Select All Transactions
  • Tick the Update Box
  • Enter in the current tax code
  • Enter in want you want the new tax code to be
  • Run

Repeat this for every tax code you want to change


6. Log into sage – Reindex and compress the data

7. Check the tax codes


8. Change tax code in Configuration to match the correct tax codes you have changed

See Sage KBA 33290

9. Backup data and send back to the customer


Sage Micropay CSO setup

Sage Micropay CSO setup


If the Central Statistic Office (CSO) has selected your company for participation in their survey and you haven’t yet setup CSO reporting in Micropay, this document
will explain how to set this up.  Once you have completed the setup you can generate the following CSO survey reports.

  • Earnings, hours and employee cost survey (NHECS)
    This report monitors change in labour costs in Ireland and across the EU and must cover all payrolls belonging  to the same tax registration and is
    submitted quarterly to the CSO
  • National employment survey (NES)
    The (NES) reports on statistical employment information from business that have more than three employees.  This report  must cover all payrolls
    belonging to the current company and be submitted annually to the CSO at the end of the calendar year.

There are 3 steps to setting up CSO reporting in Sage Micropay,  Activate the CSO reporting feature,  Set up your payments for CSO reporting and Setup you
employees for CSO reporting.


Step 1 – How to activate the CSO feature in Sage Micropay

  • On the top menu bar click on Company/Payroll and select on ‘Company Details’.
  • On the ‘Company Details’ screen click on the tab ‘CSO’
  • On the ‘CSO’ tab enter in your company’s central business register (CBR) number into the ‘CSO CBR Number’ box and click ‘OK’. (If you are unsure of this
    number please contact the Central Statistic Office)

This process must be completed on each of your payrolls in order to activate the CSO feature.


Step 2 – How to setup your payments for CSO reporting

Once you have activated the CSO feature in Step 1 you are  now ready to start configuring your Payments for CSO reporting.  You don’t need to
specify CSO settings for the following payment types:  Redundancy, illness benefit,  Benefit in Kind (BIK), maternity benefit and paternity benefit.

  1. On the menu bar, click Company/Payroll then click Payments.  This will list all the payments entered in Sage Micropay
  2. Select a payment that’s subject to CSO reporting and click ‘Edit’.
  3. Under ‘CSO Statistical Reporting, complete the following information:
    EHECS Type                  Choose the relevant CSO type for this payment.  If you are unsure please contact the Central Statistic Office for assistance
    Hours Multiplier           Enter the CSO hours multiplier value.  This helps to ensure that the hours you record in the EHECS report is accurate
    NES Type                       Select the NES type for the payment if applicable.
  4. Click ‘Save’ to save your changes.
  5. Repeat steps 2 to 4 for all relevant payments then click ‘Close’.
  6. Repeat all the above steps in each of your payrolls.


Step 3 – How to setup your employees for CSO reporting

Once you have added the CSO details to your payments you will now need to add the CSO categories to each of your employees on your payrolls, to do this:

  1. Open your employees record by clicking on the ‘Edit Employee’ icon on your process map or by clicking on ‘Processing’ on the top menu bar
    and select ‘Edit Employee’.
  2. Select the employee that you wish to add the CSO details to and click on the ‘CSO’ tab.
  3. If your employee needs to be excluded from the CSO report, tick the ‘Exclude Employee from CSO Reports’ box and then click ‘Save’.
  4. To include this employee in the CSO report, complete the following information:
    *  Occupation Status
    *  Type of Employment Contract
    *  CSO Occupation Category
    *  Hours per Working Day
    *  Contracted Hours
  5. Click ‘Save’ to save your changes.
  6.  Repeat steps 2 to 5 for all employees on your payroll.
  7. Repeat the steps above for all your payrolls.


Please note, if you are setting up the CSO feature mid year, you must delete all entries on the CSO History table and then repopulate it.  This is because
the CSO History was populated before you made any amendments to the CSO details.  Once  you click
on the button ‘Fil in Blank History’ Sage
Micropay will re populate the CSO history table with the new information that you have entered against the employee.

How to Delete the Existing CSO history

In the Employee Details on the CSO tab click onto the CSO entry line and press F5 on your keyboard to delete each of the lines.

Once you have cleared out the old CSO History click on the ‘Fill Blank History’, Sage Micropay will repopulate the CSO history with your amended
details.


Click ‘Save’ to save your changes.


(SD)

ROS Password changed and RPN’s won’t download in Sage Payroll v.22.2

ROS Password changed and RPN’s won’t download in Sage Payroll


in order for Sage Payroll (Micropay) to sync with ROS for the purpose of downloading live RPN’s and uploading payroll Submissions, Sage Payroll (Micropay) uses
a ROS digital cert which is download from your ROS site.  Every now and again ROS requires users to change their online password,
When this happens the original ROS digital cert that Sage Micropay uses becomes invalid. This document will explain the
steps required to download a new ROS digital cert and load it into your Sage Micropay.


Step 1  Downloading your new ROS digital cert

Open up your ROS home page and click on ‘Manage My Certificates’


On the ‘Manage My Certificates’ screen click on the line that has your cert name and select the Save icon


Select ‘Yes’ on the save screen and ‘OK’ on the next screen.  This will download you ROS digital cert with your new password to the Downloads folder on your PC.


Step 2 Locating your new ROS digital cert

By default your newly downloaded ROS cert is saved to the ‘Downloads’ folder on your PC.  Open up your File Explorer and click on ‘Downloads’
on the left hand panel and locate your new ROS digital cert and copy it.

By default Micropay looks to the ROS digital cert in the ROS folder on your local C drive.  If you are unsure, log into Sage Micropay and,
click on the  ‘Retrieve RPN’s’ icon.  The ‘Certificate’ location on this screen is the location of your original ROS cert. This is the location that you
will need to copy your newly downloaded cert to.


Step 3 Amending your ROS password in Sage Micropay

Once your new ROS digital cert has been copied to the ‘Certificate’ location you will need to add your new ROS password to Sage Micropay.
To do this open up your payroll and click on the icon ‘Retrieve RPNs’.  Enter in your new ROS password and click ‘Next’.  Sage Micropay
sould now be connecting with ROS.


Important Note:  You will need to run this process on all PC’s that Sage Micropay is installed on.


(FL)

How to refund pension contributions

How to refund pension contributions


If you have deducted too much pension from an employee, you may need to refund this back to them. You can do this in one of two ways:

1. Enter a negative pension contribution on the employee’s timesheet or reduce the usual contribution by the amount of the refund. Alternatively, if there is not an ongoing contribution then enter just the refund amount with a – in front of it in time and pay.   For example if the standard weekly pension contribution is €25.00 and the amount to be refunded is €10.00 then edit the pension contribution deduction in time and pay to be €15.00 (€25-€10).

OR

2. Set up a new payment to be used in time and pay for the refunded amount. Then edit the ytd pension contributions in the deductions tab of employee record to take into account the refunded amount. See instructions below:

  • If the pension was originally deducted as a gross deduction ie it was deducted from gross pay before paye tax was calculated, then the refund must be subject to paye but not usc or prsi as these were already charged on the original income before the pension contribution was deducted.
  • Click Company/payroll then Payments and New. Enter details as shown below and save.

  • Click Edit Employees and select the relevant employee.  Click the Deductions tab, Amend the Balance E’e and Total E’e to the correct year to date total for the pension.  If required, to correct the employer amounts, you can edit the Balance E’r and Total E’r values.
  • In Enter Time and Pay enter the refund amount against the payment you set up earlier.

Note you may have to use method 2 in some cases where pension contributions are calculated using formula and cannot be manually edited in time and pay.