• New Sage Payroll Update v27.1 Released
    Includes ERR and CWPS enhancements
  • New Sage Payroll Update v27.1 Released

KB Category: Sage Payroll (Micropay)

Change the holiday year and do the rollover in Sage Payroll v.21.3

Change the holiday year and do the rollover in Sage Payroll


After a couple of attempts, I managed to change the holiday year and do the rollover. The sequence was as follows:

  1. Verified closing balances to be rolled over at EOP in final pay period of old year
  2. Rolled over the balances by choosing Year End and Roll over Holiday Balances
  3. Ran the Holiday Report again and checked the balances had carried forward correctly
  4. Set the new pay period
  5. Changed the start and finish dates of the holiday year.
  6. Ran the Holiday Report again to ensure balances had not changed


The key thing was to do the rollover first, then set period and then set the new holiday leave year start and end dates.


Set up ASC – Additional Superannuation Contribution in Sage Payroll (Micropay)

Set up ASC – Additional Superannuation Contribution in Sage Payroll (Micropay)

Additional Superannuation Contribution (ASC) calculations come into effect from 1 January 2019 and replace the Pension Related Deduction (PRD). Read more about ASC >

This article explains how to set up your payroll for ASC calculations in Sage Payroll 2019. If you have more than one payroll, you must complete the tasks below in each of them if ASC calculations are applicable.

Before you can proceed with the steps detailed below, you must install the 2018 year end update (v21.3/22.0) and transfer your 2018 payrolls into Sage Payroll 2019. The year end update will be available for you to download and install in early December.

Activate the ASC option within your payroll

  1. On the menu bar, click Company/Payroll then click Additional Superannuation Contribution.
  2. Select the Use Additional Superannuation Contribution (ASC) feature check box.
  3. Click OK.

Mark payments as being subject to ASC

  1. On the menu bar, click Company/Payroll then click Payments.
  2. Click on a payment, then click Edit.
  3. Select the Apply Additional Superannuation Contribution check box, then click Save.
  4. Repeat steps 2 and 3 for all payments that are subject to ASC calculation, then click Close.

Apply ASC settings to your employees

  1. On the menu bar, click Processing then click Employee Details.
  2. Next to the Surname box, click browse   and click the relevant employee.
  3. Click the Deductions tab.
  4. Under Public Sector – Additional Superannuation Contribution (ASC), click the ASC Status arrow then click the relevant option.
  5. If the employee is in subsidiary employment and their main employment is elsewhere, select the Subsidiary check box.

If you select this check box, ASC calculates at the highest rate of the pension scheme the employee is a member of. The highest rate for a member of a standard or fast accrual pension scheme is 10.5%. For members of the single scheme, the highest rate is 7%.

6. Click the Pension Scheme arrow, then click the relevant scheme the employee is a member of.

7. Click Save.

8. Repeat steps 2 to 7 for each employee you want to enter ASC settings for, then click Cancel.

You’ve now assigned ASC settings to your employee(s). In each subsequent pay period, when you process your employees’ pay details, their ASC liability automatically calculates and appears on their payslip.

ASC calculates before tax is deducted from an employee’s pay. There is also employer PRSI relief in respect of ASC. Employee PRSI and universal social charge (USC) are deducted from an employee’s pay after ASC calculates so there is no relief on these.

Resend Payroll Submission option

Resend Payroll Submission option (v22.2)


If you make any changes to a previous pay period after you’ve sent the submission to Revenue, you can use the Resend Payroll Submission option to let Revenue know about the changes.

To resend the submission, follow the steps below.

    1. From the process map, click Payroll Submission.
    2. When the warning about the Amended Submission appears, click Yes.
    3. Enter your ROS digital certificate password in the box provided, if not previously saved.
    4. Click Next then click Continue.
    5. Check the information is correct within the Review Details window.To view a detailed breakdown of the values per employee, click Export Details.
    6. Once you’re happy with the details, to proceed, click Submit.

      Once you click Submit, this process can’t be reversed or stopped.

    7. Once the amendment submission is successfully received by Revenue, a confirmation window appears. To produce a copy of the submission log for your records, click Export Details then to:
      1. Print the report, click the Printer button.
      2. Save a PDF copy of the report, click the Save button.

To close the report, click X at the top right-hand side of the window.

  1. To close the Send Payroll Submission window, click Finish.

If you want to check or review the previous submissions you’ve made to Revenue, you can do this using the View Payroll Submission Log option. Read more >

Shadow payroll

Shadow Payroll


Shadow payroll is a mechanism used to assist with the reporting and tax withholding obligations in a host country for an employee who is remaining on his or her home country’s payroll system while on assignment in the host country.

The following procedures will apply:

  • The employer should include all income paid to the employee from the date an assignment commences including the income from the date PAYE is applied.
  • The Revenue Payroll Notification (RPN) will operate on a week 1 basis.

Details from Revenue about a shadow payroll can be found here

You can click here to get details on how to set up a shadow payroll in Sage Payroll.


How to Use Fiddler to Investigate a Stuck Submission

How to Use Fiddler to Investigate a Stuck Submission

**Please be aware that you cannot change the GUID number or ROSDATA file anymore going forward.  If a customer should need to do a submission in a previous period, then the absence of history in the ROSDATA file would stop them from doing that.

If a submission is hanging, the problem is that its stuck at Sage’s RTX server and needs to be pushed through to ROS. You can check this as follows:

Check to see if you are getting error message 500 on Fiddler (steps a – h below)

a. Download and run from https://www.telerik.com/download/fiddler/fiddler4

b. Open Progress TelerickFiddler Web Debuger

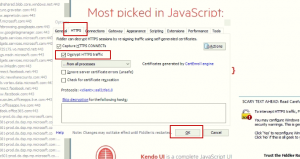
c. Select Tools  –  Options

d.Tick the box for Decrypt HTTPS CONNECT

e. Click OK

f. Log out of Fiddler and the Payroll

g. Log back in to both

h. Drag the icon over payroll

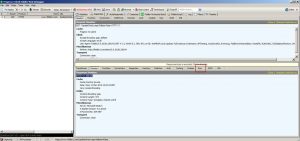
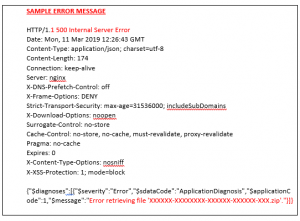
Once you are logged back in you should get the 500 error message.  It will give you any error messages in red (on the left of the screen)


Double click on the error and click on RAW on the right hand side and copy the error message into notepad to send with the other details to sage

 ‘Error 500 – Error retrieving file XXXXXX.zip’ would indicate a problem at Sage RTX Server and you will need to contact Sage to get the submission released.

New Employee (2019) has P45 from his previous employment (2018)

New Employee (2019) has P45 from his previous employment (2018) 


Question:

A new employee commenced employment in our company in February 2019 and has a P45 from his previous employment which ceased in December 2018. Do Revenue expect us to request a P45 from this employee?


Answer: 

No, there is no requirement to request this P45 as it is no longer needed to register a new employment in 2019. The new employer requires the employee’s PPSN and a start date in order to request an RPN for the employee which will result in the employment being registered on Revenue’s records. The employee should retain the P45 for their own records.

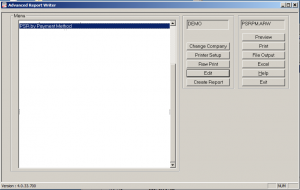
ARW Report – Payroll Submission Report by Pay Method


ARW Report – Payroll Submission Report by Pay Method


To download and install the payroll submission report as follows:

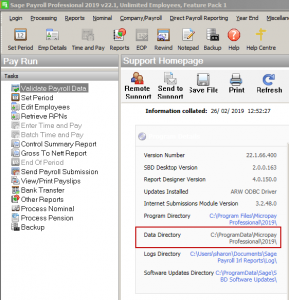
1. Locate where you need to save the payroll files by clicking on Help – System Information in your payroll

2. Click on the Data Directory.  This will open the file location where you need to save the ARW reports.


3. Click here to download the ARW files.

4. Unzip the files and save to the above location within your company file

5. Save the 2 files (PSRPM.ARW and PSRPM.ARP) into the data directory.

6. When you log into your ARW your report is now available to run.


If you are not using the ARW feature and require training please contact us on 051-395900 and we can arrange this.