This article show you what to do for year end for the 2023/2024 tax year in Sage Payroll.
Processing your year end in Sage Payroll has never been easier. Follow our simple guides to complete your year end tasks and get ready for the new tax year.
We have some useful resources listed below which can assist you to complete your year end which will include:
2023 Year End Update: You can Download the 2023 Year End Update (V26.3 & V27.0 )by Clicking Here .
2023 Year End Booklet: You can Download the 2023 Year End Booklet by Clicking Here.
2023 Year End Checklist: You can Download the 2023 Year End Checklist by Clicking Here.
Your Payroll Year End booklet will have information on important changes to your year end software including :
ERR – Enhanced Reporting Requirements is not part of the year-end, but it is a new feature in the year end software and a new reporting requirement that will commence on Jan 1st 2024.
CWPS – From Jan 1st 2024, the CWPS calendar will revert back to Jan to Dec. This means that the new calendar must be set up now and the CWPS balances and history cleared prior to setting the first period of 2024.
Recorded Webinar Demonstrating the Payroll Year End Process
Pimbrook hosted a number of live webinars where we stepped through the Payroll Year End process from start to finish, if you missed these a recording is available here Sage Payroll Year End Webinars 2023
For more information on the above Additional Helpful links can be found here: We have also put together some other articles which you find helpful as you work through the payroll year end.
Click on the links below to view each one.
You will be prompted to change your Admin password when logging into the software.
Must be at least eight characters in length.
Must contain at least one letter.
Must contain at least one number.
Must contain at least one special character/symbol.
If your payroll or user password doesn’t meet the password requirements it will prompt you to change these also.
New Payment type added to Sage Payroll
An Expenses payment type has been introduced to support the Enhanced Reporting Requirements (ERR) Coming into effect from 1 January 2024.
You’ll need to process payments that will be reported under ERR using an Expenses payment. This includes payments for small benefit exemption, remote working daily allowance and certain travel and subsistence items.
ERR functionality will be available in your Sage Payroll 2024 update.
CWPS rates
CWPS rates have increased effective from 18th September.
One4all vouchers
Minimum and Maximum limits have been applied to the vouchers.
Sage Payroll update version 23.4 is now available.
**Important Note: If you are using the CWPS Feature in Sage Payroll, you should refrain from installing this update until on or before Monday 28th September! This update contains the new rates which pertain to the new CWPS year (CWPS New year starts on 1st October. Monday 28th Sept is the start of Week 1 of the new CWPS year.)
What’s New:
New CWPS rates, (come into effect on the 28th of Sept). Link to full article here –> CWPS New Calendar
Timesheet warnings with regard to EWSS, when the Gross Pay/Insurance weeks are outside of the allowed range. Link to full details here –> EWSS TImesheet Warnings.
Timesheet EWSS information flag, to indicate when an EE is marked for EWSS.
Installing the Update: You may be prompted to install the update from your Sage Payroll software, if not you can download and install it from the Pimbrook download area. The procedure for this is the same as with any prior payroll update – see notes below:
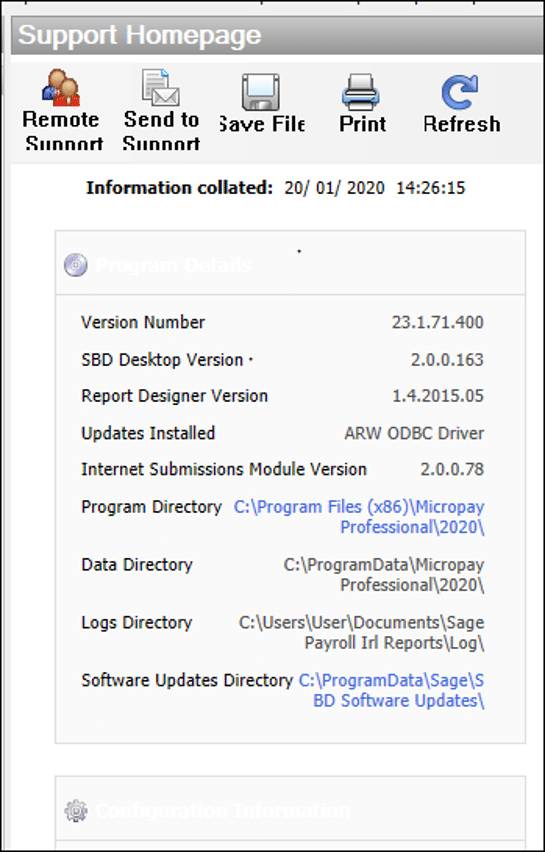
Ensure you have the correct version of software for the update. To see the version, open Sage Payroll 2020, click Help then click System Information. The current version should be V23.3
In the System Information Screen, make a note of the Program Directory and Data Directory.
Check that all of your payrolls have a status of End of Period (EOP) or Start of Period (SOP).
Back up your payroll data.
Close Sage Payroll 2020 and all other software.
Log in to the computer as administrator (or as a user with administrator rights) and turn off any anti-virus and “User Account Control”.
Download the update from the Pimbrook Download area by clicking here.
Execute the downloaded file and follow the install steps, ensure the program and data directories are the same as noted in 2 above, for more information see our article on Sage Payroll Update Instructions and Preparation.
Important Note:
Please ensure that you install the update correctly, particularly if you are using a network installation and the data location is not on the same computer. If you find that some employees are on PRSI class A1 regardless of their PRSI eligible pay then you probably have not applied the update to your data location (i.e. the server). If this occurs please reinstall the update correctly to all required locations (i.e. client and server computers).
Moving your Sage Payroll (Micropay) from an old computer to a new computer involves an number of steps to install the software on the new machine and to copy over any local data.
The correct procedure is outlined below:
1. Take note of the “Program and Data Directories” from your current payroll installation on the old computer. This is shown under “Help – System Information” in your Sage Payroll software.
2. If your Sage Payroll is installed on a “Standalone Computer”, copy these “Program and Data Directory” folders to the same locations on the new computer, if it is a Client/Server installation, copy just the “Program Directory” to the same location on the new computer. These folders are by year so you should copy all folders for the years that you require to the new computer, if you want them all, then copy the parent folder (e.g. “C:\ProgramData\Micropay Professional” (Note: If the Sage Payroll Data Directory will be different on the new computer you will need to change the dataloc.ini file before you run the latest software. To do this go to the Sage Payroll “Program Directory” (as per 1 above) and browse to the dataloc.ini file. Copy this file out to the Desktop. Double click and open with Notepad. Change the path for the data, save the file and then copy into each year in the “C:\Program Files (x86)\Micropay Professional” or “C:\Program Files (x86)\Sage Payroll Irl” folder, if you are prompted that the file already exists, overwrite it).
3. If you have ROS certificates on the computer for payroll submissions then these may need to be copied to the new computer. You should find out where the certificates are on the old computer and copy these to the new computer, this is done as follows:
On the old computer, open Sage Payroll
Select “Retrieve RPNs”.
This will show you the folder path and file name of the ROS certificates (e.g. something like “C:\ROS\DigiitalROSCert.p12.bac”)
In Windows take a copy the ROS certificate file.
Move this copied certificate file to an ROS folder on the new computer (e.g. “C:\ROS”, you may need to create this folder).
After Sage Payroll is installed on the new computer (see step 4 below) you will need to set the ROS Digital Certificate when you first “Retrieve RPNs”. This is done by browsing to the new folder where the ROS certificate was copied to (see above) and selecting the certificate file. You will most likely have to enter your ROS password and save this.
4. Run the latest update of Sage Payroll (see Installing Sage Payroll) and check the Program Directory and Data Directory match the directories copied in 2 above during the installation.
Sage Payroll update version 23.1 is now available.
What’s New:
The primary change in this update relates to an increase in the national minimum wage by 30c to €10.10 and consequently the Class ‘A’ employer PRSI threshold will increase from €386 to €395. The two are not effective until 1st Feb 2020, but the update can be installed anytime before this date, as the software will only apply the new legislation changes to any payrolls dated February 2020 onwards.
Update Timesheet “Over 65” Warning to “Over 66” (as 65 was the incorrect age.)
“Set Period” will generate an error if the pay date is not within the current tax year.
Employees who were not paid in the period, are now excluded from the Control Summary ‘Employee count’.
In line with number 4 above, Employees with ‘no pay due’ will now be excluded from the Bank Transfer, Cash Dissection, Cheque Register & Credit Transfer Reports.
Fix to Payments Report (Export to Excel) to include decimal places.
Installing the Update:
You may be prompted to install the update from your Sage Payroll software, if not you can download and install it from the Pimbrook download area. The procedure for this is the same as with any prior payroll update – see notes below:
Ensure you have the correct version of software for the update. To see the version, open Sage Payroll 2020, click Help then click System Information. The version should begin with v23, if it does not, please install the payroll year end update, v23 – see here Sage Payroll Year End 2019 Update .
Make a note of the Program Directory and Data Directory.
Check that all of your payrolls have a status of End of Period (EOP) or Start of Period (SOP).
Back up your payroll data.
Close Sage Payroll 2020 and all other software.
Log in to the computer as administrator (or as a user with administrator rights) and turn off any anti-virus and “User Account Control”.
Download the update from the Pimbrook Download area by clicking here.
Execute the downloaded file and follow the install steps, ensure the program and data directories are the same as noted in 2 above, for more information see our article on Sage Payroll Update Instructions and Preparation.
Important Note:
Please ensure that you install the update correctly, particularly if you are using a network installation and the data location is not on the same computer. If you find that some employees are on PRSI class A1 regardsless of their PRSI eligible pay then you probabaly have not applied the update to your data location (i.e. the server). If this occurs please reinstall the update correctly to all required locations (i.e. client and server computers).
After the customer has run their Sage Payroll V22.4 Update and entered their new CWPS ‘Week 1’ payroll (CWPS Week Dated 30/09/2019 – 04/10/2019), they encounter issues with the data that shows in the CWPS Contributions Report.
Symptoms:
The report either shows no data for ‘Pay Week’ 1 (Run Report Week1 – Week1)
Or it shows data at old rates, and for ‘Pay Week’ 39 or 40 (or whichever might be applicable to that payroll) (Run Report Week1 – Week52)
Cause:
This happens because the new CWPS Calendar was setup after setting the period in question. When you click Set Period – in the background the software grabs the appropriate ‘CWPS’ week number from the CWPS Calendar, based on the ‘Period Date’ field for the period and saves the CWPS data (per timesheet) against the chosen CWPS week number in the CWPS history table. If the new CWPS Calendar is not setup before Set Period, the set period screen will grab the CWPS week number from the ‘Old’ calendar (that being maybe 39 or 40). Some users will notice this in the Set Period screen and will change it themselves. Some wont:
Solution:
As the CWPS week number on the Set Period screen can only be changed at status SOP, the only solution is to:
(Carry out the steps in the order shown below)
Restore back to the previous period EOP (EG: EOP 38)
Check the CWPS Rates are still the new ones. (If they are not – run the update again or change them manually).
Set up the New CWPS Calendar (Start Date 30/09/2019)
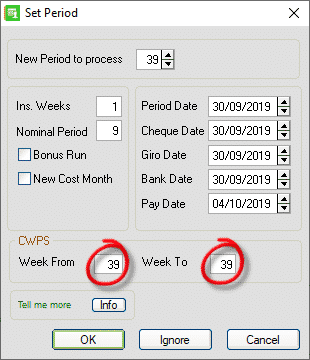
Set the period in question (EG: Period 39) making sure that the CWPS Section of the Set Period Screen says ‘Week From: 1’ and ‘Week To: 1’ (If weekly payroll). This may say ‘Week From: 1’ and ‘Week To: 4’ if it’s a monthly payroll.
Clear the CWPS Balances: Click Year End at the top of the screen and then click New Construction Pension Year. Click yes to the message when prompted.
Check CWPS Report (Week 1 – Week 52) to confirm it is blank.
Run Timesheets again.
Run EOP.
Check CWPS Report Again (Week 1 – Week 1) – It should be ok now.
The Calendar year for the Construction Workers Pension Scheme changed back in 2019. In previous years it has been a ‘Jan – Dec’ year. From 1st October 2019, it changed to an ‘Oct – Sept’ year. Due to the new CWPS calendar year, the CWPS Rates will be changing annually on the 1st of October.
V23.4 supports those increases to the Construction Workers Pensions Scheme (CWPS) which come in to effect from 1st of October 2020. When installed, the update will immediately apply changes to the necessary rates. If this applies to your payroll, then this update will help you to remain compliant. Please note though, that this update will need to be installed on a particular period so as not to apply the increases too soon.
You will need to carry out the following steps to complete the update:
Choose the Appropriate Period to Run the Update
Backup Your Payroll
Download & Install The Update prior to setting your ‘Applicable Period’
Set up the new CWPS Calendar prior to setting your ‘Applicable Period’
Set your Applicable Period (‘Period Date’ must be on or after 28/09/2020)
Browse The New Rates & Check Categories
Clear the CWPS Balance History
Run your CWPS Report (1-52) to confirm it is blank.
Process Timesheets
Check CWPS Report to confirm rates used are correct.
Steps 1-8 are detailed below:
1. Choose the Appropriate Period to Run the Update:
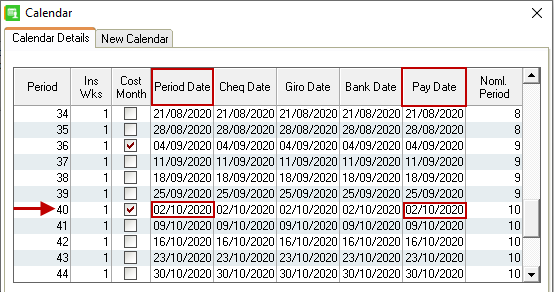
If the change in CWPS rates effect your payroll, then it is imperative that you install the update at the appropriate time. At the moment you install the update, the CWPS Rates will change in your payroll software. As the rate increase is only applicable from 1st of October 2020, ideally you should wait to install the update, until ‘End Of Period’ of your last September payroll. That is, the last September payroll where ‘Pay Date’ is a September 2020 Date (See ‘Pay Date’ in Image Below).
You can check this in advance, by clicking the ‘Company/Payroll’ menu at the top of the screen, and choosing ‘Calendar’. In the example below, as the applicable period is Period 40, it would be appropriate to run the update and set up the new CWPS Calendar at End of Period 39. This way the new rates and new CWPS Calendar will exist before setting the first CWPS Period (CWPS Week1).
Your payroll(s) may differ to this example, so check the calendar in each of your payrolls, before processing timesheets.
2. Backup Your Payroll
We recommend to take a backup of your payroll data, in your usual manner, before running an update.
It may also be advisable to print off your CWPS Report for CWPS Weeks 1-52, prior to making the necessary changes to CWPS, as this report will be cleared later in the process.
3. Download & Install The 23.4 Update prior to setting your ‘Applicable Period’:
As per step 1 above, make sure you have chosen the correct moment to install the 23.4 update, as the CWPS Rate changes must not be used until your appropriate period. Once you have identified the moment you need to run the update in, you can click the link below to download the update. Run the update in the usual manner.
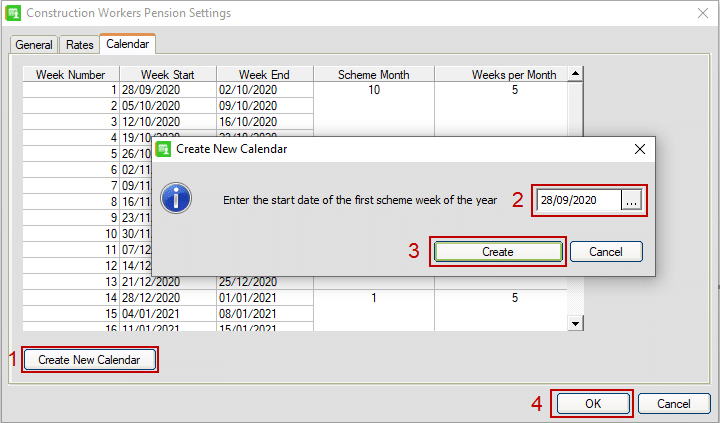
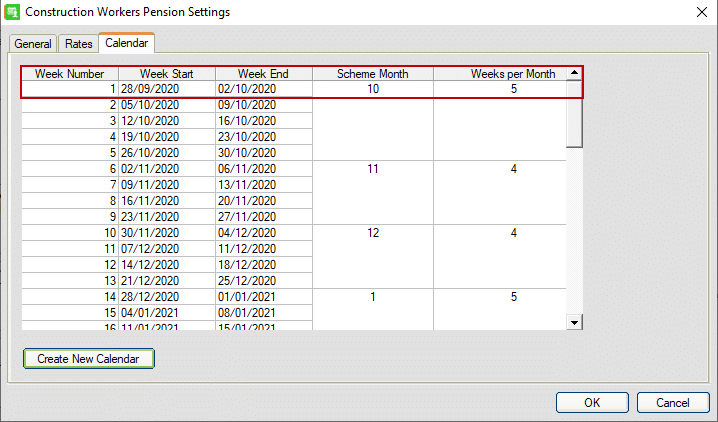
In order to comply with the new CWPS calendar year format, you will need to set up a new CWPS calendar. To do this:
Click on ‘Company/Payroll’ menu.
Choose the ‘Construction Workers Pension’ option.
In the window that is presented click on the ‘Calendar’ tab.
In here click on the ‘Create New Calendar’ button.
Enter the start date of 28/09/2020 (This is the Monday of the first week of the new CWPS calendar).
Click ‘Create’
Click ‘OK’
The new Calendar should look like this:
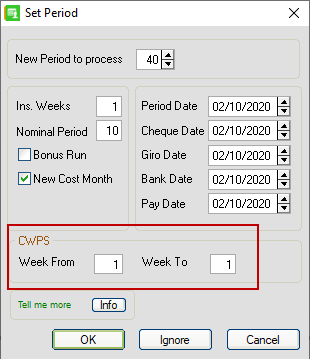
5. Set your Applicable Period:
Set you applicable period number. ensure that your ‘Period Date’ is on or after 28/09/2020. This date (28th Sept) is the start date for the new CWPS Calendar. If your period date is prior to this, your CWPS contributions may not report into the correct period. In the example above, this is period 40. Your applicable period may differ to this.
Note On ‘Set Period’:When you click ‘Set Period’ make sure that the ‘Week To’ and ‘Week From’ fields in the ‘CWPS’ area of the screen are: both equal to ‘1’ if running a weekly payroll, or show From ‘1’ To ‘5’ if running a monthly payroll. If this is not correct, then your CWPS data may report to the incorrect CWPS ‘Pay Week’.
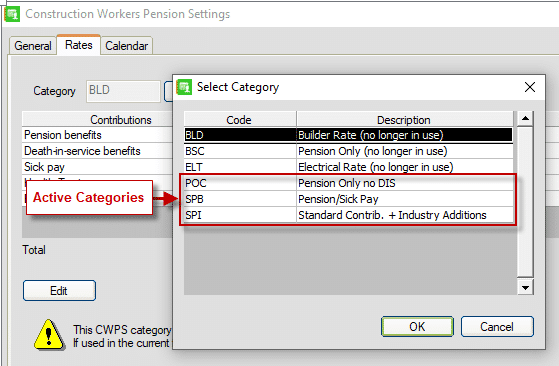
6. Browse The New Rates & Check Categories:
After you have set the period, browse the CWPS categories & new rates under the ‘Company/Payroll’ menu – ‘Construction Workers Pension’ option. The new rates are listed here.
There are only three Active Categories: POC (Pension Only no DIS), SPB (Pension/Sick Pay) and SPI (Standard Contrib + Industry Additions). Other earlier categories are no longer in use:
It is also advisable to browse your employees, and ensure that they are assigned to the correct category. To do this:
Choose the relevant employee in ‘Employee Details’, Click ‘Deductions’ Tab, Under ‘Construction Worker’s Pension Scheme’ select the correct category from the drop down list. Click Save.
7. Clear the CWPS Balance History:
From the menu bar at the top of your window, click Year End then click New Construction Pension Year.
When you receive the prompt to clear the balances and history, to continue, click Yes.
8. Run your CWPS Report (New Year 1-52) to confirm it is blank:
Click ‘Other Reports’
Choose ‘Construction Pension’ on the left hand side.
Click ‘Preview’
There should be no data for any ‘Pay Weeks’ in the report.
9. Process Timesheets:
Once you have carried out steps 1-8 above, you can continue to process your timesheets & do End Of Period as normal.
10. Check CWPS Report to confirm rates used are correct:
Check your CWPS Report after EOP to view contributions at new rates for CWPS Week1. Ensure the rates are correct before completing CWPS Week1 in your payroll, as if they are not correct, you will need to re-process at the correct rates.
This website uses cookies so that we can provide you with the best user experience possible. Cookie information is stored in your browser and performs functions such as recognising you when you return to our website and helping our team to understand which sections of the website you find most interesting and useful.
Strictly Necessary Cookies
Strictly Necessary Cookie should be enabled at all times so that we can save your preferences for cookie settings.
If you disable this cookie, we will not be able to save your preferences. This means that every time you visit this website you will need to enable or disable cookies again.
3rd Party Cookies
This website uses Google Analytics to collect anonymous information such as the number of visitors to the site, and the most popular pages.
Keeping this cookie enabled helps us to improve our website.
Please enable Strictly Necessary Cookies first so that we can save your preferences!