• See our Sage 50 Advanced Query Tool – AccountsMate
    Live Webinar Demonstration
  • Transition from TASBooks to Sage 50
    Easy with the Right Partner and Remarkably Beneficial
  • See our Sage 50 Advanced Query Tool – AccountsMate
  • Transition from TASBooks to Sage 50

KB Category: Sage 50 Accounts

Sage 50 Accounts

Make corrections in activity windows (V24.2)

Make corrections in activity windows


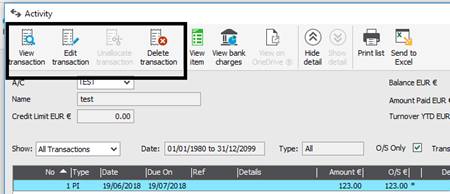
New in Sage 50 Accounts v24.2, you can now edit transactions direct from the activity windows, speeding up the corrections process and saving you valuable time.

Where to find the new options

Window Options
Click Customers, select a customer and click Activity 1.Edit transaction

2.Unallocate transaction

3.Delet transaction

Click Suppliers , select a supplier and click Activity 1.Edit transaction

2.Unallocate transaction

3.Delet transaction

Click Bank , select a bank and click Activity 1.Edit transaction

2.Unallocate transaction

3.Delet transaction

Click Nominal , select a nominal  and click Activity 1.Edit transaction

2.Unallocate transaction

3.Delet transaction


Include bank charges as you post supplier payments and customer receipts

Include bank charges as you post supplier payments and customer receipts

If you often post bank payments for bank transaction fees, the new Bank charges feature introduced in Sage 50 Accounts v24.2 makes it much quicker. You can now post a bank charge at the same time as you post the customer receipt or supplier payment, so you’re finished in half the time.

Enter your bank charge settings

To start using bank charges, you must add bank charge settings to your bank account record. You can amend these settings at any time.

1. On the navigation bar click Bank accounts.

2. Double-click the bank account where you post your customer receipts and supplier payments.

3. Click Settings, then complete the window as follows:


Default Charge Account Click the bank account you pay your bank charges from.

This can be the current bank record or a different one, for example, if this is a foreign bank account but your charges are paid from your Sterling account.

Nominal Code Click your bank charges nominal code, for example, 7901. If required, to create a new nominal code click New.
Department Click the department you want to post bank charges to.
Tax Code The default tax code for bank charges is T2 by default, which is the Exempt VAT rate as advised by  Revenue. You can change this if required.


4. Click Save then click Close.

5. Repeat the above steps for any other bank accounts as required.

Contact your customers and suppliers using Skype for Business

Contact your customers and suppliers using Skype for Business

If you have customers or suppliers who are available to contact using Microsoft Skype for Business, in Sage 50cloud Accounts v24.2 you can now do this quickly from within the customer and supplier records.

Set up Skype for Business

To use this feature you must have Sage 50cloud Accounts and have Microsoft Office 365 with Skype for Business installed.

Set up your customers and suppliers

To use Skype you must enter Skype email addresses in your customer and supplier records.

1. On the navigation bar click Customers or Suppliers.
2. Double-click the required record and under Email1, Email2 or Email3, enter your customer’s or supplier’s Skype email address.

To add an email address to other addresses, click Address & Contacts select the required address then click Edit and enter an email then click OK and click Close.
Click Save.

Use Skype to contact a customer or supplier

1. On the navigation bar click Customers or Suppliers.
2. Double-click the required record then click Skype.

If there’s more than one email address on a record, click the required contact then click Open in Skype.


Amending archives

Amending archives

New in Sage 50 Accounts v24.2, you can now edit or delete items in your archive files. This feature was added to help you with the General Data Protection Regulation (GDPR).

Edit your archived data

1. Click File then click Open and click Company Archive.
2. From the list of archived data, select the archive data you want to edit then click Open.

If access rights were set up on the company prior to archiving the data, you need to log into the archive with the same user name and password that you used to access the company data at the time.

You can now edit customer, supplier and subcontractor account details, or delete these records in line with the normal deletion rules.

Quotations, invoices, credit notes, sales orders and purchase orders can also be deleted.

You can also run the Clear Audit Trail routine within the archive.

3. To return to your company data, click File, choose Open then click Open Company Data.

Add social media links to your customers and suppliers

Add social media links to your customers and suppliers

In Sage 50 Accounts v24.2 and above, on your customer and supplier records you can add links for the following social media sites:

  • Twitter
  • LinkedIn
  • Facebook
Add social media links to your record

1. On the navigation bar click Customers or Suppliers.
2. Select the required record and click Edit.
3. On the Details Tab, In the Social Media section enter the required link or username, for example https://twitter.com/pimbrook_sw then click save.

If you enter the full path, it is shortened to just the username.

4. To visit the site, re-open the record and click the button next to the required link.

Prevent postings before a specified date in Sage 50 Accounts (Lock Date)

Prevent postings before a specified date in Sage 50 Accounts (Lock Date)

Sometimes you may want to stop transactions being posted before a certain date, for example, to close down a previous month or year. You can do this using the Lock Date feature.

How it works

Once you set a lock date, if anyone tries to post a transaction dated prior to that lock date, a warning message appears.

  • If you’re logged in as manager you can override the warning and post to the locked period.
  • Users with lock date access can also override the lock date and post to the locked period.
  • Users with no lock date access can’t post to the locked period. They can still create invoices, sales orders and purchase orders with a date before the lock date, but they can’t update or post the items.

Set a lock date

  1. On the menu bar click Settings then click Lock Date.
  2. Select the Lock posting before check box, enter the required date then click OK.

Set a user’s lock date access

  1. Open Sage Accounts and log in as Manager.
  2. On the menu bar click Settings then click Access Rights.
  3. Select the required user from the list then click Edit.
  4. Expand the Settings menu.
  5. To allow access to override the lock date, select the Lock date settings check box. Alternatively, to remove access, clear the check box.
  6. Click OK then click Close.


Sage 50 Accounts – ‘Your transaction date is set before the current lock date’

Sage 50 Accounts – ‘Your transaction date is set before the current lock date’

When posting a transaction in Sage 50 Accounts, the following message may appear:

‘Your transaction date is set before the current lock date of dd/mm/yyyy.’

This occurs when a lock date has been set on your data and you try to post a transaction dated before the lock date.


Users with access to override a lock date

If you’ve access to override a lock date, you receive the following message:

‘Your transaction date is set before the current lock date of dd/mm/yyyy.
Do you wish to proceed and post to a locked date?
Note – posting with an alternative date may affect your statutory returns.’

To post into the locked period, click Yes. Alternatively, to return to your transaction to check the date, click No.

Users with no access to override a lock date

If you don’t have access to override the lock date, you receive the following message:

‘Your transaction date is set before the current lock date of dd/mm/yyyy.
If the date is correct please refer to your system administrator or accountant for advice on how to post to a locked date.
Note – posting with an alternative date may affect your statutory returns.’


The person who logs into Sage 50 Accounts as manager can amend your access rights to allow you to override the lock date. Alternatively, another user who has lock date access can post the transaction for you.

Why don’t transactions appear in the bank reconciliation window

Why don’t transactions appear in the bank reconciliation window

If you can’t find a transaction in the Bank Reconcile screen this can be due to the following reasons:

  • The date of the transaction doesn’t match the reconciliation period.
  • The transaction is entered against the wrong bank account.
  • The transaction is a type that doesn’t appear on a bank.
  • The transaction is grouped with other transactions.
  • The transaction is already reconciled


To identify why a transaction doesn’t appear in the Bank Reconciliation window, locate the transaction in Transactions or Financials , then check

  • Type – ensure it’s a bank transaction. Only bank transactions appear in the Bank Reconciliation window. For example, BR, BP, CR, CP, VR, VP, SR, SP, PP, PR, JC or JD.
  • Account – ensure it’s the correct bank account. The Bank Reconciliation window only displays transactions for the selected bank.
  • Date – the date of the transaction should be on or prior to the reconciliation date.
  • Amount Paid – if the date and reference are the same as other bank transactions, then the transactions may be grouped together in the bank reconciliation window . If the transaction is grouped, only the total value of the grouped transactions appears in the Bank Reconciliation window and this won’t be the same as the Amount Paid column in the transactions or financials window.
  • Bank – check the reconciliation status in the Bank column. This should be N for the transaction to appear in the Bank Reconciliation window. The Bank column may display one of the following:
Bank Column Description
R The transaction has already been reconciled.
N The transaction hasn’t yet been reconciled.
-(Dash) The transaction isn’t applicable for bank reconciliation.


If the transactions still don’t appear after checking the reasons above, you may have corruption in your data. To check:

  • On the menu bar click File then click Maintenance then click Check Data.