KB Category: Sage 50 Accounts

Sage 50 Accounts

Excel Integration – Consolidation of worksheets (Management Reports) using Excel Consolidation

Excel Integration – Consolidation of worksheets (Management Reports) using Excel Consolidation

 This document explains how to open a Sage Management Report in Excel using Sage Excel Integration and then using an Excel Consolidation function to create a consolidated management reports


Excel Integration:

Log into Sage and go to File > Microsoft Integration > Excel Integration

 

This will open Excel on the PC in question with a new Sage tab

Click on the Sage tab and click on ‘Select Company’ drop down


Because this is the first time that Excel is connecting to Sage there will be no companies listed.  To add a company to Excel click Add Company.


The Select Company screen will appear, select the company that you want to add to Excel and click OK.

The login screen will appear for you to enter in your Sage 50 user details.  At this Stage if you are logged in already as this user close Sage.  If you have a new user setup for Excel Reporting you can use this user to log into Sage via Excel.


To pull in a report to Excel select the drop down of Sage Reports and click on Profit and Loss for example.  Make sure that you have selected the first cell that you want the report to start at in my case its Line 1 Cell A.  Click Insert
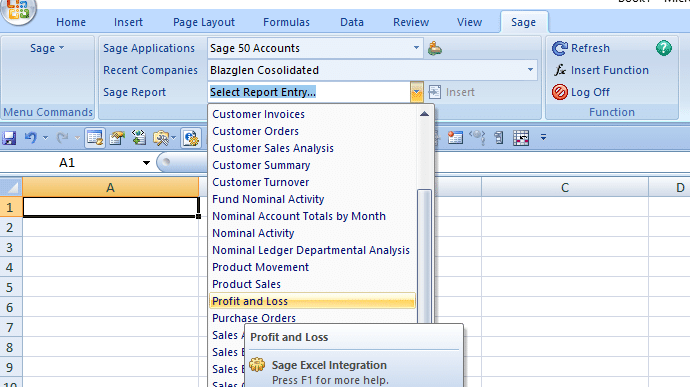
 

If you want to pull in a different Profit and loss report onto a different worksheet for consolidation, open the next Sheet tab in excel and on the top of the Sage tab make sure that you click on the ‘Log Off’ button so that you can then select the drop down of the Recent Companies field to either Add a new company or select your next company if they have already been added to Excel.



For the excel consolidation to work it is advised to add your management reports to each new work sheet, the tabs can be called KBH June 18, TB June 18, KSM June 2018 for example.  The 4 tab can be called Consolidation June 18 and it is on this worksheet that you will be consolidating the 3 tabs.


How to merge two reports on different worksheets into one.


This is a simple Excel formula in my example I will just be merging two reports ie Profit and Loss reports into the one report as a Consolidation


In Excel use Sage Excel integration to pull out the Profit and Loss using the same COA and date range onto work sheet 1

On work sheet 2 pull the profit and loss from the 2nd company using the same COA and date range.


The consolidated report will be on Worksheet 3

How to Consolidate:

Remove all headers from the 2 reports on Sheet 1 and 2 so that you have the following:

:
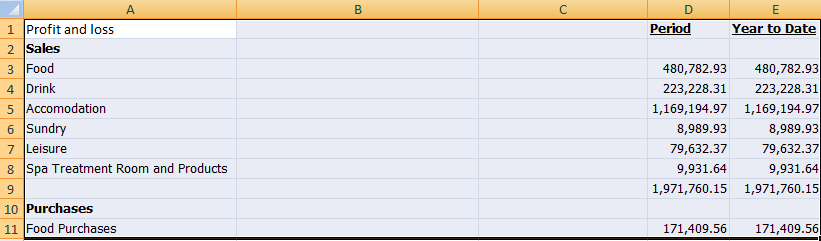


On worksheet 3 where the consolidate report will site run the consolidation for example


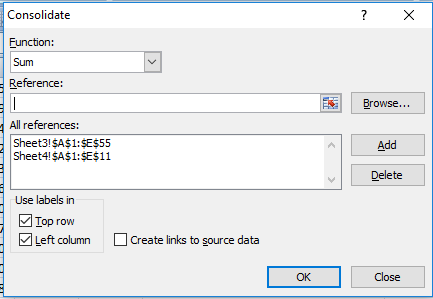
Because we want to pull in the  totals from both sheets select Sum in the Function field as seen below

The Reference box is the range that you want to consolidate.  So on Sheet 1 select the range that you want to consolidate and then click Add to include it in ‘All References.  Do the same again for sheet 2 by selecting the range that you want to consolidate and then click Add.


Under the section Use Labels in, select the Top Row and Left Columns, if you don’t select them it won’t pull in the headers or the Profit and Loss Categories in column A.  Once you are happy select OK to consolidate.


Note:

Once consolidate it will correctly consolidate both reports under the correct Profit and Loss Categories however, it won’t highlight the categories so you will need to do this yourself


https://www.ablebits.com/office-addins-blog/2015/09/01/consolidate-excel-merge-sheets/


Restoring a backup from OneDrive when using Sage 50cloud Accounts (V24.2)

Restoring a backup from OneDrive when using Sage 50cloud Accounts

In Sage 50cloud Accounts v24.2 and above, you can easily restore scheduled backups when integrating with Microsoft Office 365.

Steps

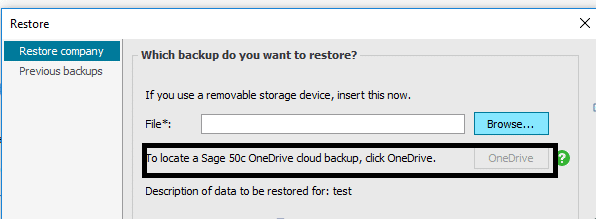
1. On the menu bar click File then click Restore.

2. Click OneDrive then click the required backup file and click OK.

3. Click OK then click Yes, and once complete click OK.

4. Enter your Logon name and Password then click OK.


Make corrections in activity windows (V24.2)

Make corrections in activity windows


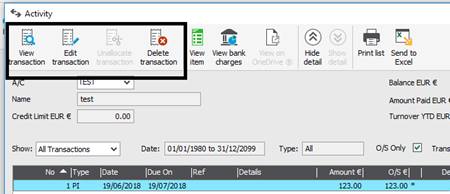
New in Sage 50 Accounts v24.2, you can now edit transactions direct from the activity windows, speeding up the corrections process and saving you valuable time.

Where to find the new options

Window Options
Click Customers, select a customer and click Activity 1.Edit transaction

2.Unallocate transaction

3.Delet transaction

Click Suppliers , select a supplier and click Activity 1.Edit transaction

2.Unallocate transaction

3.Delet transaction

Click Bank , select a bank and click Activity 1.Edit transaction

2.Unallocate transaction

3.Delet transaction

Click Nominal , select a nominal  and click Activity 1.Edit transaction

2.Unallocate transaction

3.Delet transaction


Include bank charges as you post supplier payments and customer receipts

Include bank charges as you post supplier payments and customer receipts

If you often post bank payments for bank transaction fees, the new Bank charges feature introduced in Sage 50 Accounts v24.2 makes it much quicker. You can now post a bank charge at the same time as you post the customer receipt or supplier payment, so you’re finished in half the time.

Enter your bank charge settings

To start using bank charges, you must add bank charge settings to your bank account record. You can amend these settings at any time.

1. On the navigation bar click Bank accounts.

2. Double-click the bank account where you post your customer receipts and supplier payments.

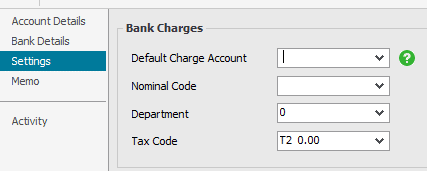
3. Click Settings, then complete the window as follows:


Default Charge Account Click the bank account you pay your bank charges from.

This can be the current bank record or a different one, for example, if this is a foreign bank account but your charges are paid from your Sterling account.

Nominal Code Click your bank charges nominal code, for example, 7901. If required, to create a new nominal code click New.
Department Click the department you want to post bank charges to.
Tax Code The default tax code for bank charges is T2 by default, which is the Exempt VAT rate as advised by  Revenue. You can change this if required.


4. Click Save then click Close.

5. Repeat the above steps for any other bank accounts as required.

Contact your customers and suppliers using Skype for Business

Contact your customers and suppliers using Skype for Business

If you have customers or suppliers who are available to contact using Microsoft Skype for Business, in Sage 50cloud Accounts v24.2 you can now do this quickly from within the customer and supplier records.

Set up Skype for Business

To use this feature you must have Sage 50cloud Accounts and have Microsoft Office 365 with Skype for Business installed.

Set up your customers and suppliers

To use Skype you must enter Skype email addresses in your customer and supplier records.

1. On the navigation bar click Customers or Suppliers.
2. Double-click the required record and under Email1, Email2 or Email3, enter your customer’s or supplier’s Skype email address.

To add an email address to other addresses, click Address & Contacts select the required address then click Edit and enter an email then click OK and click Close.
Click Save.

Use Skype to contact a customer or supplier

1. On the navigation bar click Customers or Suppliers.
2. Double-click the required record then click Skype.

If there’s more than one email address on a record, click the required contact then click Open in Skype.


Amending archives

Amending archives

New in Sage 50 Accounts v24.2, you can now edit or delete items in your archive files. This feature was added to help you with the General Data Protection Regulation (GDPR).

Edit your archived data

1. Click File then click Open and click Company Archive.
2. From the list of archived data, select the archive data you want to edit then click Open.

If access rights were set up on the company prior to archiving the data, you need to log into the archive with the same user name and password that you used to access the company data at the time.

You can now edit customer, supplier and subcontractor account details, or delete these records in line with the normal deletion rules.

Quotations, invoices, credit notes, sales orders and purchase orders can also be deleted.

You can also run the Clear Audit Trail routine within the archive.

3. To return to your company data, click File, choose Open then click Open Company Data.

Add social media links to your customers and suppliers

Add social media links to your customers and suppliers

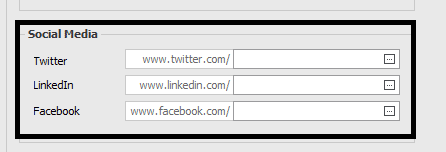
In Sage 50 Accounts v24.2 and above, on your customer and supplier records you can add links for the following social media sites:

  • Twitter
  • LinkedIn
  • Facebook
Add social media links to your record

1. On the navigation bar click Customers or Suppliers.
2. Select the required record and click Edit.
3. On the Details Tab, In the Social Media section enter the required link or username, for example https://twitter.com/pimbrook_sw then click save.

If you enter the full path, it is shortened to just the username.

4. To visit the site, re-open the record and click the button next to the required link.

Prevent postings before a specified date in Sage 50 Accounts (Lock Date)

Prevent postings before a specified date in Sage 50 Accounts (Lock Date)

Sometimes you may want to stop transactions being posted before a certain date, for example, to close down a previous month or year. You can do this using the Lock Date feature.

How it works

Once you set a lock date, if anyone tries to post a transaction dated prior to that lock date, a warning message appears.

  • If you’re logged in as manager you can override the warning and post to the locked period.
  • Users with lock date access can also override the lock date and post to the locked period.
  • Users with no lock date access can’t post to the locked period. They can still create invoices, sales orders and purchase orders with a date before the lock date, but they can’t update or post the items.

Set a lock date

  1. On the menu bar click Settings then click Lock Date.
  2. Select the Lock posting before check box, enter the required date then click OK.

Set a user’s lock date access

  1. Open Sage Accounts and log in as Manager.
  2. On the menu bar click Settings then click Access Rights.
  3. Select the required user from the list then click Edit.
  4. Expand the Settings menu.
  5. To allow access to override the lock date, select the Lock date settings check box. Alternatively, to remove access, clear the check box.
  6. Click OK then click Close.